
|
Spoilers for Deus Ex: Mankind Divided - A Criminal Past follow!
|
|
This page contains information regarding the progress sequence of the expansion A Criminal Past for Deus Ex: Mankind Divided. It also contains lists of collectibles and achievements.
Objectives & XP Rewards[]
Note that there are no Ghost and Smooth Operator bonuses in A Criminal Past.
| Objective | XP | ||
|---|---|---|---|
| Go out to the yard | 500 | ||
| (Optional) Speak to the Fixer in the yard | 250 | ||
| (Optional) Search the Fixer's cell | 250 | ||
| (Optional) Retrieve the package | 250 | ||
| (Optional) Consume the Altered Biocell * | |||
| (Optional) Bring the altered biocell to Flossy | 250 | ||
| Get to Cell Block B | 1950 | ||
| (Optional) Give the altered biocell to Red Shoes | 1000 | ||
| Find Guerrero in Cell Block B | 1950 | ||
| Enter Solitary Confinement | 3150 | ||
| (Optional) Visit the Fixer in the Infirmary | 250 | ||
| Find Guerrero in Solitary Confinement | 3150 | ||
| Restore power to the emergency override system | 1950 | ||
| Use the security computer to unlock cell S-04 | 500 | ||
| Release Guerrero from Solitary Confinement | 1950 | ||
| Shut down the transport tracking system | 3150 | ||
| Disable the anti-aircraft turrets (2/2) | 3150 | ||
| (Optional) Investigate the Infirmary | 250 | ||
| Meet Guerrero on the landing pad | 500 | ||
| Deal with Guerrero ** | 3150 | ||
| (Optional) Speak to the Fixer *** | 250 | ||
| Escape on the transport | |||
| Points of Interest | |||
| The Death of Wilburg | 750 | ||
| Secret Stash / Maintenance Mystery | 750 | ||
| Roll Call | 750 | ||
| The Primrose Path | 750 | ||
| The Plush Revolt | 750 | ||
| Vanishing Act | 750 | ||
| The Head of the Snake | 750 | ||
* Completing this objective cancels the quest chain to bring the biocell to Flossy and Red Shoes.
** Only if Adam fails to persuade Guerrero to return with him to Task Force 29.
*** Optional objective if the Fixer survives the events on the landing pad.
Walkthrough[]
You start the mission in Cell Block A of the Pent House. Due to the Tai Yong Medical suppression chip that you have received, you are unable to use any augmentations due to the chip's "Signal Scrambler v.3.42" feature. This means you cannot perform any takedowns and cannot hack terminals. The chip also imposes "the Choke," which causes you to lose health when you attempt to use any augmentation, and will also give you periodic health shocks.
Additionally, to prevent easy access to weapons during the first part of the mission, the "storage" interface used to access DLC weapons and consumables is initially disabled. The storage remains disabled until you first meet Guerrero.
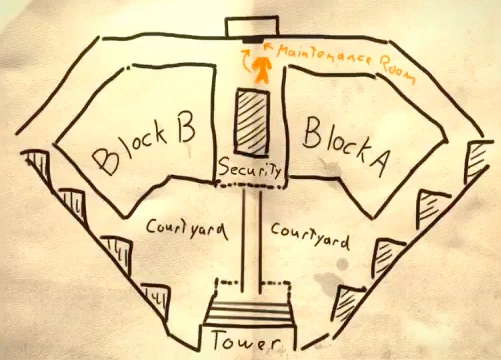
The Cell Blocks[]
- Mandatory Objectives: Go out to the yard; Go to Cell Block B; Find Guerrero in Cell Block B
The first objective is to go out to the yard, where you will meet Flossy. Flossy explains that the inmates are resentful of the prison guards, who are baiting inmates into breaking rules and subsequently executing them. Flossy will also direct you to speak to the Fixer for a solution to relieve the pain caused by the Choke.
The Fixer can be found at the southeast part of the yard, near the entrance to the prison's central tower. Speak to the Fixer. If you choose the dialogue option "Dig Deeper" and "Accept", he will ask you to help deliver something to Flossy. The Fixer will also offer you a pill that will restore your ability to use your augmentations. You may accept or refuse.
- If you take the Fixer's pill
- The suppressor chip will be disabled fully. Thus, you regain access to your augmentations, including the ability to perform takedowns, and you will no longer lose health due to the Choke.
- Basic augs (including hacking capture level 1) are automatically unlocked. However, Praxis points are not included with the pill. You will likely have zero Praxis points at this time, and will need to gain more to unlock further augmentations.
- The main drawback with the Fixer's pill is that that using augs will now cause your vision to blur. The effect is temporary and lasts a few seconds.
- If you refuse the Fixer's pill
- You can get a keycard from Flossy (without having to complete the optional objectives discussed below).
- If you refuse the pill, you can still get the pill later from the stuffed toy that was near the Fixer, although doing so involves going through a restricted area. This stuffed toy disappears after you've met with Guerrero.
Agreeing to help the Fixer retrieve the delivery for Flossy will activate the optional objective "Search the Fixer's Cell." This objective requires you to search his cell, A-309, to find a note in the stuffed toy (Teddy). The note contains a hint to proceed to the Shower Room. The next objective is "Retrieve the Package." In the Shower Room, find another Teddy by the left-side lockers. The Teddy contains a note with the code 6014. Use the code 6014 at the locked door of the laundry room to the right of the Shower Room. Open a Teddy inside the laundry room to find an Altered Biocell.
If you retrieved the altered biocell, you may either use it yourself, or bring it to Flossy. If you bring the biocell to Flossy, he will direct you to bring it to Red Shoes and provide you with a general access keycard. Red Shoes can be found in an outdoor cell in the yard of Cell Block B. Giving Red Shoes the altered biocell is optional.
- If you use the altered biocell on yourself
- If you did not take the Fixer's pill, you will regain access to your augmentations. However, the altered biocell does not disable the Choke. Therefore, if you did not also take the Fixer's pill, you will lose health whenever you activate augmentations and will still experience plain flashes periodically.
- You gain 5 Praxis points directly, and generally 1 more as a result of Praxis gain due to completion of the optional objective.
- If you give the altered biocell to Red Shoes
- Red Shoes will be able to play a key role in initiating the riot. The consequence is that when the inmates riot, they will be stronger than otherwise, allowing the inmates to take over parts of the prison tower. This option is optimal if you wish to reduce the amount of hostile guards as much as possible.
- Flossy will be more favorable to you in a later meeting.
- Additional notes
- Refraining from using both the Fixer's pill and the altered biocell is required for the "Winners Don't Use Drugs (or Biocells)" achievement.
- It is not possible to use Augs in A Criminal Past without either the side effect of blurry vision (if the Fixer's pill was taken) or health loss (if only the altered biocell is taken).
Once you have obtained a keycard, you will have access to all restricted areas of the Cell Blocks. If you did not get the keycard by speaking with Flossy, you can still find them lying around the prison. One way to the get a keycard is to enter the vent in the supply room to the left of the Shower Room (keycode: 6014). Travel through the vent to reach the ceiling area of Cell Block A. At the west side of the ceiling area, use a vent opening to drop down into the Cell Block A security office. There, you can find a keycard in the drawers.
There are many ways to get into Cell Block B. However, before entering Cell Block B, you may want to first visit the maintenance room near the outdoor security room between two cell blocks (which is also the destination for the "Secret Stash / Maintenance Mystery" Point of Interest). This room contains a yellow jumpsuit in a locker. Using the yellow jumpsuit will turn Cell Block B into a non-restricted area.
From the security area between the two cell blocks, one way of getting into Cell Block B is to sneak up the stairway attached to the Cell Block B building. There, you will find a vent leading into Cell Block B. If you happen to have gotten the attention of the guards, note that the guards will not be able to follow you through the vent. (Once at the ceiling area of Cell Block B, if you have not yet obtained a keycard, find a vent at the southwest corner leading to a security office at the southwest of the area. The drawer in the security office will contain a keycard.)
To complete the objective of "Find Guerrero in Cell Block B," head to the showers located on level 1 of Cell Block B. You will need a keycard to get into the showers. A cutscene will play when you enter the showers.
Rescuing Guerrero from Solitary Confinement[]
- Mandatory Objectives: Enter Solitary Confinement; Find Guerrero in Solitary Confinement; Restore power to the emergency override system; Use the security computer to unlock cell S-04; Release Guerrero from Solitary Confinement
Stenger has arrested Guerrero and sentenced him to solitary confinement and subsequent execution. However, Stenger needs to attend to dealing with the riot that has broken out, so he leaves you alone.
Proceed out to the yard and enter the Tower. If you had given the altered biocell to Red Shoes earlier, you will find the bottom floors of the tower to be controlled by the inmates, which makes things significantly easier. There are two main approaches to getting to Solitary Confinement and completing the remaining objectives.
Option 1: Use the secret passage through the Infirmary
Getting to the infirmary is an optional objective, but the benefit is that it opens an easy way into Solitary Confinement that completely avoids confronting prison guards. If the inmates control the area, the path to the infirmary is entirely safe. The infirmary can be accessed using the east wing elevator on the second floor (level 3 in the in-game map). Head down to the infirmary and speak to the Fixer. If you initially refused the Fixer's pill and refuse it again, he will provide the "Primrose Path" POI. The POI only serves the purpose of granting extra experience points, and is not required to proceed.
After speaking with the Fixer, grab the infirmary keycard on the cart near the Fixer. This keycard opens the morgue. Go in the the closet of the morgue. Inside the closet, find a button below the computer, which switches the computer to a security computer (security rating: 5). Hack the security computer. If you are unable to hack the computer and don't have a multi-tool, buy some crafting parts in the Teddy shop in the infirmary so you can craft a multi-tool. After hacking the security computer, use it to open a secret door, which leads to the outdoor area around Solitary Confinement.
Once at the outdoor area around Solitary Confinement, you may proceed as follows:
- Option 1A: Immediately turn right (beware of the mines, however) and find a locked concrete entryway that leads into Solitary Confinement.
- Hack the door (security rating: 2) and enter the passageway. Climb the ladder to get into the interior of Solitary Confinement. At this point, turn left (west) and go to the end of the west-side maintenance area, where you will find a vent opening, which directly lead to the office on level 3 of the in-game map.
- Inside the office on level 3 of the in-game map, climb the ladder upward and find a pocket secretary on the desk underneath the sign "Emergency Override." Reading the pocket secretary, which indicates the location of Guerrero, satisfies the "Find Guerrero in Solitary Confinement" mission objective even if you have not located his cell in-person. Next, go back down the ladder and open the door to the server room. Sneak path the turret and enter the server room with the override panel.
- Option 1B: Climb the ladder to the bridge and enter Solitary Confinement trough a vent. If this option is taken, you will end up in the interior of Solitary Confinement. After locating Guerrero, you will need to enter the server room to restore power to the emergency override system.
- It is possible to reach the server room through the front door, which is guarded by a turret. Another way is to get to the ceiling area, and use a vent at the southwest-corner of the ceiling area. This vent provides can access the west-side maintenance area. The end of the west-side maintenance area has a vent opening that directly lead to the office on level 3 of the in-game map, as described for "Option 1A" above.
Option 2: Cross the bridge from the Tower to Solitary Confinement
Instead of going through the infirmary, you may also access the automated defense office of the tower, and cross the bridge to Solitary Confinement. It's reachable from the processing/observation areas using the East wing elevator; the necessary keycard is on the corpse of a CO outside the security door.
However, the crossing is heavily guarded. A few inmates will assist, but they will not have the firepower to overcome the guards. After reaching the other side, proceed as stated for "Option 1B" discussed above.
Once you've reached the server room, you'll find a 3x3 flip puzzle in the form of switches. To solve the puzzle, active all four corners, and then activate the center. Solving the puzzle completes the objective of restoring power. Then, use the security computer to unlock Guerrero's cell. Then, speak to Guerrero to release him.
Please note that if you are going for the Objection! achievement, you must find the requisite pocket secretaries in the processing area and in the automated defense office before releasing Guerrero.
Shut down the transport tracking system[]
- Mandatory Objective: Shut down the transport tracking system
This objective and the objective of disabling the anti-aircraft turrets can be done in either order. However, in consideration of travel efficiency and loot, it is preferable to complete this objective first.
The Administration Building can be approached from the main entrance, where there is an intense firefight between the guards and the inmates. However, for a stealth run, the easiest way into the Administration Building is through the underground passageway connected to the infirmary. Upon reaching the Administration Building through this passageway, you will find a storage room with a great deal of valuable loot (including multi-tools and Praxis kits).
The ultimate destination is the Warden's Office, which is located in the management offices on the roof level. To get to the management offices, you may use either one of the two elevators on the administration/lobby level (level 2 of the map inside the Administration Building).
- The elevator on the north side (near the lobby area) is sparsely guarded, but requires traversing through many moving lasers. If you take this route, you will end up at the security office on the north side of the roof level. From this point, the preferable stealth route is to move through the broken glass to the exterior, and then use the exterior ventilation duct structure (reachable by first jumping on the guard rails, if necessary) to get to the management offices part of the roof level.
- The elevator on the south side leads directly to the management offices. However, reaching this area requires traversing through a large number of guards.
- It is also possible to reach the roof level from the exterior of the Administration Building using the upgraded Icarus Dash or the Klipspringer Jump Mod.
Once you've reached the management offices, head to the Warden's Office. If you failed to deliver the altered biocell to Red Shoes, Flossy and the inmates will turn hostile unless you use the "reason" interrupt. Use the security terminal on the desk to unlock to door. Then use the terminal inside the back room to disengage the transport tracking system.
At this point, an optional objective of visiting the infirmary unlocks. Visiting the infirmary reveals the fate of Stenger. On Stenger's body is a keycard for his safe on the security office on the Administration Building roof level. Visiting Stenger's office and opening his safe (revealed by interacting with a button under the desk) reveals a Praxis kit, a nearly-fully-upgraded revolver, and a pocket secretary containing plot-relevant information.
Disable the anti-aircraft turrets[]
- Mandatory Objectives: Disable the anti-aircraft turrets (2)
Use the West Wing Elevator (north side of the bottom floor of the processing area) to get to the roof of the tower. D-Town will appear when you activate the elevator. The elevator will open onto a catwalk leading to the roof where the two anti-aircraft turrets are located, surrounded by various forms of defense. The turrets are guarded by a laser grid, two drones, two robots, and cameras. Moreover, unlocking the manual override at each turret requires hacking (or unlocking) a two level 5 terminal. If you are playing with augs, Glass-Shield Cloaking is helpful here.
At the north of the roof is a raised platform with a radar. The security hub on top of this platform (password: B0TT0PP5) can be used to disable the two cameras. All four drones can be also disabled from this hub.
If you have at least one multi-tool, you may simply disable the terminals at the turrets using multi-tools and activate the manual override. A multi-tool is located at the east-side turret, so only one additional multi-tool is needed. Even if the bots are active, it is possible to unlock the terminals using the multi-tools while hiding around the nearby cover.
It is also possible to shut down the terminals at the turrets without having to hack or use multi-tools on the terminals at the turrets. Move to the center of the roof between the two turrets to locate a small cable duct door. Climb inside it to find a ladder with a laser grid surrounding it, leading to a small room. The grid on the ladder can be disabled by hacking the terminal on the wall near the ladder. Enter the room to find a large mechanical tower in the center of the space. Circling it you will find a destructible grate and behind it a breaker switch. Use the breaker to access a computer in the tower and press the nearby EG switch to automatically unlock the computer. The computer will allow you to activate manual override of the turrets, saving the trouble of hacking them to shut them down. There is a air duct in the room leading to the exterior of the roof where there is a security hub. If desired, you may hack this hub quickly or enter the password (B0TT0PP5), using Glass-Shield Cloaking again to hide yourself if possible, to shut down the cameras, robots, and lasers on the rooftop. Then, proceed to disable the turrets.
From there, return to the elevator to go back to the landing pad to meet Guerrero. Alternatively, if you have Icarus Landing, you may simply jump down to the landing pad from the north side of the roof.
Meeting at the landing pad[]
- Mandatory Objectives: Meet Guerrero on the landing pad; Escape on the transport
Arriving at the landing pad, you will find that Guerrero is holding the Fixer at gunpoint. In this confrontation, you may side with the Fixer (in which case Guerrero and the nearby turrets go hostile), side with Guerrero (in which case, he will shortly open fire on the Fixer), or convince Guerrero to back down.
Convincing Guerrero to back down results in the "best ending" (both the Fixer and Guerrero taken back to TF29). If you are playing with augs, you can use use C.A.S.I.E to persuade Guerrero.
If you are playing without augs (i.e., you did not take the Fixer's pill or the altered biocell), it is still possible to convince Guerrero to back down. To accomplish this, you need to track down and piece together the following five pocket secretaries, which pertain to Wilburg's murder, Junkyard's harvesting operation, and evidence that the Fixer is not a criminal mastermind:
- The two pocket secretaries required for the Objection! achievement:
- "Schedule Change: Mejia, Oscar" (found in east-side room at the middle of the Processing Area)
- "Recovered Turret Command Logs" (found inside an unlocked safe in the Automated Security office on level 5 of the Tower)
- "Worthmuller" (found in the admin building's psychologist office)
- "RE: This week's list" (found on Stenger's body in the Infirmary)
- "Audio Transcript" (found in the safe in Stenger's office)
Make sure that all the pocket secretaries have been read/opened before the final confrontation with Guerrero. This will unlock a dialogue option labelled "Blackmail." When speaking with Guerrero, first choose "Challenge," then "Confront about Wilburg" or "Hold Accountable," and finally "Blackmail." Jensen will threaten to reveal Guerrero's involvement in Wilburg's murder unless he agrees to hand over the intel Interpol is after. Guerrero complies and backs down without a fight, allowing you to speak to the Fixer and take both of them with you on the VTOL.
Points of Interest[]
The Death of Wilburg[]
To get this POI, go to Cell Block A's yard and talk to the guy near the cool-off cage. To complete the POI, get to Cell Block B, go to the first level and search the broken drone to find a hacking device. The POI can be completed after the riot starts, which makes it considerably easier, because the two guards that were previously guarding the crime scene have disappeared.
Secret Stash / Maintenance Mystery[]
This POI is started by reading a pocket secretary in the left security office on level 3 of Cell Block A. The safest way to get there is through the vents - go to the supply room on the first floor (door code 6014), follow the vent to the ceiling area, then find another vent on the opposite side to reach the security office. The office is unoccupied. Duck down and press the EG switch to the right of the window to black out the window so you cannot be seen.
Location of the stash.
Read the pocket secretary on the desk to learn the location of the stash (maintenance room between the cell blocks) and its door code (3499). Search the drawers to get a General Access Keycard that lets you reach that area. Here you can also hack the security hub (level 2) to disable some cameras in the A-block.
Go to level 2 of the A-block and use the keycard to open the door to the security area. The area is patrolled by guards and monitored by security cameras. Get to the maintenance room in any way you prefer (e.g. by hiding behind the environment objects).
The maintenance room can be directly reached by traveling through a vent accessed at the ceiling of the Shower Room in Cell Block A. This route requires traveling through an electrified area. However, if you move quick enough, it is possible to get through the electrified area without using stimpacks.
Once you are in the maintenance room, check the lockers in the back to complete the POI. Here you also find the yellow jumpsuit for the Dressed for the Occasion achievement.
Roll Call[]
While you are still in the area between Cell Blocks A and B, get to the security office there and take down the guard inside. Read the pocket secretary on the desk that contains the inmate registry for Cell Block B. It says Hector Guerrero is in cell B-116.
To complete the POI, get to cell B-116 and read the note you find there.
The Primrose Path[]
This POI only becomes available if you refuse to take the Fixer's special pill when you talk to him in the yard. Before heading to Solitary, make your way down to the Infirmary and talk to the Fixer. Navigate the dialogue options until he offers you one of his pills again, then refuse. He will instead tell you there is a secret path connecting Medical with Solitary. Once you get the POI, grab the Infirmary keycard on the small cart next to him, which opens up the morgue door not far from Fixer. Now use that same card on the back door in the morgue, and you will find yourself inside the medical wing's medicine supply closet. There are 10+ painkillers, some biocells, and a curious computer in this room. If you look under the table, you will see a button. Press it, and the generic, unlocked computer switches to a level 5 security computer. Either hack it (not likely) or multi-tool it, then open the false door in the wall. Remember to turn off the camera! Once you step through the new "door," you will complete this POI.
Vanishing Act[]
To get this POI, you must have been witness to at least one ghost story/rumor before the riots start. B-block yard loves talking about this. Alternatively you can find a pocket secretary in Solitary Confinement in the same room you find the emergency override computer – you can't miss it – and that will start the POI as well. Apparently, solitary cell number 6 is impossible to escape from, and guarantees death for all in there – or so they say. Once you make your way to Solitary confinement, the POI will start blinking. To get the 750 XP, step into cell #6, and move the floor grate. If you plan on falling down, you need Icarus Landing System or HypoStims to survive, but doing so is worth another 300 XP on top of the 750, and there is a quest item, two machine pistols, some typhoon ammo, and a praxis kit waiting for you down there (but you can always find another way to get down there without falling by means of a vent but you won't get the 300 XP for falling through the grate). No reason not to take a leap of faith, really, with that kind of reward sitting unclaimed.
The Head of the Snake[]
After you disable the transport security system in the Warden's office and watch the cutscene, go to the Infirmary. Search Stenger's body to get his keycard and the POI. Go to Stenger's office on third floor (level 4) of the Administration building and press the button under the desk to open a secret wall compartment. Use Stenger's keycard to open the safe and read the pocket secretary found inside, containing an audio transcript.
Achievements[]
| Image | Name | Description | Points | Trophy |
|---|---|---|---|---|
|
A Criminal Past | Complete A Criminal Past. | 30 |
|

|
Winners Don't Use Drugs (or Biocells) | Complete A Criminal Past without using the Fixer Pill or the Altered Biocell. | 30 |
|
|
Code of Conduct | Complete A Criminal Past without killing anyone. | 30 |
|

|
Don't Reach, Kid | Find the basketball and put it in the hoop. | 15 |
|

|
Smooth Like Soap | Find Mejia in Cell Block B without raising an alarm. | 15 |
|

|
Objection! | Get Mejia to confess to murdering Wilburg. | 15 |
|
|
Quid Pro Quo | Help out a fellow inmate by making a trade. | 15 |
|

|
Dressed for the Occasion | Blend in with the proper prisoner jumpsuit. | 15 |
|

|
A Just Cause | Decide what to do with the Altered Biocell. | 15 |
|

|
Umlauts or no Umlauts | Decide the Fixer's fate. | 15 |
Keycodes & Passwords[]
| Location | Code or password | Device type (sec. lvl) |
Source |
|---|---|---|---|
| Cell Block A, laundry room on the first floor | 6014 | Keypad (1) | [SRC 1] |
| Cell Block A, supply room on the first floor | 6014 | Keypad (1) | [SRC 1] |
| All security office doors in blocks A and B | 3014 | [SRC 2] | |
| Cell Block A, security hub | CL4NKN3T1ON (10th character is the letter O, not the digit zero) |
Security hub | [SRC 3] |
| Maintenance room between blocks A and B (where you complete the Dressed for the Occasion achievement and the Secret Stash POI. | 3499 | Keypad (1) | [SRC 4] |
| Cell Block B, security hub | SUNGLASSES | Security hub | [SRC 5] |
| Security hub in Automated Security office on level 2 of the Tower (Central Drone Controller computer) | N4RDIN3M0R4N0 (9th and 13th characters are the digit zero, not the letter O) |
Security hub | [SRC 6] |
| Admin building, door to Storage area on level 2 | 2297 | Keypad (3) | [SRC 7] |
| Admin building, security hub on level 2 in Security Offices (Admin Corridor computer) | S3CUR3SYST3M | Security hub | [SRC 8] |
| Warden's office, computer password | 2027 | Computer (1) | [SRC 9] |
| Warden's office, code to disable the transport tracking system. The terminal is in the vault, the vault door can be opened from the security hub on the Warden's desk. | 2027 | Misc. Terminal (1) | [SRC 9] |
| Password to all personal computers | 2027 | [SRC 9] | |
| Security hub on the watch tower on the roof | B0TT0PP5 | Security hub (1) | [SRC 10] |
| Landing Pad Turrets | P3WP3WS | Security hub | [SRC 11] |
List of keycode/password sources[]
- ↑ 1.0 1.1 "4-Digit Code" story item found in a Teddy inside the shower room
- ↑ "Access code for security room doors" - Pocket secretary found on a guard patrolling just outside A-block
- ↑ "Backup schedule" - Pocket secretary in the sniper tower in the Block A yard
- ↑ "Heads up" - Pocket secretary found in the security office of Cell Block A
- ↑ "B-Block entrance security PW" - Pocket secretary found in cell B-317 during the riot
- ↑ "Tower Drones" - Pocket secretary found next to a dead guard at the gate of the tunnel leading from Processing to Solitary Confinement
- ↑ "Storage doors code" - Pocket secretary found on the sink in the men's room on the 2nd level of the Administration building
- ↑ "FW: Codes for the Elevator Area" - Pocket secretary found on a sofa in the Lounge area on level 2 of the Administration building
- ↑ 9.0 9.1 9.2 "Override Code Update *CONFIDENTIAL*" - Pocket secretary found on the table in the middle of the warden's office. When this pocket secretary is read, it triggers the keycode/password display for the Transport Tracking System terminal and also all personal computers in the facility.
- ↑ "URGENT - rooftop security code" - Pocket secretary found in an elevator shaft at the southeast corner of the Tower, level 3 in the in-game map
- ↑ "Turrets and reinforcements" - Pocket secretary found on the northeastern section of the roof of the Processing Area
Story Items[]
- Main article: Story Items (A Criminal Past)
Locations of Collectibles[]
Praxis Kits[]
|
Expand List
This list is incomplete. You can help the Deus Ex Wiki by expanding it.
|
Cell Block Areas
- The altered biocell found in the laundry of Cell Block A, if you choose to use it yourself, will give you 5 Praxis points and the A Just Cause achievement. Remember that this counts as satisfying a critical mission, so it is very likely that you will end up with 6 Praxis. Just keep in mind that using the altered biocell instead of delivering it to Red Shoes has story consequences that make the remaining game harder.
- Inside the fox toy in the narrow tunnel under the walkway between Cell Block A yard and Cell Block B yard. *Only available before the riot*.
- Block B: secret path to storage room (silencer and some minor loot) behind a false wall in 204. Straight to the left as you enter the passage is a grating with a Praxis kit behind it, revolver with 6 standard rounds, 2 AP rounds, and a cylinder of 10 AP .357 rounds behind a false wall in 319, Praxis hidden in ceiling storage in 108, secret path to the maintenance corridor under the fence behind fake wall in 116, laundry room has a vent that leads into the shower maintenance corridor, which contains crafting components, and conveniently can be opened from inside, thus making a zero pill, zero boosted powercell playthrough possible.
- Block A: Praxis in the ceiling storage of cell 307, empty stun gun in 301 behind a false panel in the wall (needs some fiddling unless you have super strength, but is very doable. Patience is key), gyroscopic regulator and a STOP! hack software (behind the towels above the mirror, top shelf) in 315, 5 stun gun darts in 203 in a door frame stash, Praxis in 204, as well as a not so secret passage to the turret guarding A-block entrance, and a split in the road to the veteran level sniper providing cover fire for said turret, behind a low res wall painting, Neuropozyne in 208 and 320, in one of the "secret" stashes close to the door frames. Various other bits of alcohol and crafting components can be found in A-block as well, plus painkillers in some rooms. Look behind the handful of hygiene products the inmates are allowed to possess.
- After you meet Guerrero in the showers, wait for the cutscenes to end and you will find a Praxis kit on the table on front of you.
- Another Praxis kit is in the adjacent security office, on the floor near the lockers.
- Return to the Shower Room in Cell Block B after the riots start, and circle around the showers. You will find a Praxis kit on the body of a dead inmate, with a biocell lying nearby.
Solitary Confinement
- In Solitary Confinement cell S-01, on the floor.
- In cell S-06, jump through the hatch in the floor (you will need the Icarus Landing System to survive) and walk through the corridor to find a fenced area. To get there without augs, go down the ladder to the security override and enter a vent up on the wall behind you, follow the tunnel round until you end up by a wall-breakable vent and a ladder down, then take the ladder. The kit is inside the fox toy. Here you also find the story item "Augmented Heart".
- Exit the building past the fenced area. Keep following the path outside and head right around the building to the southern corner of the map. The Praxis kit is behind a rock on the valley floor next to a fragmentation mine.
- Another Praxis kit can be found to the far west. It is hidden under some grass, in a rocky, mine free area, almost at the very western corner of the map.
Administration
- 3 kits are in green containers labelled A38, CA6, F24 (unlabelled) in the Storage area on level 2 of the Administration building.
- In the elevator shaft on level 1 of the Administration building, in a toy fox hidden in a box. Crawl space entry at the front of elevator in the cafeteria.
- Starting from the administrator level, head down the horribly messed up stairs right next to the south-western most meeting room, towards the cafeteria. At the bottom of the stairs is quite a lot of debris, most of it heavy classed. If you have superstrength, you can move the soda machines out of the way (one green, one yellow), and you will find a Praxis kit hidden underneath them, somewhat vedged close to yet more debris. For even easier identification, this is also the stairs that has a leather sofa and a bunch of new age masterpiece potted plants. Depending on how you approached the first part of the DLC, resistance down here might be anything from fortified veteran guards with shotguns and armor piercing combat rifles, to various mines.
- In Stenger's office, in a secret wall compartment accessed via a button under his desk.
- On the balcony area outside the corridor where Stenger's office is, behind the red fence.
- In Warden's office, use the security hub to open the vault door and check the safe inside. (This is the same place where you disable the transport tracking system.)
- On Flossy's body if you take him out in the Warden's office.
Central Tower
- In the security office on level 2 near the Automated Security elevator, on a shelf to the left of the weapons cabinet.
- In the security office on level 2 opposite the East Wing elevator, inside the second to left locker.
- Ride the Automated Security elevator all the way up, then look towards the ceiling. Open the hatch, and jump up. Now crawl to the edge of the elevator, and you will see boxes along with a teddy containing a Praxis kit. Also accessible through a hatch from the Automated Security floor.
- In an unlocked safe in the Automated Security section on level 5 of the Tower.
- On D-Town's body when he blocks access to the West Wing elevator.
- On the roof where you disable the anti-aircraft turrets, on a shelf below the security hub located on the north-side raised platform.
Weapon Mods[]
|
Expand List
This list is incomplete. You can help the Deus Ex Wiki by expanding it.
|
| Mod | Location |
|---|---|
| Laser sight | Cell Block A, in a weapon cabinet in the security office. |
| Silencer | In the security building between Cell Blocks A and B, inside the weapons cabinet. |
| Silencer | Cell Block B, in the supply room on the first floor. This item will disappear once the riot phase begins. |
| Silencer | In the security office opposite the East Wing elevator on level 2, on the table next to the locked door |
| Silencer | In the Storage area on level 2 of the Admin building, inside the green container labelled E20. |
| Silencer | Can be bought for 1200 |
| Holosignt | In the Processing Area there are two central rooms. Check the room on the east side and search the weapons briefcase. It has a combat rifle loaded with 30 standard 5.56mm, 30 AP 5.56mm, a separate holosight mod (probably best to save it for the machinepistols), and 15 10mm EMP pistol rounds. |
| Laser sight | In the Processing Area there are two central rooms. Check the room on the east side and find a laser sight near the security terminal. |
| 4X scope | In the Automated Security office, on a shelf near the right hand door leading outside. |
Upgraded and other Notable Weapons[]
| Weapon | Features | Location/Notes |
|---|---|---|
| Pistol | Laser sight; upgraded damage (level 1). | Sniper overlooking the B-block prisoners' approach, reached either by jumping into his little 'office' with klipspringer leg aug, or taking the long way around. While the sniper in question spends most of his time admiring his rifle, there's a 10mm pistol on a box, right next to an E-book. Includes a full magazine of 15 standard bullets, and 5 EMP bullets. |
| Combat rifle | All weapon mods (silencer, holosight, laser, 4x scope); fully upgraded (except rate of fire). | In the A-block showers. Includes 48 standard rounds and 48 armor piercing rounds. Only available after the riot. |
| Battle rifle | Laser sight. | Found in the tunnel under the central catwalk leading towards the Processing building. Open the door, and look to your right. It is hidden behind some boxes, and has a convenient vent nearby, as well. Includes 10 standard rounds and 10 AP rounds. |
| Revolver | Laser sight; fully upgraded (except hair trigger). | Found in the safe in Stenger's office. This safe cannot be opened until Stenger is found in the infirmary. Some bug or error prevents normal ammo fired from this revolver to take advantage of the upgraded damage, essentially doing as much damage as a vanilla magnum revolver, but AP rounds are unaffected. |
| Pistol | All weapon mods (laser and silencer); max ammo capacity pistol; non-standard base 80 reload. | Ride the Automated Security elevator all the way up, then look towards the ceiling. Open the hatch, and jump up. Now crawl to the edge of the elevator, and you will see a) a steep fall, and b) some boxes and a teddy. Fall all the way down to the "top" floor of the fenced in area, then make your way down another level. Getting this item requires both the klipspringer leg aug and Icarus landing, or 2 hypostims and a perfect landing. |
| Grenade launcher | This is the sole grenade launcher in A Criminal Past. It can be found in the guard shack between A and B's security doors, and comes stock with 2 frag grenades. You can find an additional frag grenade on a robber in A-block shower (only if you don't kill him before the riot), and 2 more frag and gas grenades in the administration storage room, alongside a revolver with one level of reload speed and a single AP round loaded. If you want to use this weapon, you have to claim it before the riot, because it disappears once the riot phase begins. | |
| .357 revolvers | Non-standard ammo capacity. | Several generic .357 revolvers have 8 to 10 capacity, without the relevant upgrades. They are scattered throughout the world. |
| Stun gun | Laser sight; fully upgraded; non-standard 80 base reload | Found in the desk right outside Stenger's office, which is located in the Security Offices wing of Administration. |
| Tranquilizer rifle | In the weapon cabinet in the Central Security Office adjacent to Cell Block B, near the main entrance |
eBooks[]
|
Expand List
This list is incomplete. You can help the Deus Ex Wiki by expanding it.
|
Note: DLC eBooks give XP but do not count towards Tablet Collector.
| eBook | Location |
|---|---|
| Top Ten Tech... Trends in VR | Cell Block A, cell A-214. |
| Cellread - Everyday Items | Cell Block A, security office on level 3. |
| The Moment to Fight Back, ch. 16, p. 422 | On a crate on the "balcony" above the turrets as you go out of Cell Block A to the yard. The area can be accessed via a vent behind the picture frame in cell A-204. |
| Cellread - Signs of a Riot | Atop the sniper tower in the yard of Cell Block B. |
| Calming Eye Exercises & Meditation | At the security outpost in the south corner of Cell Block B's outside perimeter. This outpost is accessed by climbing up the ladder. |
| Cellread - Fictional Guard | In the office north of the Processing Area on level 2 of the Tower. |
| Model AA-02 Stun Baton User Manual | Under Solitary Confinement, on the way to restore power to the emergency override system, in the room where you get down from the ladder. |
| Cellread - Dating a C.O. | Admin building, office 103 (in the middle of level 2). The eBook is on the shelf behind the desk on the left, sitting next to the red folders. |
| A Lasting Legacy | Admin building, office 302. |
| Library Book Policy | Admin building, office 305, on the table with a flower pot. |
| The Vacillating Lover | Admin building, Stenger's office, on a bookshelf. |
| The Profitable Prophet | Automated Security section of the Tower, on the desk to the left of the door heading downstairs. It is on top of a neatly sorted pile of papers. |
| Natural Way Resort Vacations | In the room accessed through a vent opening beneath the central turret on the roof level of the Tower. |
Tips[]
- Ammo is not rare, but it is not exactly common, either. The most abundant ammo types are 5.56mm (regular and AP), .357 AP, shotgun shells (regular and EMP), and 7.62mm. Once armored enemies start appearing, the shotgun and standard 5.56mm become less useful, as they are less potent against armor.
- A Criminal Past, like System Rift, features sturdy helmets. It is not enough to hit a helmeted enemy in the head once, twice, or even three times with standard bullets. More often than not, 5+ standard bullets are needed to break the helmet, each connecting hit awarding Piece by Piece XP points. If you only have low-damage weapons on hand, like the shotgun, the pistol, and the machine pistol, it is typically more economical to aim for exposed throats, the stomach, or even limbs rather than heads. A burst shot from the shotgun to an enemy's gut will typically take him down, while the same burst to the head might only break the helmet. Should you be low on ammo in general, but still need those experience points, try to land a glancing hit with the combat rifle's AP ammo. If all goes well, you will get 3-5 Piece by Piece, and can subdue opponents with whatever other means are available to you.
- Other than biocells, there are generally very few resources available in plain sight. If you do not have the Micro-Assembler augmentation, you may find that you only have enough crafting materials to upgrade one or two weapons. However, a number of semi- to fully-upgraded weapons can be found, including oddities like machine pistols with a higher-than-normal rate of fire, and magnum revolvers that have 8 or 10 round capacity cylinders prior to any upgrades.
- If you prefer the revolver, A Criminal Past is the DLC adventure you have been waiting for. Not only is AP .357 ammo one of the most common ammunition, but a single damage upgrade pushes you over the instant kill limit on even helmeted elite enemies, making the Classic Diamondback .357 or an upgraded regular revolver a very economical and useful weapon for this mission. A Criminal Past features far less standard .357 rounds than it does the armor piercing variant. About 120 AP rounds can be found, but only 30 or so standard .357 rounds are available.
- One can easily maximize XP before the riot by unlocking the Quicksilver implant and getting every guard to swarm the same area. The best spots are A-block's command center, A-block's shower, and, assuming you have Klipspringer, the narrow path leading into B-block. Simply do repeated double non-lethal takedowns, and make sure you do the same to the EXO-suit guys. While you cannot perform a double EXO-suit takedown, they are worth quite a lot of XP individually (Elite +30, Expedient +10, Merciful Soul +20). There are also plenty of robots and turrets, so investing in Typhoon to maximize the Piece by Piece bonus can be a good idea. The Typhoon aug is useful in the last third of the DLC and your allies (should you side with the inmates) do not really care all that much when you blow up 10 of them in a single go. The game actually awards experience points for slaying inmates, even if they are allied.
- A Criminal Past is harder than the main game. People who can effortlessly run through the main game on Give Me Deus Ex will find that A Criminal Past actually puts up some resistance. Meanwhile, players who are only barely surviving the main game on such a difficulty may find A Criminal Past to be difficult on GMDX.
- A Criminal Past challenges stealth-oriented players by featuring ever-present cameras, reinforced turrets, robots, drone sentries, and tight patrol routes that seem designed to flush the average ninja player out of his hiding spots. Furthermore, A Criminal Past does not award any Ghost or Smooth Operator bonuses at all, and most mechanical enemies can see you when you are cloaked**. If you do not disable the choke with the Fixer's fix, this extends to every enemy. Additionally, if you find yourself using stealth, consider setting up ambushes if you are unable to move through an area without causing a disturbance. Key places reinforce as you progress, so if you were successful in getting past, say, Observation early on, you will find that when you return, there are now EXO-suits and helmeted elite soldiers with AP assault rifles waiting for you, alongside all the enemies you did not kill on your first way through. This gets even worse if you do not venture into Administration early on, and let it sit undisturbed until the game tells you to go there. (** Mechanical enemies CANNOT see Jensen while he is cloaked, but some of them are extremely sensitive to sound. EXO-suits, while mechanical in nature, are really just humans, and turrets don't have sound detection. Drones and robot walkers are the mechanical enemies you have to be on guard for. If you wish to do a stealth-based play through, the leg silencer upgrade on Jensen's leg is useful. While energy-expensive, enabling both leg silencers and the glass cloak simultaneously will allow you to sneak past these enemies.)
- A Criminal Past places a big emphasis on choice and consequences. You are free to do whatever you want, with the exception of pulling out weapons in the Infirmary (where the Fixer is located), but everything you do early on will have consequences later.
- Whether the Fixer's pill is taken, and the manner of handling the altered biocell both have consequences, as discussed above.
- Killing certain characters before the riot removes them during the riot part. For instance, the inmate who trades alcohol for a multi-tool. If you keep him alive, you will find him looting a large number of dead COs in the A-block shower during the riot, and if you knock him out, the treasure is yours (two 20 round boxes of 5.56mm standard, a single frag grenade for the grenade launcher, two biocells, two flashbangs, one EMP grenade, 30 crafting material, and one Dai-Taiga beer can). However, If you kill him before the riot starts, then there is no way to get any of this loot.
- The riot itself can also be quite a bit harder if you don't take out any of the guards or their assets before it starts.
- Theoretically useful abilities like robot and turret domination are extremely practical in A Criminal Past, as is the upgraded radar. The Glass Shield Cloak is less useful. The Typhoon is also useful in many later battles. If you go heavy on the energy tree, the TITAN (if you choose to use experimental augmentations) is useful for complex battles due to the abundance of biocells everywhere, especially if you deliver the altered biocell to Red Shoes.
- If you have access to the Micro Assembler, you retain it no matter your selection of whether experimental augmentations are permitted. However, the chaff eye aug is not available if you play lore-accurate augmentations.
- Hacking is not that important. The maximum level common barrier is a level 3 lock. Even at the very end, lots of terminals and optional hacks remain at level 1, and sometimes 2. There is a grand total of 3 level 5 hacks, and a single level 4 hack in all of A Criminal Past. Administration is the most heavily secured, having almost exclusively level 3 locks, while the actual prison and processing facilities themselves rarely go above 2. If you keep the altered biocell for yourself, you will find plenty of multi-tools on dead inmates scattered throughout the place. If you cooperate with them, you will be forced to invest in minimal hacking, use firepower and grenades to destroy doors, or turn crafting material into multi-tools. Despite the low level of the hacks, not many of them are what could be called "easy." Level 2 hacks in A Criminal Past can be as difficult and nail-biting as level 4 hacks in the base game, and many of them do reward huge XP and software drops, should you have the skills needed to get through them properly.
- A Criminal Past provides a story-driven option of playing without any augmentations at all. If you take this approach, the stun gun provides a good substitute to the normal takedown that you otherwise would have available. In addition to ammo found around the prison, 20 stun gun rounds can be purchased from the Infirmary shop. Additionally, due to the large amounts of cameras and mechanical enemies, silenced pistols equipped with EMP rounds are very useful. A single EMP round from a silenced pistol is enough to disable a camera, allowing you to quickly destroy it afterwards with silenced normal rounds without anyone's notice. This method also allows you to slowly but stealthily take down turrets by using silenced gunfire.
- Due to the prevalence of fully and/or moderately upgraded weapons, be very careful what you use the handful of weapon mods on. Remember, a fully modded, and essentially fully upgraded combat rifle can be found in A-block shower after the riots, and doing the leap of faith off the top of the elevator when you are in Automated Security rewards you with a fully modded, max ammo capacity, 80 base reload 10mm pistol.
- Due to the prevalence of shotguns and shotgun shells of both types, it might prove beneficial to put both a laser and a silencer on one, and upgrading it as you go. As said above, eventually, shotguns cease to be all that useful, but until then, it will serve you well.
- A Criminal Past features a new world item, called "emergency first aid station." These can be found in Processing and beyond, and they universally hold painkillers, hypostims, and biocells. Keep a look-out for these, especially if you took the altered biocell for yourself.