
|
"I once thought I could save the world... now look at it"
— Spoilers for Deus Ex: Mankind Divided follow!
|
|
This page is dedicated to revealing the exact amount of experience points awarded during different stages of Deus Ex: Mankind Divided with the goal of obtaining the most XP possible. By following this guide you should be able to unlock most available augmentations by the end of the game and would be able to fully max out at the beginning of New Game+.
It contains major spoilers and presupposes good knowledge of the game's mechanics. Therefore it is not recommended as a guide on a first playthrough — refer to Deus Ex: Mankind Divided walkthrough instead.
For a general discussion of the game's experience system see Praxis.
Starting Notes[]
Abbreviations[]
- GTD: Getting Things Done for completing a main mission objective. (various XP)
- COM: Completionist for completing a side mission objective. (various XP)
- GHO: Ghost. (200 XP)
- SMO: Smooth Operator. (200 XP)
- SOC: Covers bonuses earned by going through certain conversations or using the Social Enhancer aug in some instances. These include Silver Tongue, Spin Doctor, Stop the Presses, and occasionally, Split Decision, Life Lesson and Wait Your Turn. (1000/500/200/250/100/50 XP)
- HAC: Covers the hacking bonuses Script Kiddie, Grey Hat, Black Hat, Network Adept and Master Hacker for devices of Level 1, 2, 3, 4 and 5 respectively; and also the XP bonuses from First Try and Data Extraction (if applicable). Each device is listed as (LX+Y), where X is the difficulty level and Y is the sum of XP from all data nodes. For the purposes of this guide, First Try bonus (5 XP) is always included in the Level bonus. (30/55/80/105/130 + various bonus XP)
- KEY: Covers Access Granted, Free Admission, Open Sesame, Entering Without Breaking and Master Felonist bonuses given for devices of Level 1, 2, 3, 4 and 5 respectively, when unlocked by entering a keycode/password. Normally only listed for devices that can be hacked and re-locked, then unlocked again (hacking them twice would give no bonus) or for devices that can be used to trigger the password glitch. (25/50/75/100/125 XP)
- GLI: Includes the sum of all KEY bonuses for the personal computers triggered with the password glitch in a particular area (see the link for details). (various XP)
- EXP: Covers the exploration bonuses Traveler, Explorer, Pathfinder and Trailblazer. (100/200/300/400 XP)
- EBO: Scholar bonus for reading one of the 75 eBooks. Reading all 75 of them will unlock the Tablet Collector achievement. (100 XP)
- TRO/VET/ELI: Number of enemies who, when neutralized, reward you with a Trooper/Veteran/Elite bonus (10/20/30 XP). Includes Merciful Soul (20 XP) and the method of neutralization bonuses, typically Expedient or Headshot (10 XP for both). Does not include any Piece by Piece bonuses. Note that many normally friendly NPCs may turn hostile to the player if attacked or provoked (street policemen, armed civilians, etc.), but since no XP rewards are given for dealing with them they are not included in these counts. (40/50/60 XP)
- STD: Single takedown.
- DTD: Double takedown. (45 XP)
- TUR/DRO/BOT: Number of turrets/drones/SB-71 bots in a particular part of the map. Includes the bonus for remotely hacking turrets/drones/bots (Machina + Flawless = 15 XP) plus the basic bonuses Scrap Metal/Void Warranty/Junk Yard for destroying them (15/20/40 XP). We do not include any Piece by Piece bonuses (5-20 XP per armor plate for bots and turrets, depending on the type). The reason explained in Combat XP section below. (30/35/55 XP)
- PTW: Number of environmental devices that can be (de)activated via Remote Hacking. (5 XP)
- CAR: Number of cars whose alarms can be disabled, and lockdown barriers in Prague that only activate when a street alarm panel is used. (10 XP)
- MCH: Number of security devices that can be (de)activated via Remote Hacking (10 XP). Also covers electrochromic glass switches (ECGS). Always includes 5 XP for Flawless bonus. (15 XP)
- § XXX: For various reasons, this XP reward is not included. Typically, because it is preferable to take it later, in which case it will be included in a subsequent section. Or, sometimes because it may be more beneficial avoid this particular option completely, in which case it is color coded: § XXX.
- PRA: Praxis kit (20 in total).
- TRI: Triangle code collectible (35 in total).
- BRE: Breach software collectible (30 in total).
Section summaries[]
At the end of each section you will find a summary for XP:
- Section XP: The sum of all the different non-combat XP bonuses earned in this section
- Combat XP = Human XP + Robot XP
- TRO: Number of troopers (10 base XP, 40 with optimal non-lethal neutralization)
- VET: Number of veterans (20 base XP, 50 with optimal non-lethal neutralization)
- ELI: Number of elites (30 base XP, 60 with optimal non-lethal neutralization)
- DTD: Number of maximum possible double takedowns
- Human XP = TRO*40 + VET*50 + ELI*60 + DTD*45
- TUR: Number of turrets (15 base XP, plus 15 XP for a flawless remote hack)
- DRO: Number of drones (20 base XP, plus 15 XP for a flawless remote hack)
- BOT: Number of sentry bots (40 base XP, plus 15 XP for a flawless remote hack)
- Robot XP = TUR*30 + DRO*35 + BOT*55
- Total XP = Section XP + Combat XP
- Max XP = Total XP + Max XP from the previous section
Augmentations Build[]
Here is the list of augmentations required to get every XP reward listed on this page. This guide was done in stealth and takedowns-only playstyle so the augmentations choice reflects that too.
Mandatory augs
- Hacking Capture Level 2 + 3 + 4 + 5: Must be upgraded to level 3 during your visit to Ruzicka Station, and up to level 5 before you leave Prague for Golem City. It won't be a bad idea to get it to Level 5 right away, since hacking is second only to mission completion bonuses as a source of experience in the game and there are plenty of high-level devices in the very first district of Prague. Note, that unlike Deus Ex: Human Revolution, upgrading it doesn't lower the chances of detection, so you will also likely need either Hacking Stealth or Fortify to help with more complex devices.
- Remote Hacking (Environmental Domination + Security Domination): Enables remote hacking. On New Game+ playthroughs, it should be already active during the Dubai mission, since there is a single radio in that level. Otherwise, it has to be activated during the first visit to Prague.
- Social Enhancer (C.A.S.I.E.): Provides numerous alternative conversation paths and enables the Persuade dialogue option. A few side missions during your first stay in Prague require it.
- Smart Vision: Besides highlighting structural weaknesses and useful items (with MAGPIE upgrade), it allows remote hacking through walls and solid objects. There are several objects hidden behind walls that can't be remote hacked without it, although they don't offer much XP (less than 200 XP in total). They are all marked with the tag "Smart Vision required" in the guide.
- Quicksilver Reflex Booster: Enables double takedowns and should be activated as soon as possible. Even if you do not intend to spend your time setting up double takedowns on every single enemy, it comes in handy when you need to quickly and quietly neutralize two enemies standing very close to each other while having a talk, which happens fairly often.
- P.E.P.S. with Precision Diode upgrade: Offers the single most valuable method of non-lethally defeating human enemies when double takedown is not an option, provided that you can hit them with a charged headshot. With headshot the formula for a Trooper-level enemy is Trooper + Merciful Soul + Dust to Dust + Marksman or 10+20+10+10=50 XP, which is 10 XP more than all other non-lethal methods, including single takedown and headshots from stun gun or tranquilizer rifle. Unfortunately the P.E.P.S. blast is very loud and hence not particularly suitable for stealth, unless you use it on the last remaining enemy in an area. Also to score headshots with it consistently you have to shoot enemies point-blank from the front, while in cloak, which is very cumbersome in practice. So it can be skipped entirely as a method of neutralization unless you insist on squeezing every last drop of XP from the game. There is, however, another highly lucrative use for P.E.P.S. involving an exploit that enables you to do two mutually exclusive missions (M11 and M12) at the same time.
Mandatory "single use" augs
- Electromagnetic Pulse Shielding: Required to hack a Level 1 door leading to the area of SM00: Neon Nights in the Prekazka sewers (although it's not the only option of getting there). The panel is only active when the generator electrifying its surroundings is turned on. Without the aug, you will be forcibly removed from the device's interface when you try to use it. Note that the keypad could be hacked on the 2nd or 3rd visit to Prague if you don't want to waste 4 Praxis points early. This aug is not required to get any other bonus in the game.
Non-mandatory, but highly useful augs
- Optimized Musculature: Moving heavy objects will enable quick shortcuts through almost every location in the game. There are a couple of devices and objects in Prague that require you to move heavy objects to gain access to them — although you can also use explosives or P.E.P.S. to blow them out of the way.
- Klipspringer Jump Mod: There are a lot of hidden places to explore which naturally requires a lot of jumping. And though every hidden area in the game can be reached by stacking crates, it's hardly worth the effort.
- Icarus Landing: Used to circumvent Adam's low tolerance for falling damage. Comes in handy during the exploration.
- Icarus Dash: In its charged form, allows Adam to reach certain ledges more easily. Can be considered semi-mandatory to get a Trailblazer bonus on top of the giant cube in front of Palisade Property Bank — but you can also reach it by stacking several crates on a nearby pillar.
- Glass-Shield Cloaking: Essential for aggressive non-lethal/Ghost playstyle that we follow in this guide. Double takedowns in general are very hard to perform without it. Additionally, allows for easy hacking of devices in direct view of enemies or civilians (like alarm panels and shop doors in Prague). One "undocumented future" of this aug is that if you fully stop moving before interacting with a device while cloaked, the energy drain from it drops to a zero for as long as you remain in the device's interface — which allows you to hack any device freely after spending just 2 Praxis points, without any further upgrades for the battery capacity or the cloaking aug itself. Also helps you steal valuables from vendors without repercussions.
- Punch Through Wall: Enables you to locate and punch through weak walls. Not truly necessary as the structural weaknesses can be highlighted with Smart Vision and destroyed with explosives such as a single frag mine or even normal weapons (preferably with armor piercing ammunition).
- Hacking Fortify & Stealth: Makes hacking go a lot smoother. One of the two should suffice, when fully upgraded. Just Stealth Ver. 2 alone should be enough for most devices in Prague and later in the game you should have enough hacking software in your possession to handle the more complex Level 4 or 5 devices.
- Hacking Capture: Turret & Bot domination: Enables you to do two things. 1) Deactivate robot enemies that are already active, allowing to destroy them without them reacting to damage and making the process of removing their armor much easier. And 2) Activate bots and drones that normally remain inactive or concealed behind walls without sounding an alarm: it can be done by quickly switching Friendly Fire toggle on and off in a security hub while Intruder Tracking is toggled off. You can, of course, always just trigger an alarm and fight them head-on after you've gotten all the stealth bonuses in an area, and not worried about losing Foxiest of the Hounds achievement. Robots can also be temporarily disabled with EMP damage to for easy disposal.
- Micro-Assembler: Enables the option to disassemble objects into crafting parts. Can help if you often find yourself running low on biocells.
- Focus Enhancement: The slowdown effect can assist you in flawlessly hacking devices with Remote Hacking aug in the later stages of the game.
Build Order[]
An example of an augmentation build that should allow you to get all the XP bonuses in the order they are listed:
- After completing M3: Getting in Top Shape Again you should end up 12 Praxis. Use the augs listed below to hack, explore and do non-combat side missions in Prekazka District (SM02, SM03, and the portion of SM00 up until the sewers). Visit North Prague, when required. Try to collect 20000 credits for the 2 Praxis kits at Tars' shop.
- Hacking: Capture Level 5 (4 Praxis)
- Hacking: Stealth Ver. 2 (2 Praxis)
- Remote Hacking + Upgrade (3 Praxis)
- Optimized Musculature (1 Praxis)
- Klipspringer Jump Mod (2 Praxis)
- Once you have collected enough Praxis get the following augs. Focus on finishing all the business in Prekazka District.
- Glass-Shield Cloaking (2 Praxis): Will allow you to freely hack alarm panels in Prekazka District and doors at Tars' shop. Level 1 Cloak is enough at this stage.
- Social Enhancer (2 Praxis): Used during SM00: Neon Nights and SM05: Samizdat.
- Quicksilver Reflex Booster (2 Praxis): Once you get this you can start doing missions involving combat (finish SM00 first, then start SM01).
- Once you cleared Prekazka, move on to North Prague. Go to TF29 HQ (M4) and complete the main missions M5 and M6 up until you are asked to leave Prague for a lot of easy XP. Then start going through the main hub. The first two augs would be of great help here:
- Icarus Landing (2 Praxis): There is a lot of vertical exploration in this district with high risk of falling to death.
- Glass-Shield Cloaking (2 Praxis): Upgrade the Cloak to Level 3 to reduce its energy consumption. Would come in handy once you get to Palisade Property Bank.
- Smart Vision (2 Praxis): To remote hack the devices that are hidden behind solid walls. Not truly neccessary, as there are less than 20 devices that require it in the whole game and they are never that important.
- Get a few battery upgrades, as the energy is probably the biggest bottleneck for a stealth+takedowns playstyle.
- Once you're mostly finished in Prague you should end up with 35-36 Praxis points, and if you only spent them on the listed augs, you should have enough points to get the "single-use" augs required to unlock the gated XP bonuses. Either invest in them now or leave them for later visits to Prague. If you decide on purchasing them at this point then you should have all the augs you'll need to get all XP bonuses in the game. After that you can start investing in incremental aug upgrades.
- Electromagnetic Pulse Shielding (4 Praxis): For the door panel in the Prekazka sewers leading to the area of SM00.
- Icarus Dash (2 Praxis): If you have enough points and don't want to stack crates you can get this to grab the Trailblazer bonus on top of the giant cube in front of Palisade Property Bank.
Combat XP, Double Takedowns and Piece by Piece bonuses[]
There will be a slight variation in earned XP depending on player's chosen combat tactics and story/dialogue choices. Since this is a guide on how to maximize XP all story-related decisions are geared towards enabling the player to engage the most enemies possible without role-playing considerations, and may be incompatible with certain achievements, such as Pacifist, and Foxiest of the Hounds. Though these cases are rare and clearly marked in the guide.
Every human enemy in the game is presumed to be knocked out with at least a non-lethal, "special" method. For individual enemies the favored method XP-wise is a headshot from charged P.E.P.S. with the Precision Diode upgrade (50/60/70 XP for a Trooper/Veteran/Elite-level enemy), which gives 10 XP more than a single takedown or a headshot from a stun gun or a tranquilizer rifle (40/50/60 XP with all 3 methods for Trooper/Veteran/Elite). Nevertheless we would still count the XP rewards for all single enemies as (40/50/60 XP) for the sake of simplicity and because headshots with P.E.P.S. are extremely unreliable.
For multiple enemies we prefer double melee takedowns whenever possible, because they net the most XP (40/50/60 XP for two STDs depending on an enemy's level, and an extra 45 XP for the DTD itself). In Combat XP sub-sections you'll find every enemy on a map listed along with the number of maximum possible DTDs. Strategies to approach this ideal can be found in the Double Takedowns guide. It should be noted that trying to go for all possible double takedowns will most likely double the amount of time you would have to spend on a 100% playthrough. Follow those recommendations for DTDs at your own discretion.
When it comes to robot enemies we have to exclude Piece by Piece bonuses completely, even though you will likely earn them while destroying bots and turrets. The reason for that is, due to a bug that was never fixed, you can continue to earn XP by damaging detached armor plates as long as you 1) keep the turret/bot they came from alive, and 2) do not disable it with remote hacking. Meaning that depending on the method of neutralization, the amount of XP earned from a single bot or turret can vary greatly. If you simply shoot off the plates one-by-one with a pistol or a rifle you will get one result (55 XP for a turret, 140 XP for a bot), but if you use explosives, which can score several hits at once on multiple armor plates, you are guaranteed to earn significantly more (100+ XP for a turret, 200+ XP for a bot). Further, you can potentially earn unlimited amount of XP by continuously shooting detached plates with a gun (200 XP per shot from a shotgun) or by throwing heavy objects at them (with up to 200-300 XP per throw), which is not something we could possibly account for in this guide. So for the sake of consistency, we have to assume that we remote hack every robot (which temporarily disables XP rewards for damaging armor plates) and then immediately destroy them (which guarantees that we do not get any variable XP from Piece by Piece bonuses). That earns us flat 30/35/55 XP for turrets/drones/bots. How you choose to handle this exploit is up to you. See Farming XP (on Praxis page) for more details.
The Password Glitch[]
There is an unfixed glitch that's been in the game since Day 1, where using a keycode/password on a keypad/personal computer gives a bunch of different KEY bonuses as if several devices were unlocked at the same time, in addition to the reward for the device you unlocked. When done on purpose, the glitch can net you 3000+ extra XP on the first visit to Prague and up to 10000 XP in total throughout the game, if you don't mind utilizing exploits to your advantage.
If you're not interested in the details of the inner workings of this glitch and only want the XP, then just follow the steps listed at the end of each major section. We will describe it here in more detail.
The glitch applies only to personal computers, not keypads nor other devices, like alarm panels; also PCs that are unlocked by default (green) don't count. It is irrelevant if you hacked those PCs or if you have found passwords for them or if those passwords even exist: simply interacting with them once is enough. Once you've interacted with a PC the game remembers it and adds it to a list of PCs that are eligible for the glitch in a particular area of the map (like South and North Prague, TF29 HQ, Golem City, etc.). If you then enter the correct keycode on any device in the same area the glitch would trigger for all PCs on that list, give you the XP for them and then remove them from the list. This effectively allows you to double-dip on hacking XP rewards, as you can hack the PCs first, get all the normal rewards plus XP from datastores, and then ALSO receive a corresponding reward for unlocking them with passwords as well (25/50/75/100/125 XP for devices of Level 1/2/3/4/5) — even though you didn't.
As you can see, it's easy to trigger it unintentionally and earn at least some of the glitched XP, since the only thing you have to do is use a keycode/password at any point, but maximizing the XP gains requires some work. To get the best results out of it, you should:
- Pick a device that will be used for the glitch. Preferably it should:
- be a keypad that you can find the code for
- be re-lockable by some mechanism (there are 2 such devices in the game)
- have no datastores, so you don't lose any Data Extraction bonuses if you don't hack it.
- Interact with all the personal computers you can find in an area (hack them, but don't use passwords for them or any other device).
- Return to the chosen device and enter the code to unlock it. You should see all the extra XP bonuses pop up on the screen.
What complicates matters is that there is a lot of weirdness in how the game defines what "area" means, and how it handles the transitions between different areas. If you, let's say, travel to Ruzicka Station, then quit and restart the game, and then try to do the glitch in Ruzicka you will earn 100 XP, which is what you'd expect to get for the two PCs of L1 (25 XP) and L3 (75 XP) located in that area. If you would do the same in Prekazka district you would also get the expected result (925 XP for all the PCs in the district). But if you travel to Prekazka district from Ruzicka and THEN immediately do the glitch there you will be awarded with full XP for both locations at the same time (1025 XP). Restarting the game or traveling to North Prague will make the game "forget" that you've been to Ruzika and revert things back to default, so that when you trigger it in Prekazka district you will get XP only for the PCs in Prekazka alone.
However, it is not true for the North Prague in general. For example, a code entered on a device in the Palisade Bank during the 1st visit will trigger the glitch for most PCs in Norther Prague (i.e. in Cista and Davny districts), but if you try to do it on a device in Davny district then you would miss on some XP from Cista. But then on the 2nd visit, triggering the glitch in the Bank won't provide the XP for the PCs in Red Light district, requiring you to trigger the glitch from Davny too. So, picking the perfect device and location requires some testing — which we already did in this guide. You just have to follow the instructions.
We include the XP acquired from the glitch in total XP count (listed as GLI(---)), since it doesn't require any special actions and can be easily triggered during normal play by accident. Of course, the choice of using the glitch is up to you. If you'd prefer to avoid it completely then the only way to do that is to never enter a keycode or password on any device and exclusively use hacking, thus also skipping all the XP for KEY bonuses.
Dubai[]
Main mission: M1: Black Market Buy
If you are planning to 1) earn additional 160 XP on 4 extra Trooper enemies in Part I and II, and 2) neutralize all 16 operatives in Part III by yourself, then it is recommended to select Non-lethal / Long range option during the opening dialogue to receive the tranquilizer rifle from Miller. Stun gun (Non-lethal / Short range) should also work and there are about equal amounts of ammo to be found for both in Dubai, but it makes headshots harder to score and it's riskier, as you have to get within 8 meters of an enemy when using it. It would also make it harder to neutralize the 4 extra Troopers. Alternatively, you can grab the Elite Edition Tranquilizer Rifle from your inventory storage after you start the mission, if you have access to it. In that case, the choice of stun gun would be preferable.
Part I: Restore Power to the Keypad[]
- EXP(100): Air shaft near the starting location.
- TRI: Triangle code inside the air shaft.
- HAC(30): Door (L1) to which the power has to be restored.
- GTD(500): Open the aforementioned door.
Once you open the door, don't go through it yet. Carefully snipe the two enemies standing in the next room with tranquilizer rifle. You may have to lure one of them closer to you to avoid him seeing you shoot his friend.
- TRO(x2): If you headshot them with tranquilizer rifle, then you should get the same amount as for 2 single takedowns.
After you're done, move further and agree to start the first tutorial. Once tutorial is completed those 2 enemies will respawn, as if nothing happened.
- TRO(x3) / DTD(x1): The two enemies reappear, and there is another one in the next room.
- HAC(30): Door (L1) of the storage/locker room area on the top floor.
- EXP(100): Shaft of the non-working elevator. Requires punching through a wall from the locker room area on the top floor.
Part II: Jam the Signal Booster & Seal Off Access to the Atrium[]
- TRO(x20) / DTD(x10): There are 20 enemies present by default in this area, when you don't do any tutorials.
After you get down to the lower floor, proceed further, ignore the second tutorial, and take down the 2 enemies near the elevator's exit.
- EXP(100): Vent circling around the room at the end of the corridor going right. Its grating will fall off as you pass by.
Enter the vent and snipe two enemies through the opening with tranquilizer rifle. Crawl further down the ventilation shaft, until you receive the prompt for the third tutorial. Agree to it and complete it. Again, after you finish it the 2 enemies you just sniped will reappear.
- TRO(x2): If you headshot them with tranquilizer rifle, then you should get the same XP as for 2 single takedowns.
- EXP(100): Gas filled service area in the first penthouse.
- EBO(100): Sitting on a crate right next to the signal jammer.
- § PTW(5): A radio in the observation lounge. Since this bonus is only available in New Game+, we ignore it for now.
- GTD(250): (Secondary) Jam the Signal Booster.
- GHO(200)
- HAC(30): Door (L1) leading to the exhibition hall.
- GTD(500): Seal off Access to the Atrium.
- GHO(200)
Part III: Stop the Chopper from Escaping[]
If you take long enough time to get to the Atrium, the sandstorm should start during this part of the mission, which extends the completion timer for the next two objectives. Even then, because of the strict time limit (100 seconds to keep Singh alive, 175 seconds to stop the chopper) and the TF29 team "assisting" you with gunfire, the assumption of performing all eight DTDs on all 16 enemies (8*45=320 XP) while maintaining Ghost (2*200=400 XP) is very much theoretical. On a fresh New Game, you will be lucky to defeat 13 or 14 enemies using single melee takedowns with a couple of DTDs at best, as your allies usually kill 2 or 3 enemies on their own. On New Game+, if you have the required equipment (fully upgraded Cloak, Focus aug, 30+ biocells, lots of smoke grenades) you can probably achieve better results with DTDs, but the prospect of getting all 8 remains unlikely.
More realistic approach requires you using the tranquilizer rifle to snipe the enemies, which should provide the same XP reward as single takedown (50 XP for a headshot on Veterans). If you want to try this, then make sure you collect all the tranquilizer rounds in the previous parts of the mission. After you enter the atrium, jump down and immediately climb to the balcony with TF29 soldiers. You'd have neutralize all but one, so that they do not interfere with you dealing with shadow operatives. Leaving one soldier who is closer to the elevator alive will ensure that enemies will not move around and remain turned in one direction away from the chopper, allowing for easy headshots. Stun gun would be the fastest choice here, but quick bodyshots with from tranquilizer rifle should also work. Once you dealt with your allies, move to the other side of the balcony and non-lethally neutralize Singh (won't affect the secondary objective and will ensure that he survives past the 100 seconds). Jump down and move behind the chopper. All 16 operatives should be in cover with their backs turned to you, so that you can snipe them one by one with some time left for you to grab the Exploration bonus before you disable the chopper.
- VET(x16): 16 shadow operatives. (8 DTDs not included here.)
- EXP(100): On the left side of the atrium, on a path covered by metal scaffolding.
- TRI: On the right side of Atrium you can find a triangle code on top of a container. You can drop there from the far side of the balcony.
- GTD(500): Stop the Chopper from Escaping (by removing the battery at its nose).
- GHO(200)
- GTD(1000): (Secondary) Protect Singh.
- GHO(200)
SECTION SUMMARY (Dubai)
- Section XP: 4240
- Combat XP: 2375
- TRO(x23): Enemies that you encounter normally.
- TRO(x4): Enemies that only appear if you do the trick with the 1st and 3rd tutorial.
- VET(x16)
- DTD(x11): 8 DTDs for shadow operatives not included here.
- Human XP: 2375 = 27*40 + 16*50 + 11*45
- Total XP: 6615
- Max XP: 6615
Prague, first visit[]
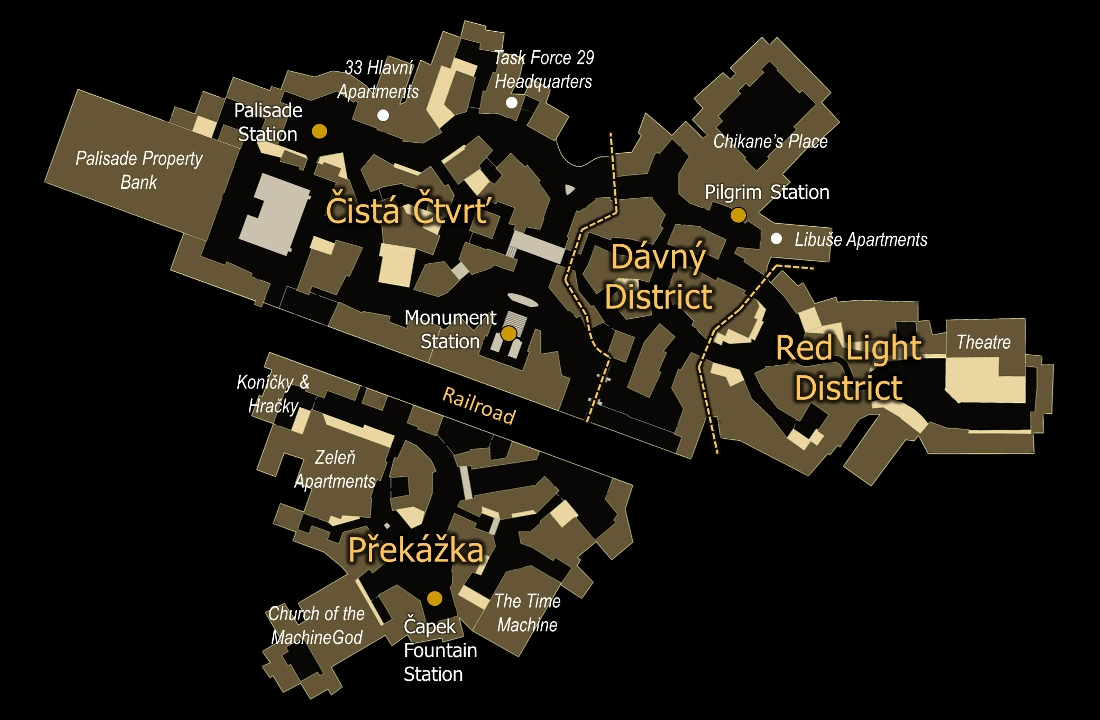
The districts of Prague.
We prioritize finishing M3: Getting in Top Shape Again in order to allow all necessary augmentations to be unlocked. There is little point in exploring Prekazka district without the hacking augs, so we will aim to activate them as soon as possible — see the Build Order section for more details.
South Prague (Prekazka District), Part I[]
Adam's Apartment[]
Main mission: M2: Morning Comes Too Soon
- EBO(100): In the secret compartment next to Adam's bed.
- TRI: Inside the secret compartment.
- EBO(100): On the kitchen island, next to Adam's computer.
- EBO(100): On the living room table.
- § PTW(15): 2 radios and the TV screen. Can't be hacked at this point.
- § TRI: There is another triangle code under the fridge. Requires Optimized Musculature aug, P.E.P.S. or the use of explosives. We'll get it later.
- GTD(1950): Regroup Before Heading Out (M2).
- HAC(130): Door (L1+100) to the apartment. Requires locking the door from the home computer, then leaving through the bathroom window and hacking it from the outside. By doing this repeatedly, the Data Extraction (100) bonus can be acquired unlimited number of times.
- § KEY(25): You can also enter a keycode (any number) on the door's keypad after locking it from the home computer to receive Access Granted (25) bonus. As it can be re-locked, it is an ideal device to use the password glitch on in Prekazka district. We'll unlock it with a code at the very end before departing for Golem City.
The Time Machine[]
Main mission: M3: Getting in Top Shape Again
If you wish to score extra 6 TRO bonuses in Otar's casino you should visit North Prague before you go to Koeller's place. Travel to Palisade station, climb down to the sewers behind Tech Noir, and enter the casino area. The main entrance door (L3) is locked and can't be hacked at this point. It will be unlocked automatically once you have completed M3, and will be re-locked on your second visit to Prague. There will be 6 Dvali troopers inside the casino and near the back entrance, whom you can neutralize as you see fit. Since at this point double takedowns are unavailable, you can use single takedowns or non-lethal headshots for the same XP reward (6*40 XP). Those enemies will respawn once you finish M3 and will provide the XP again — which would happen even you decline Koeller's request for help (SM04: The Calibrator). None of the devices in the casino will reset once you accept SM04, so you can save hacking them for later. Do not pick up the calibrator yet, as it will cut off the whole Otar's mission chain. You can return to Prekazka district after you are done here and proceed with M3 as normal.
- TRO(x6): 6 enemies in Otar's casino in North Prague.
- TRO(x13): Dvali thugs in and around The Time Machine. Note that they will all disappear once M3 is finished.
- EXP(300): Maintenance shaft accessible by destroying a weak wall from the decrepit room to the east of the The Time Machine. Contains 2 vials of Neuropozyne.
- HAC(90): Door (L1+60) leading to the backstore.
- HAC(90): Computer (L1+60) in the backstore.
- EBO(100): In the backstore, in the corner next to the door leading to the actual shop.
- HAC(30): Computer (L1) on the left side of the main entrance, on the receptionist's desk.
- BRE: In the Biography section, on top of an "island" bookshelf.
- GTD(1950): Find Koller Inside the Bookstore (by entering his office) (M3).
- GHO(200)
- EBO(100): In Koller’s office, on the table with the female statue.
- § HAC(55): Koller's computer, on his desk. You would have to come back here after activating the Hacking: Capture Level 2 aug.
- GTD(3150): Go to Koller's Dungeon. Completes M3: Getting in Top Shape Again.
SECTION SUMMARY (South Prague, Part I)
- Section XP: 8390
- Combat XP: 760
- TRO(x19)
- Human XP: 760 = 19*40
- Total XP: 9150
- Max XP: 15765
South Prague (Prekazka District), Part II[]
Koller's Workshop[]
At this point, Adam's augs are reset, he is given 9 free Praxis points and is allowed to spend the accumulated Praxis points (12 in total, if this guide was followed). Once you have acquired the necessary augmentations (see the Build Order section), you can start exploring Prekazka District. It is recommended to avoid all combat on the surface until you finish SM00: Neon Nights, as it seems that civilians and police turning alarmed or hostile can void the Ghost bonus in the final Neon Nights objective.
Accept SM04: The Calibrator from Koeller. Grab 2 vials of Neuropozyne lying around the room, as you'll need them to purchase the Point of Interest information from Kazatel.
- EBO(100): In Koller's workshop on the nightstand next to the bed.
- EBO(100): Also in Koller's workshop. You have to move a painting near the elevator to reveal the secret passage to get to a room filled with gas. The eBook is in the right locker.
- HAC(80): A safe (L3) in the same room.
- PRA: Praxis kit inside Koeller's safe (1/20).
- TRI: Inside Koeller's safe.
- BRE: On Koller's desk.
- HAC(55): Koller's computer (L2), on the desk back in his office in The Time Machine.
Zelen Apartments[]
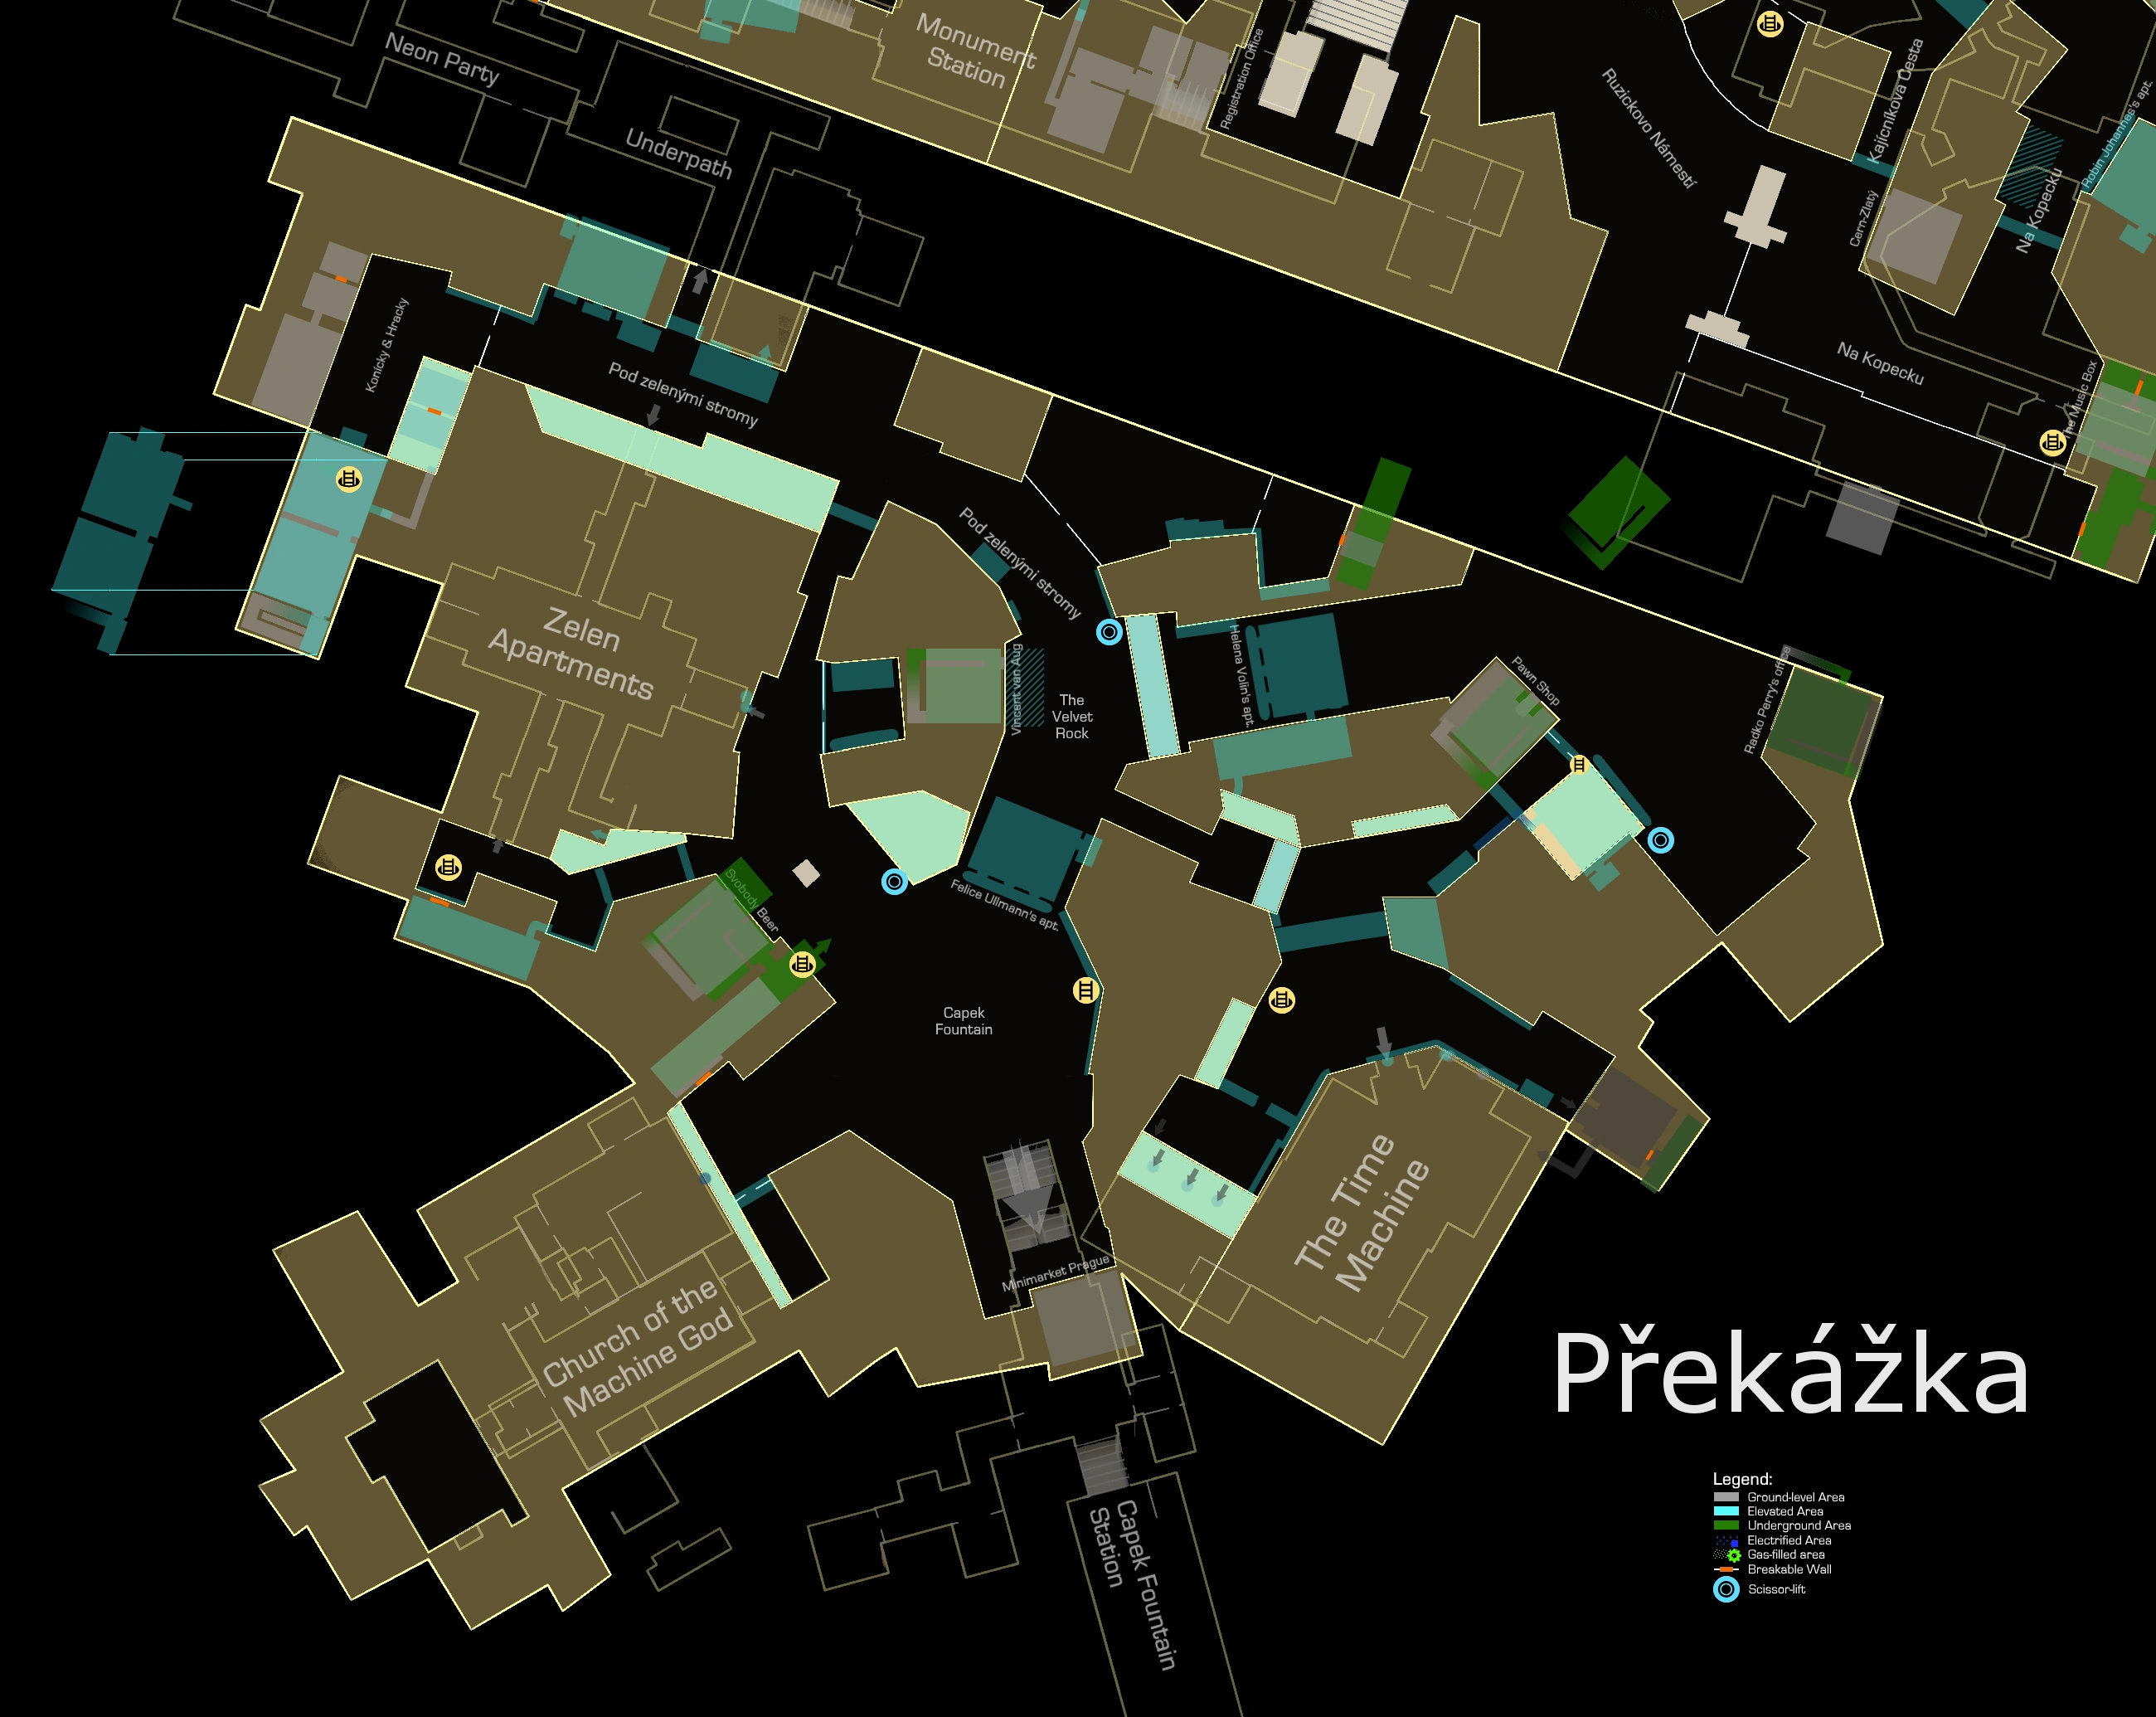
Map of Překážka district with locations marked
Adam's Apartment revisited[]
- PTW(15): 2 radios and the TV screen.
- TRI: Under the fridge. Requires Optimized Musculature aug, P.E.P.S. or the use of explosives.
- COM(350): Confront Sarif in my apartment. (SM03: The Mystery Augs, Part I)
Apartment 41 (Josef Severn)[]
- HAC(30): Door (L1) to the apartment.
- HAC(230): Computer (L3+150) in the living room.
- EBO(100): In the living room.
- BRE: In the corner of the living room, below the TV.
Apartment 32 (Olivier Berthelot)[]
- PRA: Praxis kit (2/20) in a hidden compartment under the floorboards.
- PTW(5): 1 TV screen.
- HAC(255): Computer (L4+150) on the bed.
Apartment 31 (Daria Myška)[]
- HAC(30): Door (L1) to the apartment.
- HAC(105): Computer (L4) at the bedroom window.
- PTW(20): 3 roller shutters and 1 TV.
Apartment 23 (Teresa Petrauskas)[]
- COM(350): POI: Neighborhood Watch can be completed here once you read a pocket secretary in the Coffee Shop in Davny District.
- HAC(80): Door (L3) to the apartment.
- HAC(105): Computer (L2+50) in the living room.
- HAC(80): Safe (L3) hidden behind the fridge. Requires the Optimized Musculature aug, P.E.P.S. or the use of explosives.
- PTW(10): 1 TV and 1 radio.
- EBO(100): Next to the bedroom door, on a counter.
The area hidden behind the weak wall in the bedroom can be accessed from the storage area on the ground level without alerting the civilians.
Apartment 22 (Bonbon)[]
- HAC(55): Door (L2) to the apartment.
- HAC(180): Computer (L3+100) in the kitchen, behind a box. Do not hack this before receiving the Dealing in Colors objective under the SM00: Neon Nights mission by visiting Bonbon's courtyard.
- COM(750): Complete Dealing in Colors by reading the e-mail on Bonbon's computer in the apartment (SM00).
- PTW(5): The TV screen.
- TRO(x1): Dvali thug circling the room.
- EXP(200): The vent connecting the kitchen and the staircase.
Apartment 21 (Tars Rytíř)[]
- TRO(x1): Tars Rytíř. While you can safely knock out Tars, it is recommended to postpone it until after you're finished in Prague. His bodyguards give no XP and will remain unconscious throughout the game if neutralized.
- PRA: At this point, two kits (3&4/20) are available for 10000 credits each. Once you have fully explored Prekazka District you should have enough credits to buy them (provided that you have sold the majority of the weapons you found).
- HAC(30): Door (L1) to the small wardrobe next to Tars. Requires Invisibility Cloak (or a lot of stacked crates) to avoid angering Tars.
- HAC(30): Door (L1) to the windowed bedroom used as storage. Like the door above, requires Invisibility Cloak.
- PTW(10): 2 roller shutters.
Ground Level[]
- HAC(55): Door (L2) to the left storage area.
- HAC(55): Door (L2) to the right storage area.
- EXP(200): Vent on the ceiling of the left storage area, leading to an utility corridor. Also accessible from Apartment 23 via a weak wall.
Sub-Section XP (Zelen Apartments): 3435
Vincent van Aug[]
- TRO(x1): Kazatel (the information dealer) standing in the courtyard behind Vincent van Aug. Do not knock him out until you've bought all the info from him. His bodyguards give no XP. There is a vial of Neuropozyne on the the balcony above him, with which you should have enough Neuropozyne to trade for all 3 Points of Interest.
Capek Fountain[]
- DRO(x1): Circling the area. It is recommended to leave destroying the drones for later, once you are finished with all side missions.
- CAR(30): Cars around the fountain.
- PTW(5): 1 radio in the minimarket.
- EBO(100): In the minimarket, on the counter next to the soda machine.
Felice Ullmann's Apartment[]
- EXP(200): Discover the apartment southeast of Vincent Van Aug. (Due to a bug, you can also trigger this bonus when walking through the archway below the apartment as you head to The Time Machine).
- HAC(130): Computer (L1+100) in the center.
- EBO(100): In the back of the apartment.
The Velvet Rock[]
- HAC(30): Alarm panel (L1) next to the art shop in Vincent Van Aug.
- CAR(20): Lockdown barriers controlled by the alarm panels. Only activate during alarms, which will void Foxiest of the Hounds achievement if triggered.
- PTW(5): Awning above the art shop's entrance.
- EBO(100): On a folding chair in the art shop basement.
- EBO(100): On the stage in the art shop basement.
Police Checkpoint and surrounding areas[]
Talk with Drahomir at the police checkpoint to initiate SM01: The Golden Ticket.
- MCH(75): Laser emitters around the police checkpoint.
- HAC(30): Alarm panel (L1) under the arch leading to the checkpoint.
- DRO(x1): A drone circling the area to the east of checkpoint.
- HAC(90): Door (L1+60) in the alleyway leading back to the Time Machine's courtyard.
- EBO(100): In a 2nd floor apartment southeast of the Pawn Shop.
Bonbon's Courtyard[]
The courtyard is located north of the police checkpoint. There is an open safe in the restricted area in the back. Pick up the pocket secretary from it to initiate SM00: Neon Nights. To progress it visit Zelen Apartment 22 and then head to Cista district.
- EBO(100): On the left of the main area, sitting on an armrest next to the tree.
- TRO(x1): Dvali thug patrolling the restricted area.
There is an area hidden behind the weak wall in the restricted area, but it provides no XP when discovered. It contains 1 vial of Neuropozyne and another secret area (also no XP) near the corpse that requires the upgraded jump to reach. It contains a tranquilizer rifle and some ammo.
Helena Volin's Apartment[]
Climb up to the apartment above the police checkpoint.
- COM(350): POI: Shots Fired completed (Info A from Kazatel).
- EXP(300): Discover the apartment.
- EBO(100): On the ground near the easel.
- HAC(130): Computer (L1+100) in the back of the room.
- TRI: in the back right corner.
Pawn Shop[]
- HAC(130): Entrance door (L5) to the shop.
- HAC(130): Door (L5) to the shop's basement.
- HAC(110): Computer (L1+80) in the basement.
- HAC(110): Computer (L1+80) in the basement.
- HAC(110): Computer (L1+80) in the basement.
- HAC(110): Computer (L1+80) in the basement.
- HAC(110): Computer (L1+80) in the basement.
- HAC(110): Computer (L1+80) in the basement.
Radko Perry's Office[]
- PTW(5): 1 TV.
- EBO(100): On the far left table, under the TV.
- HAC(180): Safe (L1+150) on the right wall, behind a bookshelf.
- HAC(130): Door (L5) to the basement.
- HAC(180): Computer (L3+100) in the basement.
Pod Zelenymi Stromy[]
- COM(350): Meet the document agent (SM01). Even if you somehow accumulate 35000 credits and choose to purchase the documents from him it won't affect the mission in any meaningful way.
- TRO(x3) / DTD(x1): Around the entrance of the toy factory.
- DRO(x1): Circling the street.
- CAR(20): A police car parked at the alleyway leading to Capek Square, and a civilian one at the toy factory's entrance.
- EXP(200): Apartment above the bar.
- EBO(100): In the apartment above the bar, on the bed.
Underpath[]
- HAC(105): Door (L4) from the electrified corridor to the storage room.
- EXP(200): Finding the storage room.
- COM(350): POI: Every Little Helps completed (Info B from Kazatel).
- EXP(200): Vent connecting the back corridor to the abandoned tourism center.
- PTW(5): TV in the abandoned tourism center.
Konicky & Hracky (Toy Factory)[]
- TRO(x3) / DTD(x1)
- HAC(80): Door (L3) to the right storage unit.
- HAC(105): Safe (L4) in the right storage unit.
- EBO(100): On the ground floor of the main building, on a windowsill.
- MCH(255): Various laser emitters and 2 cameras, both up- and downstairs.
- HAC(130): Security hub (L1+100) upstairs.
- COM(750): Confront the forger upstairs, by talking with Milena (SM01).
- GHO(200)
- SMO(200)
- PTW(20): 3 roller shutters and 1 radio.
- EBO(100): In Milena's room, beside the windows.
- TRI: Under the fridge in Milena's room.
SM01: The Golden Ticket[]
Proceed to Police Checkpoint to deal with Drahomir, then meet Edward and Irenka.
- COM(1500): Deal with Drahomir (and his thugs) (SM01).
- TRO(x4) / DTD(x2): Drahomir and his thugs. Use smoke grenades while taking down Drahomir to help conceal yourself from nearby civilians and police.
- COM(0): Meet Irenka Bauer (SM01) in the art shop basement.
Proceed to the minimarket next.
- TRO(x3) / DTD(x1): Three thugs belonging to Drahomir in the minimarket. The two thugs outside the market will run back to the center of the square once they see you.
- COM(750): Deal with the thug inside (SM01). If you delay this for too long he will kill Edward.
- COM(750): Meet Edward Brod. Completes Meet Edward and Irenka (2/2) (SM01). You will have to visit Cista district next.
Capek Fountain Station[]
- MCH(15): Electrochromic glass switch (ECGS) in the control booth.
- HAC(30): Door (L1) to the restrooms.
- HAC(130): Door (L3) to the control booth.
- HAC(30): Alarm panel (L1) in the control booth.
- HAC(30): Door (L1) to the service areas.
- HAC(30): Alarm panel (L1) in the locker room.
- HAC(30): Door (L2) to the server room.
- BRE: In the sever room.
- HAC(30): Alarm panel (L1) at the platform.
- HAC(30): Alarm panel (L1) at the platform.
Svobody Beer[]
- EBO(100): On the bar.
- HAC(255): Door (L4+150) to the basement.
- HAC(255): Door (L4+150) to the locked storage room in the basement.
- EBO(100): On the table in the locked room in the basement.
- EXP(300): Secret storage space accessible from the locked room.
- HAC(55): Door (L2) leading to the sewers. Accessible from the aforementioned storage space. You can enter the sewers here and destroy the 3 bots terrorizing the civilians if you wish to save them (no XP rewards).
- EXP(200): Secret room hidden behind the left wall of the alley to the west of Svobody Beer. Look up for a vent cover on the second floor. Alternatively, destroy a weak wall above the sewer entrance further down the alley.
Sub-section XP (South Prague Streets): 15490
Prekazka Sewers, Part I[]
After descending the ladder in the alley behind Svobody Beer, talk with the nearby civilians to acquire POI: Rumors of a Cult, then follow the corridor to the North, which leads to a gas-filled area.
- HAC(55): Door (L2) on the northern side of the corridor, beyond the gas-filled area.
- DRO(x3): 3 drones attacking civilians in the huge empty area behind the door. It is better to approach them from the other entrance in Svobody Beer if you want to save the civilians.
- COM(350): Complete POI: Rumors of a Cult by talking to Viznik. Acquires SM02: Cult of Personality.
- COM(350): Enter the sanctuary and talk with Richard the Great (SM02).
- SOC(100): You will automatically fail the persuasion even if you have the Social Enhancer aug.
- COM(350): Find the poster promoting the magic show with Liborio (SM02). You will have to visit Cista district next.
At this point, if you haven't yet progressed Neon Nights until you are asked to visit the lab nearby you can return to the surface and head to the metro. Return to the sewers (see Part II) once you have completed all the relevant objectives for SM00 and SM02 in North Prague.
Sub-section XP (Prekazka Sewers, Part I): 1205
Prekazka sewers, Part II[]
Richard the Great's Compound[]
Proceed once you have spoken with Liborio in Negozio di Magia and received the 3 signal scramblers from him.
- PTW(10): 2 industrial fans on the north side of the main room. Smart Vision required.
- COM(750): Install the signal scramblers (3/3) (SM02).
- TUR(x3): Above the balconies of the main area.
- HAC(130): Door (L5) to tunnel leading to the back of Richard's office.
- HAC(55): Front door (L2) of Richard's office.
At this point you can use the microphone downstairs to shame Richard, but that is less XP-efficient:
- § SOC(350): Reveal Richard to the others (SM02).
- § SOC(500)
Losing the conversation battle on purpose for SOC(100) will result in him dying, so it's best to just knock him out.
- TRO(x1): Richard the Great.
- COM(750): Neutralize Richard (SM02).
- EBO(100): In Richard's office, on a sofa.
- BRE: Next to the electricity breaker in Richard's office.
- PTW(35): 7 TV screens in Richard's office. Hack these before using the breaker.
- COM(750): Disable Richard's system by using the breaker in the office.
- COM(750): SM02: Cult of Personality completed.
Neon Lab[]
Go here once you have completed The Door of Perception from SM02 in North Prague. Purchase Social Enhancer aug, if you haven't yet.
- HAC(30): Door (L1) to the turret chamber. Requires the nearby generator to be active, which will electrify the vicinity of the door. To hack it you'll need Electromagnetic Pulse Shielding aug. It is a rather costly investment (4 Praxis) and it is recommended to spend those points elsewhere at this point, leaving it for later. You can wait until you are mostly finished in Prague — or even hack it during one of the next visits.
- HAC(130): Door (L5) to the turret chamber.
- TUR(x1): In the middle of the turret chamber.
- HAC(80): Security hub (L3) behind the turret.
- HAC(130): Door (L5) to the Neon lab's main chamber.
- TRO(x6) / DTD(x3): Don't forget that you can use smoke grenades to conceal yourself and the bodies of enemies when you perform the takedowns.
- MCH(45): 3 cameras.
- PTW(10): 2 radios.
- HAC(80): Security hub (L3) on the gallery.
- HAC(30): Alarm panel (L1) on the gallery.
Proceed further into the lab. Near the gas tank room you'll encounter the the chemist.
- SOC(500): Talk with the chemist and persuade her to assist you. Requires Social Enhancer aug: select Dismantle first, then Persuade, then Reverse Psychology twice, then Help.
- HAC(30): Alarm panel (L1) behind the chemist.
- HAC(80): Door (L3) to the gas tanks.
- MCH(165): 1 camera, 10 laser emitters in the gas tank chamber.
- TUR(x1): Overlooking the gas tank room.
- PTW(5): A ladder leading to a balcony.
- HAC(30): Laser grid terminal (L1) at the end of the balcony.
- HAC(30): Terminal (L1) controlling the gas tanks.
- COM(1500): Use the terminal to disable the tanks. Completes Where All the Colors Come From. (SM00)
- GHO(200): If you failed to get the Ghost bonus here, even if no one in the lab saw you, it is most likely because you were spotted while engaging Drahomir and his thugs on the surface.
- SMO(200)
- COM(750): SM00: Neon Nights completed.
Sub-section XP (Prekazka Sewers, Part II): 7355
SECTION SUMMARY (South Prague, Part II)
- Section XP: 24050
- Combat XP: 1575
- TRO(x24): Includes Tars and Kazatel, although it is advised to postpone knocking them out until you're ready to leave Prague.
- DTD(x8)
- Human XP: 1320 = 24*40 + 8*45
- TUR(x5)
- DRO(x3)
- Robot XP: 255 = 5*30 + 3*35
- Total XP: 25625
- Max XP: 41390
North Prague (Cista and Davny Districts)[]
Prekazka Side Missions[]
Here we include the links to all the relevant locations for the side missions SM00, SM01 and SM02, which require back-and-forth traveling between districts.
SM00: Neon Nights
SM01: The Golden Ticket
SM02: Cult of Personality
After you are done with Prekazka side missions and South Prague in general, it is highly recommended to visit TF29 Headquarters and complete the main missions M4, M5 and M6 (up until the point when you are asked to leave Prague) for a lot of easy XP.
TF29 Headquarters[]
Main mission: M4: Checking Out TF29
When you visit TF29 HQ the Interpol agents working on computers on Central floor and in Cybercrimes/Organized Crimes tend to move around a lot, which can make hacking all the listed computers difficult. Some agents will switch to a different activity after you finish M4, enabling you to hack previously occupied PCs — and conversely some computers available earlier become permanently occupied once certain agents finish talking with each other. If you play normally, you would have wait to hack some computers until your 2nd and 3rd visits to Prague in case you failed to do it on the 1st visit. However, after you enter and leave North Prague area through metro several times all PCs in TF29 HQ can suddenly become available for use (even if there are agents sitting or standing right in front of them), which will enable you to hack the majority of PCs on your first visit. We will ignore this and list the PCs in the natural order they become available.
We will also avoid triggering the password glitch in TF29 HQ by not using any keycodes here until the 3rd visit to make sure that we receive all the possible rewards for every PC.
Downstairs[]
- GTD(1950): Go to TF29's offices (M4).
Central floor[]
- MCH(90): 2 laser emitter in the elevator shaft (Smart Vision required), 1 turret, 3 cameras.
- PTW(35): 7 TV screens.
- HAC(30): Computer (L1) of Debbie Connoly. Available immediately.
- HAC(30): Computer (L1) of Simon Mactavish. Available immediately.
- HAC(30): Computer (L1) of Clemence Mauer. Available immediately.
- HAC(30): Computer (L1) of Simon Daniels. Available after M4.
- HAC(30): Computer (L1) of Aleksi Murphy. Available after M4.
Shooting Range[]
Talk with Aria Argento on the second floor to acquire POI: Shooting Range.
- HAC(55): Computer (L2) of Aria Argento.
- HAC(225): Safe (L4+120) in the corner.
- HAC(130): Weapon locker (L5).
- COM(350): Complete POI: Shooting Range. To prevent the game from crashing here you may have to 1) free up the inventory space before going into the shooting range, and 2) remove all weapons and ammo you have picked up inside before leaving.
- EBO(100): In the shooting range, on a chair.
- COM(750): Complete POI: Shooting Range Mastered.
Briefing room[]
- HAC(30): Computer (L1). Available after M4.
IT support room[]
- HAC(30): Computer (L1).
- HAC(130): Door (L1+100) to the server room.
- EXP(200): Enter the server room.
- HAC(30): Computer (L1) in the server room.
Psychologist's Office[]
- HAC(305): Computer (L5+175) of Delara Auzenne. Make sure to hack it before leaving for M5, or wait until M9 or M14.
Forensic Lab[]
- EBO(100): In Daniel Fletcher's office, near some books.
- HAC(55): Computer (L2) in the office.
- HAC(80): Safe (L3) in the office.
- BRE: In Fletcher's safe.
Infirmary[]
- PRA: Praxis kit (5/20) inside a medical container on top of a medical cabinet.
- HAC(30): Computer (L1).
- § HAC(80): Door (L3) to the supply closet. If you intend to use the password glitch in TF29 HQ, do not hack it or use its keycode (5298) yet — it is best to unlock it on the 3rd visit, after interacting with every PC in HQ. Since it does not reset between visits, it makes no difference when you choose to unlock it. The supply closet can also be entered through a ceiling hatch accessible via a small corridor next to men's restroom, so you won't miss out on anything here.
- HAC(155): Safe (L2+100) in the supply closet.
- TRI: Inside the safe in the supply closet.
Holding Cells[]
- HAC(185): Security hub (L1+155) in the security booth.
- MCH(30): 2 cameras watching the cells.
- EBO(100): Outside the cells, on a chair.
Upstairs[]
Cybercrimes/Organized Crimes Unit[]
Avoid speaking to Peter Chang here if you want to get a chance to hack his computer later.
- HAC(30): Computer (L1) of Peter Chang. Normally, it is only available for a short period after M5 before accepting SM05: Samizdat. But as was mentioned, if you leave and enter the HQ enough times his computer will eventually become accessible, along with every other PC in the building.
- HAC(30): Computer (L1) of Selina Carter. Available immediately.
- HAC(30): Computer (L1) of Benjamin Scott. Available immediately.
- HAC(30): Computer (L1) of Alison Walchuck. Available immediately.
- HAC(30): Computer (L1) of Gabriel Nelson. Available after M4.
- HAC(55): Computer (L2) of Ethan King. Available after M4.
- HAC(55): Computer (L2) of Ryan Baker. Available after M4.
- HAC(275): Computer (L2+220) of Vincent Black.
- HAC(130): Safe (L5) in Vincent Black's office.
- PTW(10): 2 TV screens.
Counter-Terrorism Unit[]
- HAC(30): Computer (L1) of Hantz Gerber.
- HAC(235): Computer (L2+180) of Strickland Hall.
- PTW(15): 3 TV screens.
- EBO(100): On the desk in the middle of the room.
- HAC(55): Computer (L2) of Duncan MacReady.
NSN Servers[]
- EXP(200): Electrified crawlspace leading to the stairs.
- EXP(200): Vent leading to the Counter-Terrorism Unit's offices.
- HAC(155): Computer (L1+125) in the maintenance room.
- HAC(55): Door (L2) leading to the server room.
- EXP(200): Enter the server room.
- GTD(3150): Plant the whisper-chip (M4).
Miller's Office[]
- GTD(1950): Meet Miller in his office. Completes M4: Checking Out TF29.
- EBO(100): On Miller's desk.
- HAC(230): Computer (L3+150) of Jim Miller. Hack it quickly before Miller starts using it or hack it later during M6.
- PTW(5): TV screen.
It is highly recommended to finish M5: Claiming Jurisdiction in Ruzicka Station and the majority of M6: Taking Care of Business (up until the point when you are asked to leave Prague) for a lot of easy XP. We include M5 here and list M6 at the end of the Prague, first visit section for consistency.
Section XP (TF29 HQ): 12650
Max XP: 54040
Ruzicka Station[]
Main mission: M5: Claiming Jurisdiction
None of the cops provide XP, so they are not listed here. Still, you can take them down if you want some free ammo and guns. As long as you remain undetected the game acts as if you avoided the police altogether. If you wish to neutralize the Exo-suit cop guarding the evidence, then use either a tranquilizer rifle or a combo of an EMP round from a silenced gun (which induces the stun effect without alerting him) followed by melee takedown. Do not use the stun gun + melee takedown combination or it will void the Ghost bonus, even if you won't see Alarmed or Hostile status on the radar.
- GTD(500): Meet Smiley at Ruzicka Station (M5).
- HAC(55): Door (L2) leading to the maintenance area of the platform.
- MCH(30): 1 camera, 1 ECGS.
- HAC(30): Door (L1) leading to the supply closet of the restroom.
- HAC(30): Door (L1) leading to control booth.
- HAC(30): Computer (L1) in the control booth.
- HAC(30): Alarm panel (L1) at the start of the side-corridor.
- HAC(55): Door (L2) to the security office.
- HAC(80): Security hub (L3) in the security office.
- HAC(30): Alarm panel (L1) in the side-corridor, under the camera.
- BRE: In the server room at the end of the corridor.
- HAC(30): Alarm panel (L1) at the bottom of the main stairs.
- HAC(30): Alarm panel (L1) on the main stairs' landing.
- HAC(30): Alarm panel (L1) at the left side of the main hall.
- HAC(30): Alarm panel (L1) at the right side of the main hall.
- EBO(100): Found at the floor of the bookstore.
- TRI: On the south side of the main hall, high on the ledge circling the area.
- GTD(3150): Retrieve the evidence (M5).
- GHO(200)
- SMO(200)
Now return to TF29 HQ.
- GTD(1950): Bring the DSD to Smiley. Completes M5: Claiming Jurisdiction.
You can complete the first objective of M6 here (Meet with Doctor Auzenne) — it is listed at the end of Prague's section.
Accept SM05: Samizdat from Peter Chang as you leave the HQ. You get a chance to hack Chang's computer at this point before he returns to his workplace.
- § HAC(30): Computer (L1) of Peter Chang. (Already included in TF29 HQ section.)
Section XP (Ruzicka Station): 6590
Max XP: 60630
Cista District[]
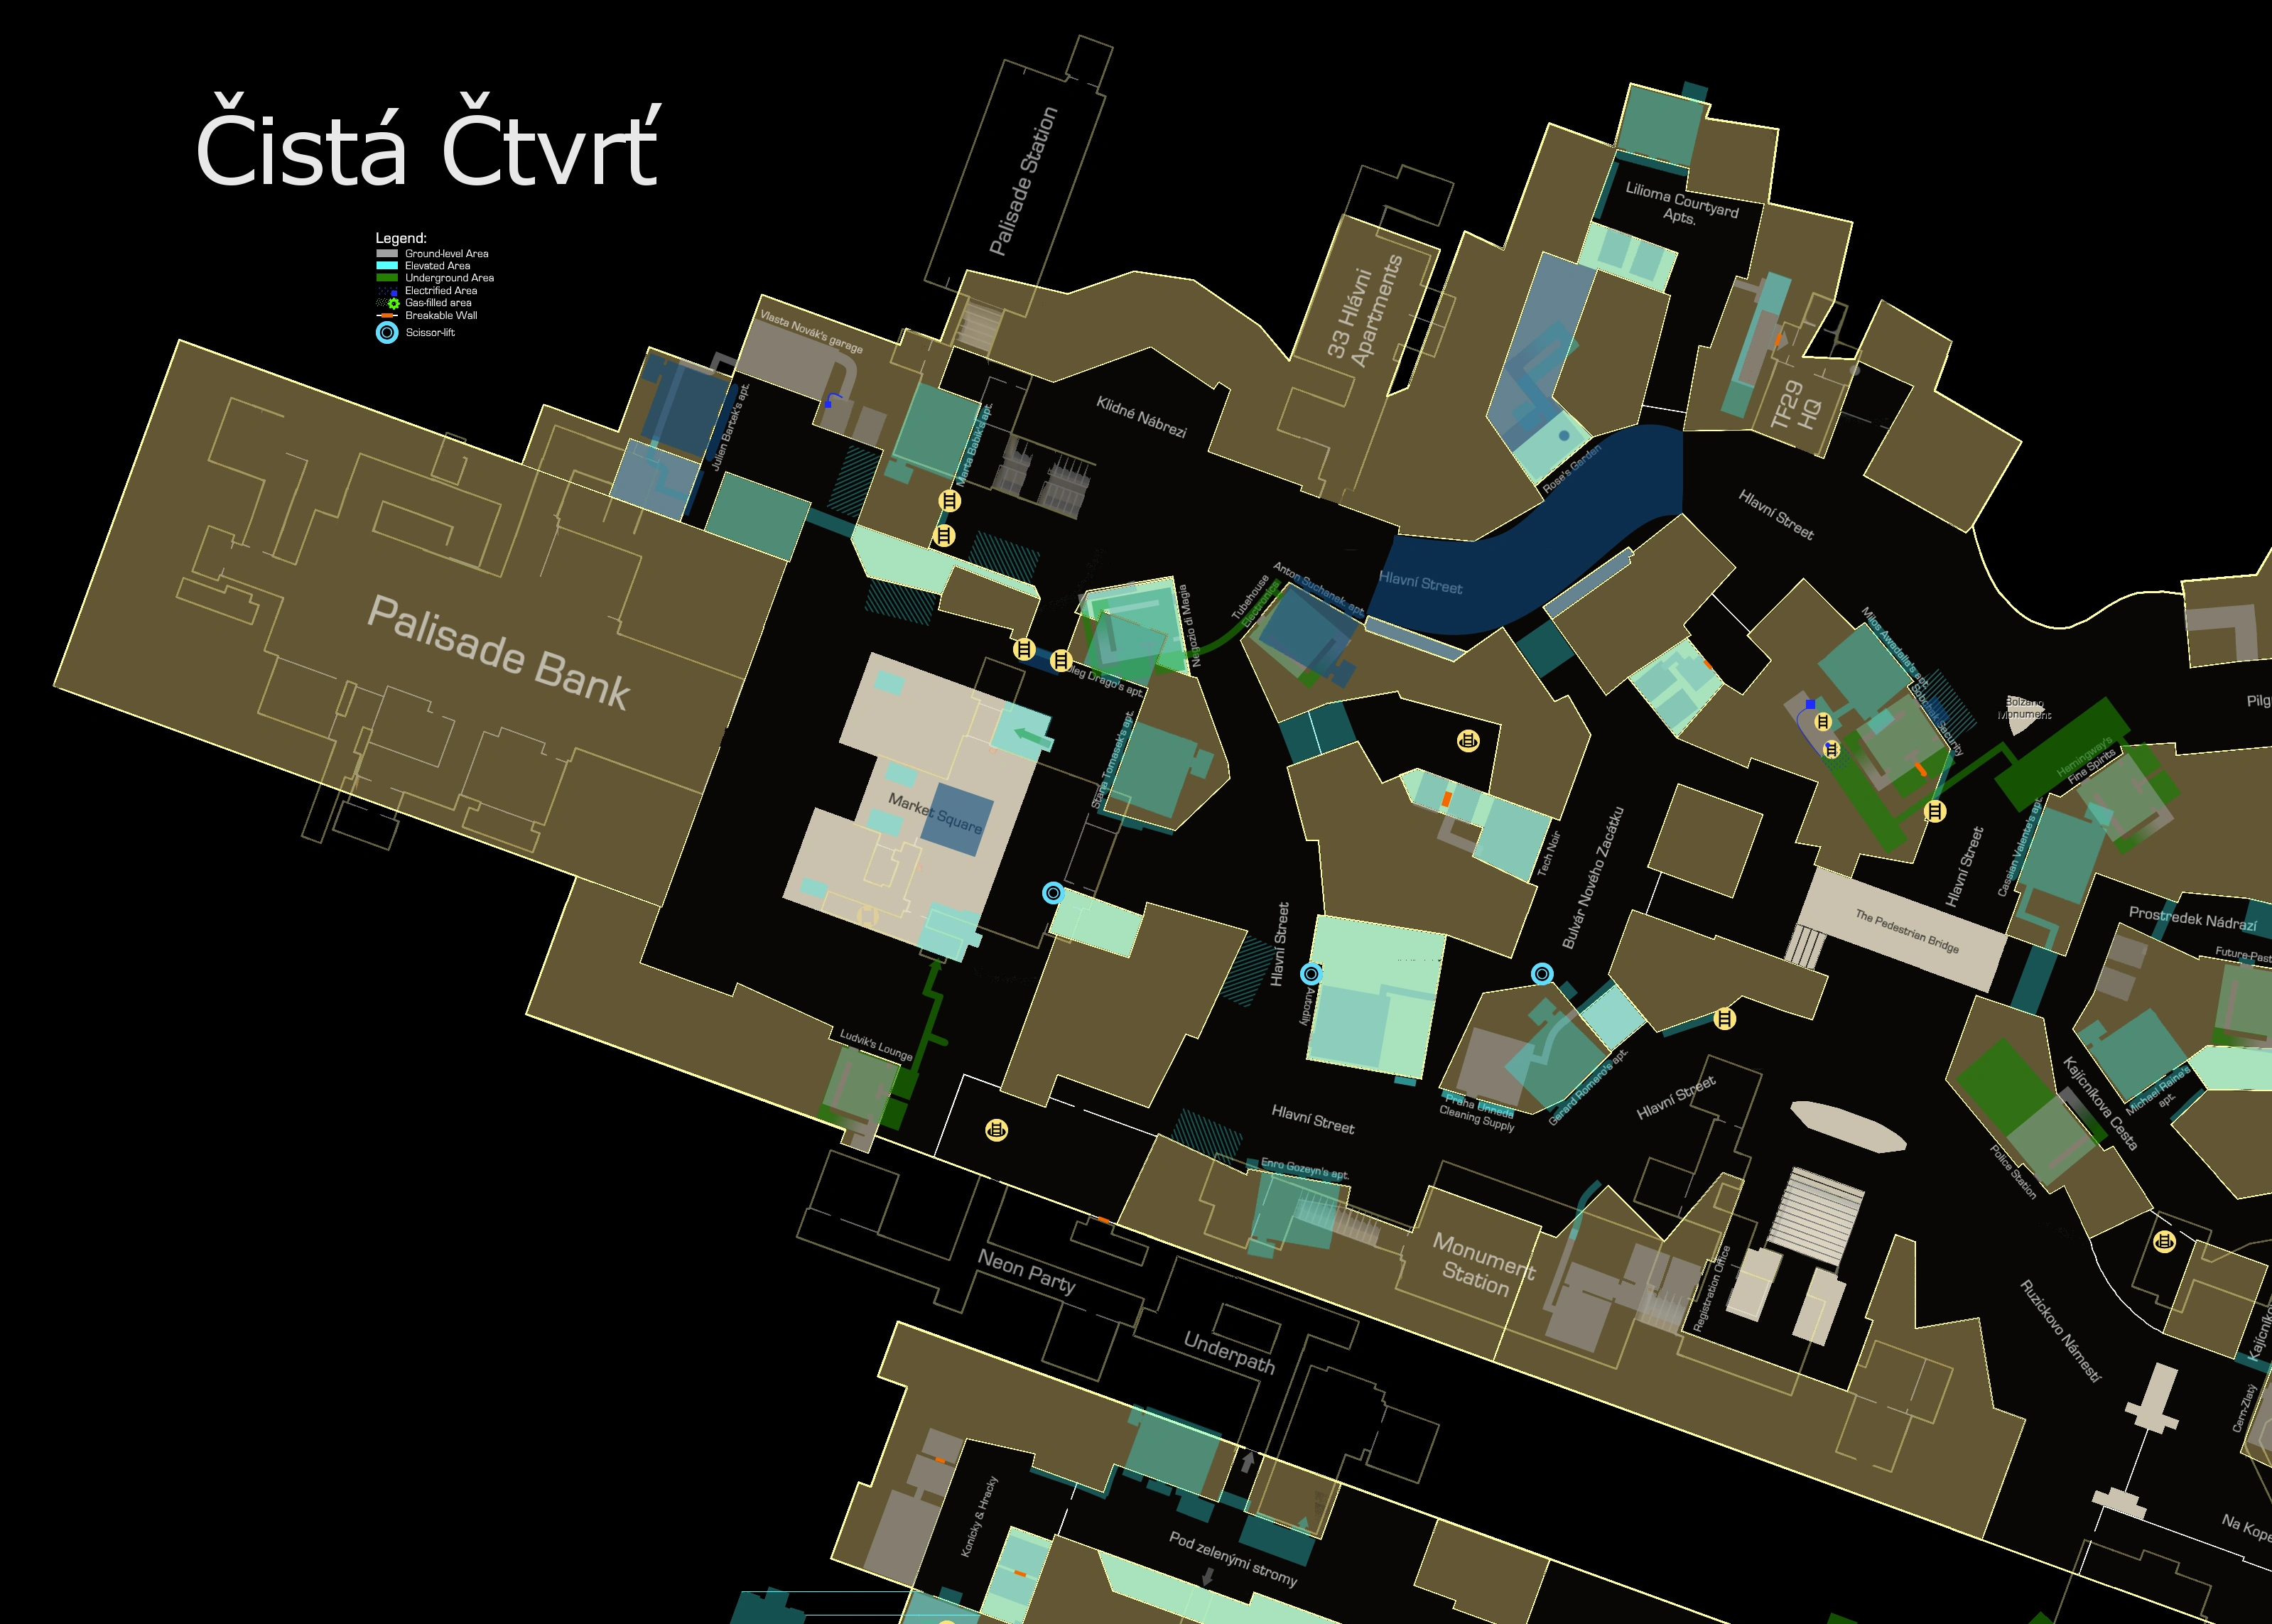

Map of Čistá district with locations marked. The guide lists the locations by following Hlavni Street in clockwise direction starting from Palisade station.
Palisade Station[]
- HAC(105): Door (L4) to the maintenance room at the end of the platform.
- EXP(400): Enter the maintenance room.
- TRI: Inside the maintenance room.
- MCH(15): ECGS in the control booth.
- BRE: Inside the control booth.
- HAC(30): Door (L1) to the restricted room opposite the control booth.
- EXP(200): Enter the restricted room.
Klidne Nabrezi[]
- PTW(10): An awning and a ladder in the southwestern corner.
Marta Babik's Apartment[]
Reachable by the ladder in Klidne Nabrezi.
- EXP(100): Enter the apartment.
- PTW(5): TV on the left wall.
- HAC(130): Computer (L1+100).
- EBO(100): On a small table.
Negozio di Magia[]
- COM(350): Seek out Liborio (SM02).
Travel to the Richard the Great's Compound in Prekazka sewers to finish SM02 (included in the previous section).
Oleg Drago's Apartment[]
- EXP(300): Enter the terrace above Negozio di Magia.
- EBO(100): On a table on the terrace.
- PTW(10): 1 radio on the terrace and 1 TV inside.
- HAC(30): Door (L1) leading from the terrace to the apartment.
- HAC(80): Computer (L3) on the table.
33 Hlavni Apartments[]
Ground floor[]
- HAC(55): Door (L2) to the left storage space.
- HAC(55): Door (L2) to the right storage space.
- EXP(200): Vent connecting the right storage space to the secret room in apartment 302.
Apartment 201 (Even Prybil)[]
- HAC(105): Entrance door (L4).
- PTW(20): 3 roller shutters and 1 TV.
Apartment 202 (John Dubnyk)[]
- HAC(55): Entrance door (L2).
- HAC(30): Computer (L1) in the living room.
- PTW(65): Various roller shutters and TV screens.
- HAC(55): Entrance door (L2).
- HAC(30): Computer (L1) in the living room.
- PTW(65): 9 roller shutters and 4 TV screens.
- COM(750): Find and read the pocket secretary downstairs (SM00).
To acquire the keycard to the Neon party, order the cleaning service through the computer. Leave the district via metro and then return to the apartment.
- COM(750): Pick up the card from the swan on the 2nd floor of the apartment to complete Behind Our Backs (SM00).
Proceed to the Neon party in the southern part of the map.
Apartment 203 (Jim Miller)[]
- HAC(230): Entrance door (L3+150).
- HAC(555): Computer (L2+500) on the kitchen table.
- PTW(5): TV screen in the living room.
- HAC(230): Computer (L3+150) in the secret room opened by interacting with the punching bag.
- HAC(130): Safe in the corner of the secret room.
- TRI: In Miller's secret room.
[]
- HAC(30): Entrance door (L1).
- PTW(20): 4 TV screens.
Apartment 301 (Mikael Mendel)[]
- TRO(x1): Mikael Mendel, the weapon dealer. His bodyguards give no XP.
- PTW(10): 2 TV screens.
- MCH(15): Tripmine in the vent connecting to apartment 302.
Apartment 302 (Little k)[]
- HAC(105): Entrance door (L2).
- HAC(30): Computer (L1) in the room to the right.
- COM(750): Find the source of the hack by hacking the computer (SM05).
Sub-section XP (33 Hlavni Apartments): 4345
The Tubehouse[]
- PTW(60): Several TV screens.
- HAC(55): Computer (L2) in the basement.
- EXP(200): Vent connecting the basement to Negozio di Magia.
- BRE: In the basement.
Anton Suchanek's Apartment[]
The apartment is located directly above The Tubehouse.
- PTW(15): 3 roller shutters.
- EXP(200): Enter the apartment.
Bulvar Noveho Zacatku[]
- HAC(80): Door (L3) to the left storage unit.
- EXP(300): Enter the left storage unit. The vent connects to Hlavni Street North.
- HAC(130): Door (L5) to the right storage unit.
- EXP(100): Enter the right storage unit.
Tech Noir and its Backyard[]
- EXP(200): Top of the archway south of The Tubehouse.
- HAC(55): Door (L2) to the right storage unit in Tech Noir's backyard.
- EXP(200): Enter the right storage unit.
- HAC(55): Door (L2) to the left storage unit. Do not use the tunnel leading to the shop yet — climb though the roof and hack the door from inside the shop instead.
- BRE: In the left storage space.
- HAC(30): Door (L1) connecting the shop to the storage unit.
- PTW(10): 2 TV screens in the shop.
- TRO(x1): Costache, the tech dealer. His bodyguards give no XP.
After you hack the door to the left storage and leave the location via metro, the storage panel's level will be upgraded to 4, and a camera and tripmines will be placed in there. If you hack them, all equipment will be reset every time you re-enter the North Prague via metro, allowing you to acquire their bonuses again unlimited number of times on ony visit. Knocking out the bodyguard who sets up the tripmines will not prevent this.
- HAC(355): Reinforced door (L4+250) to the left storage unit.
- MCH(90): A camera and 5 tripmines.
Hlavni Street North[]
- EXP(300): Glass roof above the Hlavni street.
- CAR(10): Across the entrance to 33 Hlavni.
- HAC(30): Alarm panel (L1) across the entrance of 33 Hlavni.
- HAC(30): Alarm panel (L1) across Rose's Garden.
- CAR(20): Lockdown barriers controlled by the alarm panels. Only activate during alarms.
- DRO(x1): Stationed up high across the entrance to TF29 HQ. Deploys during alarms or when damaged.
Rose's Garden[]
- EBO(100): Inside Rose's Garden, near the front windows.
- EBO(100): On the roof, lying on a mattress.
Lilioma Courtyard[]
- HAC(105): Door (L4) to the left storage space.
- HAC(55): Door (L2) to the right storage space.
Apartment of Madame Photographe[]
Located in Lilioma Courtyard.
- HAC(30): Computer (L1) on the desk.
- HAC(235): Safe (L5+105) on the left wall.
- BRE: Inside the safe.
Bolzano Monument[]
- DRO(x1): Stationed under the pedestrian bridge. Deploys during alarms or when damaged with EMP bullets.
- PTW(10): Ladder next to the pedestrian bridge and an awning above Sobchak Security.
- CAR(30): 1 near Sobchak Security, 1 near Hemingway's, 1 under the pedestrian bridge.
- HAC(30): Alarm panel (L1) near Sobchak Security.
- HAC(30): Alarm panel (L1) near Hemingway's.
- CAR(20): Lockdown barriers controlled by the alarm panels. Only activate during alarms.
Sobchak Security[]
The vendor will ask you for Neropozyne — don't give it to him until you hacked the tripmines in the basement.
- HAC(30): Computer (L1) on the desk.
- PTW(15): 2 TV screens and 1 radio in the main room.
- MCH(165): 2 cameras, 8 tripmines and 1 wireless control box that controls the awning outside (Smart Vision required).
- HAC(80): Safe (L3) inside the right storage space.
- BRE: Sitting on the table beside the safe.
The safe also contains the Tarvos Security vault keycard.
- EXP(300): Storage space on the left with lots of heavy crates.
- EXP(300): Ventilation shaft connecting with Hemingway's Fine Spirits and Milos Adawalla's apartment above.
Milos Adawalla's Apartment[]
- EXP(300): Reach the apartment above Sobchak Security.
- HAC(180): Computer (L3+100) on the desk.
Hemingway's Fine Spirits[]
- HAC(55): Computer (L2) on the counter.
- MCH(15): Camera in the basement.
- HAC(55): Door (L2) to the basement storage space.
- EXP(200): Storage space in the basement.
Cassian Valente's Apartment[]
- PTW(15): 3 roller shutters.
- EXP(300): Enter the apartment located above Hemingway's Fine Spirits.
- HAC(130): Computer (L1+100) in the room.
Police Station[]
- HAC(30): Computer (L1) behind the desk.
- HAC(80): Door (L3) leading to the basement.
Ruzickovo Namesti[]
- HAC(30): Alarm panel (L1) near the police station's entrance.
- CAR(10): Lockdown barrier controlled by the alarm panels. Only activates during alarms.
- CAR(20): Near the gates leading to Davny District.
Tourist Center[]
- HAC(30): Door (L1) to the office.
- EBO(100): In the office, behind the metro ticket window.
- BRE: Near the eBook.
- PTW(45): 9 TV screens in the underground area connecting to the sewers.
- TRI: Underground, in the north side room, on top of a shelf.
Monument Station[]
- MCH(15): ECGS in the control booth.
- HAC(55): Door (L2) in the maintenance area.
- EBO(100): In the designated augs waiting area, on a bench.
Registration Office[]
- TRO(x2) / DTD(x1)
- PTW(5): 1 TV screen.
- MCH(45): 2 cameras and an ECGS.
- HAC(130): Door (L5) leading to the validation office.
- HAC(30): Security hub (L1) in the validation office.
- COM(750): Validate the permits (SM01). The choice between Edward and Irenka only affects the story.
- GHO(200)
- SMO(200)
- COM(750): SM01: The Golden Ticket completed.
Hlavni Street South[]
- DRO(x1): Stationed above Monument station's exit. Deploys during alarms or when damaged with EMP bullets.
- HAC(30): Alarm panel (L1) near Praha Unneda Cleaning Supply.
- CAR(10): Lockdown barrier controlled by the alarm panels. Only activates during alarms.
- CAR(10): Car in front of Praha Unneda Cleaning Supply.
- PTW(5): Ladder leading to the giant ad board.
Gerard Romero's apartment[]
- EXP(400): Enter the apartment near the giant ad board.
- PTW(5): TV screen to the left.
Praha Unneda Cleaning Supply[]
This shop is currently empty.
Train Tunnels[]
Use the Neon keycard or break through the weak wall to enter the area (no XP).
- HAC(30): Door (L1) to the room with the dead raver.
- COM(350): Pick up and inspect the pocket secretary from the dead raver to complete The Rave (SM00).
Proceed to Libuse Apartment 84.
Autodily[]
- EBO(100): Inside the shop, on a table.
Enro Gozeyn's Apartment[]
- EXP(400): Enter the apartment south of Autodily.
- PTW(5): TV screen to the left.
- HAC(30): Computer (L1).
Hlavni Street West[]
- HAC(30): Alarm panel (L1) across Autodily's entrance.
- HAC(30): Alarm panel (L1) at the plaza with the circular advertisement screens hanging overhead.
- HAC(30): Alarm panel (L1) near the Market Square.
- PTW(10): 2 awnings.
- CAR(30): Lockdown barriers controlled by the alarm panels. Only activate during alarms.
Ludvik's Lounge[]
- EBO(100): Behind the front window, on a table.
- PTW(15): 3 TV screens.
- HAC(55): Door (L2) to the left storage unit in the basement.
- EXP(300): Enter the aforementioned storage unit.
Market Square[]
- PTW(15): 2 awnings and a ladder.
- CAR(20): 2 cars in front of the Bank.
- EXP(400): At the top of the giant cube in the middle of the square. Requires Icarus Dash (or several crates stacked on top of a nearby pillar).
- HAC(80): Door (L3) to the right storage unit in the small courtyard on the north side.
- EXP(200): Enter the right storage unit in the small courtyard on the north side.
- HAC(80): Door (L3) to the left storage unit in the small courtyard on the north side. Leads to Vlasta Novak's warehouse.
- EXP(200): Vent connecting Vlasta Novak's warehouse to the outside.
Stana Tomasek's Apartment[]
- EXP(400): Enter the apartment across from Oleg Drago's apartment.
- PTW(5): TV screen.
- HAC(130): Computer (L3+50).
Julien Bartek's Apartment[]
- EXP(300): Enter the apartment north of the Bank.
- PTW(5): TV on the back wall.
- HAC(80): Computer (L3) to the left.
- HAC(80): Safe (L3) behind the painting on the left. Use a biocell to reveal it.
Sub-section XP (Cista District Streets): 18315
Cista District Sewers[]
Otar's Casino[]
- HAC(30): Door (L1) to a gas-filled chamber.
- EXP(300): Enter the gas-filled chamber.
- § VET(x1): Otar Botkoveli in the casino's bar. Do not knock him out or you will lose access to two side missions.
- TRO(x8) / DTD(x4): Surprisingly, you can take out almost everyone in the casino before speaking with Otar, including the female staff, and it will not affect the outcome of SM04 or the following missions involving him — as long as you are not detected in the process. You only have to leave neutralizing Vano (he is the one with face tatoos, leaning against the bar) until after you get the calibrator, otherwise the game will soft-lock once the conversation with Otar starts.
- MCH(30): 2 cameras.
- HAC(30): Door (L1) in the northern side-corridor.
- HAC(30): Door (L1) to the weapon storage room downstairs.
- EBO(100): On a table, on the balcony in front of Otar's office.
- TRI: Inside the ventilation shaft leading to the office.
- BRE: On the desk in Otar's office.
- PTW(25): TV screens in the office.
- HAC(155): Security hub (L2+100) in the office.
- HAC(130): Computer(L1+100) in the office.
- HAC(30): Safe (L1) in the corner of the office with the neuroplasticity calibrator.
Do not pick it up yet. Circle back and enter through the main entrance from outside the casino to speak with Otar.
- SOC(1000): Persuade Otar and accept the deal. (Alpha x 3 should work.)
- COM(350): Go upstairs and get the calibrator (SM04).
- COM(1500): SM04: The Calibrator completed.
- GHO(200)
- SMO(200)
Mole People Settlement[]
- MCH(75): Tripmines securing the entrance to the settlement.
- HAC(80): Door (L3) leading to settlement.
- HAC(55): Safe (L2) in the southwest corner.
- HAC(30): Door (L1) in the corridor leading to the Tourist Center.
- EXP(200): A chamber hidden behind two heavy crates on Level 2.
- HAC(445): Safe (L4+340) in the hidden chamber.
- EXP(200): Hidden chamber on the south side of Level 1. Requires crawling through some sewer pipes.
Sub-section XP (Cista District Sewers): 5195
SECTION SUMMARY (Cista District)
- Section XP: 23510
- Combat XP: 810
- TRO(x12): Mikael Mendel and Costache are included, although it is advised to postpone knocking them out until you're ready to leave Prague.
- VET(x0): Otar Botkoveli not included.
- DTD(x5)
- Human XP: 705 = 12*40 + 5*45
- DRO(x3)
- Robot XP: 105 = 3*35
- Total XP: 24320
- Max XP: 84950
Davny District[]


Map of Dávný district with locations marked. The guide lists the locations by following the main streets in clockwise direction starting from Pilgrim Station.
Pilgrim Station[]
- MCH(15): ECGS in the control booth.
- HAC(55): Door (L2) to the service areas.
- BRE: Inside the locker room on a desk.
- TRI: Inside the locker room on top of the lockers.
- HAC(105): Door (L4) to the server room.
- HAC(105): Door (L4) to the maintenance room at the end of the platform.
- HAC(130): Door (L5) of the Dvali weapon cache in the sewers accessible from the maintenance room.
There is a room hidden behind a weak wall further down the sewers, but it offers no XP, just loot.
Pilgrim Nadrazi[]
- PTW(5): Awning above a newsstand.
- CAR(10): In front of the archway leading to Cista District.
Coffee Shop[]
- HAC(55): Door (L2) to the left storage unit in the basement.
There is a pocket secretary at the bottom of the stairs that initiates POI: Neighborhood Watch, which requires visiting Zelen Apartment 23 in Prekazka District.
- HAC(255): Door (L4+150) to a maintenance corridor from the right storage unit in the basement.
- EXP(200): Enter the maintenance corridor.
- HAC(430): Safe (L5+300) in the maintenance corridor.
Eugen Weisse's Apartment[]
- EXP(200): Enter the apartment above the coffee shop by jumping up the pipes in the maintenance corridor.
- EBO(100): In the apartment on a desk.
- BRE: In the bookcase near the vent.
- PTW(15): 3 roller shutters.
LIMB Clinic[]
- HAC(130): The front door (L5).
- EBO(100): In the basement, on a table.
- EXP(300): Crawlspace in the ceiling. Also accessible through a vent from a nearby archway outside. Contains various items, including 3 vials of Neuropozyne.
- PRA: Praxis kit (6/20) inside the crawlspace.
- BRE: Inside the crawlspace.
- TRI: Inside the crawlspace.
Libuse Apartments[]
Ground floor[]
- HAC(55): Door (L2) to a storage unit to the left.
Apartment 84 (Cygnus)[]
- HAC(55): The front door (L2).
- PTW(20): 4 roller shutters.
- HAC(255): Safe (L4+150) inside the secret room. The switch that opens it is disguised as a spray bottle on a counter.
- COM(750): Read the pocket secretary in the safe to complete The Door of Perception (SM00).
Travel to the Neon lab in Prekazka sewers to finish SM00 (included in the previous section).
Apartment 85 (Johnny Gunn)[]
- PTW(10): 1 TV and 1 radio.
Apartment 86 (Unoccupied)[]
- HAC(80): The front door (L3).
- PTW(5): 1 radio in the back room.
Apartment 94 (Picus)[]
- HAC(55): The front door (L2).
- PTW(30): 4 roller shutters, 1 TV and 1 radio.
- HAC(80): Safe (L3) in the bedroom.
The safe contains the Picus vault keycard.
Apartment 95 (Aurelius Milkovich)[]
- HAC(30): The front door (L1).
Apartment 96 (Nomad Stanek)[]
- HAC(105): The front door (L4).
- PTW(45): 4 roller shutters, and various TV screens and radios around the apartment.
- EBO(100): In the living room.
- HAC(130): Computer (L1+100) in the secret room. Normally this room can be reached by interacting with the clock nearby, but sometimes it refuses to work. In that case it can be reached trough the vent in the bathroom.
- PRA: Praxis kit (7/20) in the living room, on top of a kitchen cabinet.
- TRI: Hidden under a cardboard box in the secret room.
Sub-section XP (Libuse Apartments): 1805
Dolni Kostelni Ulice[]
- PTW(10): Awnings above the pharmacy's entrance and across Robin Johannes' apartment.
Pharmacy and Nicholas Cipra's Apartment[]
- TRO(x1): The pharmacy vendor only sells HypoStims. Can be knocked out right away after you buy them. He will reappear during the 2nd visit, if kept alive.
- EXP(200): Gas-filled ventilation area accessible from the staircase. The room at the end contains 6 vials of Neuropozyne.
- HAC(130): Door (L5) to the apartment.
- EXP(200): Enter the apartment.
- PTW(5): 1 radio in the corner.
- HAC(230): Computer (L3+150) inside the apartment.
Abandoned Store[]
This shop is currently empty.
Robin Johannes' Apartment[]
- EXP(300): Enter the apartment on the 2nd floor south of the abandoned store.
- PTW(10): 1 TV and 1 radio.
- EXP(200): Ventilation shaft leading to a gas-filled room with a valve nearby, that connects to the Music Box basement. Don't open the door there yet — break through one of the weak walls instead.
- EXP(200): At the very south of the maintenance corridor, near the weak wall leading to the streets.
The Music Box[]
- HAC(105): Computer (L1+75) on the counter.
- HAC(80): Door (L3) to the right storage unit in the basement, connecting to Robin Johannes' Apartment.
Na Kopecku[]
- HAC(80): Door (L3) leading to the storeroom under the railway at the very south of the district.
Cern-Zlaty[]
- HAC(55): Door (L2) to the shop.
Michael Raine's Apartment[]
- EXP(300): Enter the apartment between the police station and Future-Past Antiky.
- PTW(10): 1 TV and 1 radio.
Kajicnikova Cesta[]
- HAC(55): Door (L2) to the left storage unit east of the pedestrian bridge.
- HAC(130): Door (L5) to the right storage unit east of the pedestrian bridge.
Future-Past Antiky[]
- HAC(130): Door (L5) to the closet in the basement. Can be re-locked by using the antique clock on the wall and unlocked with the code (3458) for a second time.
- § KEY(125): Entering the keycode (3458) at this point will award you a bunch of other KEY bonuses for all the PCs you interacted with up to this point, as a result of the password glitch. You can re-lock the door and re-enter the keycode as many times as you want, and receive new KEY bonuses if you happen to interact with new PCs after entering the code the first time. So if you unlock it now you won't lose out on anything, but you will have to re-enter the code again later if you don't want to miss out on the glitched XP. We unlock at the very end and include the XP in the Unfinished business section.
- EXP(300): Enter the closet.
Chikane's Place[]
- HAC(130): Door (L5) to the workshop.
- PTW(10): Radio upstairs and TV in the basement.
- HAC(55): Door (L2) to the basement.
- EXP(200): Enter the basement.
- HAC(80): Computer (L3) in the secret room. Push the button behind the painting near the bed to access.
- HAC(350): Safe (L5+220) in the secret room. Interact with the trophy to access.
- TRI: Inside the secret room.
- EXP(200): Enter the upstairs apartment outside.
- HAC(80): Safe (L3) inside upstairs apartment, behind the fridge.
- HAC(80): Door (L3) to the storage room on the landing pad.
- EXP(200): Enter landing pad storage room.
Sub-section XP (Davny District Streets): 8130
Davny Sewers[]
Sewers Lab[]
- EXP(200): Enter the gas-filled area to the southwest.
- PTW(10): 2 TV screens.
- BRE: After clearing out the gas, you can find the software below the TVs.
Samizdat Hideout[]
- EXP(200): Shortcut leading back to the ladder to the Music Box. Requires crawling through some pipes on Level 2.
- PTW(15): TV screens to the left of the hideout entrance.
- HAC(80): Door (L3) to the hideout.
- COM(750): Find Samizdat (SM05).
- § TRO(x3): The three Samizdat members inside the hideout. Knocking them out instantly completes SM05 but cuts off a side mission later (SM12), even if you do it after finishing all objectives in SM05.
- PTW(20): 3 TV screens and 1 radio inside the hideout.
The following hacks are easier to execute if you enter through the upper entrance and sneak in invisible while the staff is still occupied with the conversation. Or you can let them finish and then use an electrical breaker on Level 2 to force them to leave their PCs.
- HAC(55): Computer (L2).
- HAC(80): Computer (L3).
- HAC(430): Computer (L5+300).
After that, talk with K. Select Persuade option, then Beta twice, and accept his request.
- SOC(500): Persuade K.
- COM(1500): Keep Samizdat from exposing TF29 (SM05).
Head to Palisade Property Bank next.
Sub-section XP (Davny Sewers): 3840
SECTION SUMMARY (Davny District)
- Section XP: 11970
- Combat XP: 40
- TRO(x1): The pharmacy vendor. (3 Samizdat members are not included.)
- Human XP: 40 = 1*40
- Total XP: 12010
- Max XP: 96960
Palisade Property Bank[]
Some of the DTDs are rather difficult to set up here without breaking stealth. Your best bet for getting all 8 DTDs is to do the easy ones first, then complete SM05, get Ghost + Smooth Operator and then trigger an alarm at the Bank. This way the guards will clump together for quick and easy neutralizations. There is also a bot on Level 9 that can't be controlled with Robot Domination at any security hub, so the only way to fight it is to go loud. Triggering alarms and destroying bots and turrets in the Bank will not affect the future mission set here (M12: Th Heist) in any way — all it will do is make extra guards and robots appear in the Bank on the 2nd visit.
Palisade Garage[]
- VET(x3) / DTD(x1)
- HAC(105): Side-door (L4) to the garage.
- MCH(45): 2 cameras, 1 ECGS.
- CAR(40): 4 cars in the garage.
- HAC(30): Alarm panel (L1) on a column.
- HAC(30): Alarm panel (L1) next to the security booth's entrance.
- HAC(55): Computer (L2) in the security booth.
- HAC(55): Door (L2) to the right of the main entrance. The path behind it leads to the gas-filled sewer room, then to Executive Safes A.
- MCH(15): Fan control box in the gas-filled room.
- PTW(20): 4 giant fans activated by the control box. Smart Vision required.
Vault Shaft[]
The vaults found in this area require a corresponding keycard to be opened. If you followed this guide, you should already have the Tarvos and Picus keycards. The TYM keycard can be only acquired during the second visit to Prague.
- PTW(5): Fan on the left side of the garage.
- HAC(130): Door (L5) leading to the shaft.
- DRO(x1): Stationed at the top of the vault shaft. Deploys during alarms or when damaged.
- HAC(80): Laser grid teminal (L3) on Level 6. Use it to activate the lasers, so that you can hack them without triggering an alarm.
- MCH(150): 10 laser emiters scanning the shaft.
- HAC(30): Alarm panel (L1) on Level 5.
- HAC(55): Panel (L1+25) used to deploy the TYM vault.
- HAC(30): Panel (L1) used to deploy the Tarvos Security vault.
- HAC(55): Computer (L2) in the Tarvos vault.
- HAC(80): Safe (L3) in the Tarvos vault.
- HAC(30): Panel (L1) used to deploy the Picus vault.
- HAC(55): Computer (L2) in the Picus vault.
- HAC(80): Safe (L3) in the Picus vault.
- TRI: Inside the Picus vault.
Level 8[]
- VET(x6) / DTD(x3)
- TUR(x1): In front of the vault access elevator.
- BOT(x1): In the lobby, next to the vault access elevator. Only activates during alarms.
- HAC(30): Computer (L1) of the receptionist. Hack it before he finishes talking with the customer.
- MCH(150): 4 cameras, 2 laser grids, 4 ECGS.
- PTW(20): Various devices in the offices.
- MCH(15): Lockdown door before the stairs leading to the upper level. Only activates during alarms.
- EBO(100): Near the receptionist's desk, on a couch to the right.
- EBO(100): Behind the receptionist's desk, on a table between two seats.
- HAC(30): Door (L1) to the account manager's office. Contains a Level 3 Offices Access card.
- HAC(55): Safe (L2) in the account manager's office. Contains an Executive Locker B keycard.
- HAC(55): Door (L2) to the security supervisor's office.
- HAC(80): Laser grid terminal (L3) before the stairs leading to the upper level.
- HAC(155): Security hub (L2+100) in the upper security office.
- HAC(130): Laser grid terminal (L5) in front of the vault access elevator.
- HAC(30): Alarm panel (L1) above the stairs leading down.
Level 9[]
- VET(x7) / DTD(x3)
- MCH(165): 3 cameras, 2 laser grids, 5 ECGS, 1 elevator junction box.
- PTW(40): Various screens.
- HAC(30): Computer (L1) in the boardroom. Avoid knocking out Tomas Romanek here, as he can be persuaded for SOC(500) during M12 later.
- HAC(80): Computer (L3) in the IT services.
- HAC(30): Alarm panel (L1) next to the IT services' entrance.
- HAC(55): Laser grid terminal (L2) for the laser grid between the gallery and the elevator.
- HAC(55): Laser grid terminal (L2) for the laser grid between the gallery and the elevator (on the other side).
- HAC(30): Alarm panel (L1) on the gallery.
- HAC(55): Laser grid terminal (L2) for the laser grid between the gallery and employee lounge.
- BOT(x1): In the corridor between the employee lounge and the monitoring center. Isn't linked to any security hub and only activates during alarms.
- HAC(30): Door (L1) to the monitoring center.
- HAC(55): Security hub (L2) in the monitoring center.
- TUR(x1): On the stairs connecting the monitoring center with the vault access elevator.
- HAC(30): Computer (L1) in the CTO's office.
- HAC(30): Alarm panel (L1) in the CTO's office.
- § HAC(30): Door (L1) to the CEO's office. If you intend to use the password glitch, do not hack this keypad. Leave it to be unlocked with a code later until you've interacted with all the PCs in North Prague. We include it in the Unfinished business section. You can enter the office through a series of vents near the vault access elevator on Level 8.
CEO's Office[]
- HAC(30): Alarm panel (L1) to the left.
- HAC(30): Security hub (L1).
- HAC(30): Computer (L1) of Masaaki Oshiro.
- HAC(200): Computer (L3+120) of Ashani Talwar.
The secret room can be opened up by solving the logic puzzle. The solution is: raise, turn, raise, turn, turn, raise.
- EBO(100): On a shelf on the right.
- HAC(30): Safe (L1) on the right wall.
- COM(1500): Take the Flight 451 dossier from the safe and/or drinking water analysis results from Ashani Talwar's desk. Either will complete Dig up dirt in CEO's office (SM05).
- GHO(200)
- SMO(200)
- PRA: Praxis kit (8/20) inside the safe in the secret room.
- TRI: Also inside the safe.
- BRE: On a desk in the secret room.
Level 7[]
- VET(x4) / DTD(x2)
- BOT(x1): Next to the entrance of Executive Safes A. Can be activated from the lower security room.
- MCH(105): 3 cameras, 2 ECGS, 1 elevator junction box, 1 hackable vent leading to the elevator.
- HAC(80): Security hub (L3) inside the lower security room.
- HAC(30): Computer (L1) inside the lower security room. Becomes available once the guard stops using it.
- HAC(30): Alarm panel (L1) inside the lower security room.
- HAC(30): Alarm panel (L1) outside the executive services room, under a camera.
Executive Services Room[]
- HAC(30): Entrance door (L1).
- EBO(100): On a table.
- HAC(80): Computer (L3) in the middle.
- HAC(55): Safe (L2) hidden behind a painting unlocked by the switch under the desk. Contains an Executive Locker A keycard.
Executive Safes A[]
- TUR(x1): In front of the security station.
- BOT(x1): At the west wall, near the entrance.
- MCH(165): 2 ECGS, 9 laser emitters.
- HAC(55): Security hub (L2) inside the security station.
- HAC(55): Safe (L2) inside the security station.
- BRE: Inside the safe in security station.
- HAC(30): Door (L1) to server room A.
- HAC(100): Door (L2+45) to server room B.
- HAC(105): Safe A01 (L4). Contains 4 vials of Neuropozyne.
- HAC(105): Safe A04 (L4). Contains ammo for augmentations.
- HAC(105): Safe A08 (L4). Contains 3000 credits.
- HAC(130): Safe A09 (L5). Contains a pocket secretary.
All other safes are empty.
Executive Safes B[]
- TUR(x1): In front of the security station.
- BOT(x1): At the west wall, near the entrance.
- MCH(135): 8 laser emitters and 1 ECGS (Smart Vision required).
- HAC(30): Door (L1) to server room A. Must hacked without opening the door from the inside.
- HAC(55): Security hub (L2) inside the security station.
- HAC(55): Safe (L2) inside the security station.
- HAC(105): Safe B01 (L4). Contains a large amount of credits.
- HAC(130): Safe B04 (L5). Contains a Breach software and 2 multi-tools.
- BRE: Inside the safe B04.
- HAC(130): Safe B07 (L5). Contains a Praxis kit.
- PRA: Praxis kit (9/20) inside the safe B07.
All other safes are empty.
SECTION SUMMARY (Palisade Property Bank)
- Section XP: 7160
- Combat XP: 1835
- VET(x20)
- DTD(x9)
- Human XP: 1405 = 20*50 + 9*45
- TUR(x4)
- DRO(x1)
- BOT(x5)
- Robot XP: 430 = 4*30 + 1*35 + 5*55
- Total XP: 8995
- Max XP: 105955
SM05: Samizdat[]
Return to Davny sewers, and talk with K.
- COM(350): Return the dirt on Picus to K (SM05).
Now go to Autodily shop in Cista district, and climb to the roof.
- HAC(30): Transmitter panel (L1) on the roof.
- COM(750): Override the city's info hub (SM05).
- COM(750): SM05: Samizdat completed.
Section XP (SM05): 1880
Max XP: 107835
Unfinished business in Prague, first visit[]
Don't forget to complete POI: Neighborhood Watch in Zelen Apartment 23 in Prekazka District (XP already included).
Since there are no more stealth bonuses to worry about, you can sound alarms in each district, which will enable you to 1) fight police drones in North Prague, 2) fight bots in the Palisade Bank, and 3) hack the lockdown barriers in the streets all around Prague. You can also destroy other drones and turrets, if you haven't done it before. If you are going to engage in combat with Prague Police expect to earn a lot of Reset bonuses as well (could add up to a few hundred extra XP).
If you haven't already, you can neutralize all 5 main vendors in Prague for some Trooper-level XP: Kazatel, Tars, Costache, Mikael Mendel and the pharmacy vendor. You can do that by any non-lethal method — just make sure that their bodies show no red skull after you knock them out, which can happen sometimes after a melee takedown or a stun gun shot. As long as they stay alive, they should all reappear in Prague on later visits and will not refuse to deal with you, even if they saw you attacking and turned aggressive.
As a side note, if you kill certain shop owners around Prague (Svobody beer, coffee shop, etc.) on the 1st visit their shops will become locked on the 2nd visit, with yellow tape covering the doors and the police staying on guard. You then would be able to hack the doors to those doors for some XP. However, there is no real benefit in doing it since most of the shops will be locked during the 3rd visit anyway and will not be reset between 2nd and 3rd visit, meaning that you won't get any XP for hacking them again after doing it on the 2nd visit. There is one exception to this: the pharmacy shop vendor, as killing him is the only way the pharmacy's door ever gets locked. If kept alive pharmacy stays unlocked during the 3rd visit, even though he is no longer present there and even before you accept SM11, which requires visiting this location. Doing this is hardly worth it though, as the pharmacy's door offers a tiny HAC(30) bonus. Tech Noir is another shop that only gets locked (L2) after the vendor (Costache) is killed.
Triggering the password glitch[]
At this point you can finally unlock the 3 keypads we previously skipped and trigger the password glitch for the areas they are located in, provided that you've been following the advice from before. Once you unlock them you shall receive a whole torrent of various Access Granted, Free Admission, Open Sesame, Entering Without Breaking and Master Felonist bonuses (25/50/75/100/125 XP for devices of Level 1/2/3/4/5), assuming that you've interacted with every locked computer listed in the Prague, first visit section. Note that we are leaving TF29 HQ for later, as more PCs will become available there on subsequent visits to Prague.
- Cista district
- KEY(25): Door (L1) to the CEO's office on Level 9 in Palisade Property Bank (code: 0211). We will not be able to get its HAC(30) bonus at this point, but it will become available for hacking on the 2nd visit.
- GLI(2075): This provides extra XP for all the computers in North Prague except the TF29 HQ.
- Davny District
- KEY(125): Door (L5) in the basement of Future-Past Antiky (code: 3458). Since it's a re-lockable door, we don't lose anything by using the code. Doesn't award any glitched XP if unlocked after the keypad in Palisade, but included here for consistency. Triggering the glitch from here first will award only about half of the bonuses in North Prague, and you would have to do the glitch in Palisade to get the rest of them anyway.
- GLI(0): All the extra XP was provided by the keypad in Palisade.
- Prekazka District
- Travel to Ruzicka Station, then go to Prekazka District, so that the game "remembers" the 2 PCs you previously interacted with in Ruzicka. Restarting the game or traveling to North Prague will reset this.
- KEY(25): Door (L1) to Adam's apartment (code: any number). Has to be locked from the home computer first. Since it's a re-lockable door, we don't lose anything by using the code.
- GLI(1025): This provides extra XP for all the computers in Prekazka district and Ruzicka Station.
- KEY(175): For unlocking the 3 keypads with codes.
- GLI(3100): Total amount of XP earned from the password glitch on the first visit.
M6: Taking Care of Business[]
- GTD(1950): Meet with Doctor Auzenne (in TF29 HQ).
- GTD(1950): Meet Vega in the basement of the LIMB Clinic.
- GTD(500): Meet Miller at the Helipad.
- GTD(500): Fly to Golem City.
Section XP (Unfinished business, first visit): 8175
SECTION SUMMARY (Prague, first visit)
- Section XP: 104375
- Combat XP: 5020
- TRO(x56)
- VET(x20)
- DTD(x22)
- Human XP: 4230 = 56*40 + 20*50 + 22*45
- TUR(x9)
- DRO(x7)
- BOT(x5)
- Robot XP: 790 = 9*30 + 7*35 + 5*55
- Total XP: 109395
- Max XP: 116010
Utulek Complex[]
Main mission: M7: The Rucker Extraction
It seems that all of Utulek Complex / Golem City is treated as one area for the purposes of deciding the eligibility for Ghost and Smooth Operator bonuses. Failing a criteria for Ghost by leaving a body in a direct view of enemies or police in the first two sections can make it so that you won't earn Ghost further into the complex. There is one instance in particular that's easy to miss, since you don't get a notification for it on the radar: when you approach a place in Stedry Market where Otar contacts you for the first time about doing him a favor, you encounter two men fighting in front of the police storage. If you let the scene play out, one of them will knock another one out, and eventually a policeman patrolling the storage units will see the unconscious body and void all subsequent Ghost bonuses, even though he won't become alarmed. Make sure to interrupt the fight by bumping into them as soon as you get to the Market to prevent that.
Mir Flats[]
- § DRO(x2): 2 police drones patrolling the central area. If someone sees the bots getting destroyed it will void Ghost, so it's best to leave them alone.
- PTW(170): Various TV screens and radios across the area (32 total). Deployable windows give no XP.
- HAC(105): Computer (L1+75) in Martine Onziema's unit (#000420), above the starting area.
- HAC(80): Safe (L3) in the back of the same unit.
- EXP(100): Alcove above the same unit.
- HAC(85): Computer (L2+30) in a mini storage unit on Level 4, near the neon wing statue.
- EXP(200): Ivan Berk's unit (#000513) on Level 7.
- HAC(330): Ivan Berk's computer (L5+200) in the apartment.
Berk's apartment also contains the Penguin Prince statue. You will have to carry it to RVAC row in order to gain access to a Praxis kit.
To proceed with M7, go to Sokol's Apartment. There are two ways to handle the next step:
A) Simply go in and talk with Adela.
- § SOC(200): While talking with Adela, select Urge during the QTE.
B) Cause her to panic by any means (like by throwing a concussion grenade near the apartment) OR knock her out through the window from outside the apartment (tranquilizer rifle headshot works best). If she is panicked or unconscious when you enter you will receive an extra GTD objective.
- GTD(500): Go to Sokol's Apartment.
- GTD(500): Search Sokol's Apartment (by using the messenger on his computer).
- HAC(30): Computer (L1) in Sokol's apartment.
- EBO(100): In the apartment of Vilmanis Petrauskas (#000125) on Level 3.
- HAC(80): Computer (L2+50) in unit #000125.
- EXP(200): Gas-filled area behind the unit #000125, accessible via a weak wall. Gas can be turned off from above.
- HAC(130): Door (L5) to the police-controlled storage area.
- HAC(80): Door (L3) to the storage locker in the storage area.
- PRA: Praxis kit (10/20) inside a medical box in the storage locker.
- HAC(30): Door (L1) to the room with the circuit breaker in the storage area.
- EXP(200): Electrified area connecting to unit #000252.
- HAC(55): Computer (L2) in unit #000252.
Section XP (Mir Flats): 2975
The Narrows[]
- MCH(15): Laser grid at the entrance to the Narrows.
- GTD(1950): Find Tibor in the Narrows.
- GHO(200)
- SMO(200)
- HAC(55): Door (L2) to a storage unit near Tibor's cell.
- HAC(130): Weapon locker (L5) in the storage unit.
- MCH(15): Camera overlooking the stairs.
- PTW(10): TV and radio downstairs.
- GTD(1000): (Secondary) Neutralize the cops.
- GTD(1000): (Secondary) Free Dusan.
- GHO(200)
- SMO(200)
- MCH(30): 2 laser grids at the exit.
- HAC(210): Computer (L2+155) in the back of the restricted section, in unit #000513.
- EBO(100): In the same area, on a poker table.
- PTW(5): 1 radio in the same room.
Section XP (The Narrows): 5320
Stedry Market[]
As soon as you enter the Market make sure to interrupt the two men fighting in front of the police storage by bumping into them to avoid losing Ghost bonuses in the area. Also do not to pick up the supply crates of Neuropozyne from the storage rooms until you acquire the relevant objective.
- PTW(40): Various TV screens and radios across the area.
- HAC(55): Door (L2) to the first storage room in the starting corridor.
- HAC(30): Door (L1) to the second storage room in the starting corridor.
- HAC(80): Door (L3) to the third storage room in the starting corridor.
- EBO(100): Inside the nursery, on a table.
- HAC(130): Computer (L1+100) in the nursery.
- EBO(100): On the main marketplace, on a table between the Koreni and Cerstve Maso shops.
- EBO(100): On Level 5, in a row of small bunks to the east side, in the first bunk room.
- HAC(30): Door (L1) to unit #150420.
- HAC(155): Computer (L2+100) in unit #150420.
- TRO(x1): The bald police officer carrying Tibor's keycard. He occasionally moves to a quiet corner on Level 4 for a pee break.
- GTD(1000): (Secondary) Get Tibor's Key Card
- GHO(200)
- SMO(200)
- GTD(1000): (Secondary) Talk to Lubos.
- GHO(200)
- SMO(200)
- GTD(1000): (Secondary) Use Tibor's Card in the Elevator. Completes automatically if you have the card when you talk to Lubos.
- GHO(200)
- SMO(200)
- TRO(x1): Lubos (after the business with him is concluded). Can be taken out undetected if you throw a smoke grenade near him before neutralizing him, then hide the body in the elevator and take him to the floor above.
- EBO(100): On Level 3, near Entity's shop, on the table in the middle.
- VET(x2) / DTD(x1): Entity's bodyguards. To stay undetected, throw a smoke grenade into the shop, take out Entity, then the bodyguards as they try to search for the source of noise. As long as the body stays covered up by smoke, Ghost should be fine.
- HAC(80): Door (L3) to unit #150252.
- HAC(30): Computer (L1) in unit #150252.
- EBO(100): Next to the computer in unit #150252.
- TRI: Inside the first room of unit #150252.
- GTD(500): Talk to Louis Gallois. Ask him about ARC, and do not discuss Dvalis with him yet, or you will skip the next objective.
- GTD(1950): Retrieve Gallois' merchandise by picking up 2 boxes of Neuropozyne from the storage rooms.
- GHO(200)
- SMO(200)
- HAC(320): Door (L5+190) to the secret path to ARC territory. Hack this before giving Gallois the Neuropozyne.
- HAC(130): Weapon locker #1 (L5) in Gallois' shop.
- HAC(130): Weapon locker #2 (L5) in Gallois' shop.
- GTD(500): Bring the Neuropozyne to Gallois.
- GHO(200)
- SMO(200)
- GTD(1000): (Secondary) Get Rid of Gallois. Talk to him about Dvalis and agree to spare him. Then take him out non-lethally.
- TRO(x1) + VET(x2) / DTD(x1): Gallois and his bodyguards.
Section XP (Stedry Market): 10660
The Throat[]
- HAC(30): Door (L1) to the storage shed in the entrance corridor.
- MCH(60): 4 tripmines next to the storage shed.
- HAC(130): Terminal (L5) extending the walkway to the elevator.
- PTW(10): 2 ladders on the crane-elevators that only become hackable while the cranes move.
- GTD(1950): Enter ARC Territory.
Section XP (The Throat): 2180
RVAC Row[]
- VET(x26) / DTD(x13)
- EXP(200): Secret corridor behind a weak wall on Level 1.
Further down the corridor is a "throne" surrounded by penguins. Place the Penguin Prince here, and a wall panel containing a Praxis kit will open up. The objective Get Deeper into ARC will complete once you get close to the penguins.
- PRA: Praxis kit (11/20) awarded for the Penguin Prince.
- PTW(75): Various TV screens and radios around the area. Also, a deployable ladder near the entrance.
- HAC(260): Computer (L3+180) in unit #350314 on Level 2.
- MCH(60): 1 camera, 2 laser grids, and a panel controlling them around the security checkpoint on Level 2.
- EXP(200): Ventilation shaft near the laser grids that connects to the printing room on Level 2. Going all the way through it will complete Get Deeper into ARC.
- HAC(30): Door (L1) to the library.
- HAC(55): Door (L2) to the right storage unit in the gym.
- EXP(200): Enter the right storage unit.
- HAC(270): Door (L4+165) to the middle storage unit in the gym.
- HAC(445): Safe (L4+340) in the middle storage unit in the gym.
- § HAC(30): Door (L1) to the shower room. If you intend to use the password glitch, then this is the best choice for it, so don't hack it. Once you are done with Ridit Station, but before meeting Rucker, return here and unlock it (code: 0347). The whole Golem City is considered one area, so you should receive XP bonuses for all the PCs you've encountered after Prague. We include this later.
- MCH(45): 2 cameras and a laser grid around the dormitory.
- EBO(100): Inside the dormitory, on a table.
- HAC(80): Computer (L3) in the security room (unit #505314) on Level 4.
- HAC(300): Security hub (L3+220) in the same room.
- MCH(15): Camera above the security room.
- HAC(55): Computer (L2) in the room with the green lights on Level 6.
- BRE: Inside the server room on Level 6 (unit #550125).
- HAC(230): Door (L3+150) to the left storage unit on Level 7.
- EXP(200): Enter the left storage unit.
- HAC(220): Door (L3+140) to the right storage unit on Level 7.
- EXP(200): Enter the right storage unit.
- GTD(1950): Get Deeper into ARC. Traversing any of the 3 connection between RVAC Row and Ridit Station completes this objective.
- GHO(200)
- SMO(200)
Section XP (RVAC Row): 5590
Ridit Station[]
- VET(x25) / DTD(x12)
Level 1[]
- PTW(15): TV screens and radios around the area.
- MCH(105): 2 cameras, 1 normal laser grid and another grid with 4 separate emitters.
- HAC(80): Security hub (L3) in the security room.
- BRE: Inside the security room.
- PRA: Praxis kit (12/20) found in the room east of the security room, in a searchable container covered by a blue cloth.
Level 2[]
- MCH(105): 1 camera and 2 laser grids with 3 emitters each.
- EXP(200): Ventilation shaft connecting the printing room with the main hall.
- EBO(100): In an office with several unlocked PCs, on a table with some maps.
- EBO(100): In unit #400125, on a table.
- HAC(200): Computer (L3+120) in an office adjacent to unit #400125.
- HAC(55): Door (L2) to unit #400252.
- TUR(x1): In the corridor leading to the elevator.
- HAC(95): Door (L2+40) to the left storage unit near the turret.
- EXP(200): Enter the left storage unit.
- HAC(425): Door (L5+295) to the middle storage unit near the turret.
- EXP(300): Enter the middle storage unit.
- HAC(30): Door (L1) to the right storage unit near the turret.
- HAC(240): Marek Artim's computer (L4+135) in the office near the turret.
- HAC(280): Marchenko's computer (L5+150) in the office near the turret.
Level 5[]
- EXP(200): Gas-filled room on Level 4. Accessible through a window with a gas valve nearby.
Once you are finished with this area, perform the password glitch on the keypad in RVAC Row, if you want.
- KEY(25): Door (L1) to the shower room in RVAC Row (code: 0347). Awards the glitched password XP for all personal computers you've encountered in Golem City up to this point. We lose its HAC(30) bonus.
- GLI(1125)
Finally, take the elevator to Rucker.
- GTD(1950): Access the Elevator.
- GHO(200)
- SMO(200)
Section XP (Ridit Station): 6230
Ty Zahrada[]
Rucker's Office[]
- GTD(3150): Confront Talos Rucker.
- SOC(1000): Convince Rucker to leave peacefully (Alpha - Omega - Alpha - Omega).
- EBO(100): Near the entrance, on a table.
- EXP(200): Enter Rucker's saferoom to the left.
- EBO(100): In the saferoom, on the red sofa.
- HAC(130): Safe (L5) in the saferoom.
- PRA: Praxis kit (13/20) inside the safe.
- TRI: Also inside the safe.
- BRE: In the monitoring room.
The Gardens[]
- VET(x14) / DTD(x7)
- DRO(x3): One rests near Rucker's office, the other two are on Level 2, near the extraction point. Can be activated by the security hub or with splash damage from EMP bullets.
- HAC(105): Door (L4) to a storage shack under the office's exit.
- HAC(55): Door (L2) to the room in the middle of Level 5.
- HAC(230): Security hub (L3+150) in said room.
- EXP(200): On top and inside of the elevator cabin located in the western corner of Levels 2/3.
- EXP(200): Large empty elevator shaft in the northern part of the map.
- EXP(300): The top level of the elevator shaft. (Accessible by ladder or from the vent at the top of the greenhouse).
- PTW(5): Deployable ladder to the top of the shaft.
- MCH(15): Ladder control box. (Deploy the ladder directly before using this.)
- MCH(15): Camera in the locker room on Level 2.
- GTD(1000): Get to the extraction point.
- GTD(3150): Complete M7: The Rucker Extraction.
- SMO(200)
- § GHO(—): Ghost should also exist for this objective but it's never awarded due to an unavoidable bug involving the conversation with Rucker. Failing to earn it has nothing to do with playing stealthily. You can test this by running through the whole Golem City while staying in cloak 100% of the time, not interacting with enemies, earning all previous Ghost bonuses, and you would still not get it here. But if you skip Rucker using a clipping glitch in the elevator and go straight to the extraction, then you'd be able to receive it (though skipping him would be much less XP-efficient than playing normally).
Section XP (Ty Zahrada): 10155
SECTION SUMMARY (Utelek Complex)
- Section XP: 43110
- Combat XP: 5235
- TRO(x3)
- VET(x69)
- DTD(x34)
- Human XP: 5100 = 3*40 + 69*50 + 34*45
- TUR(x1)
- DRO(x3): 2 drones from Mir Flats not included.
- Robot XP: 135 = 1*30 + 3*35
- Total XP: 48345
- Max XP: 164355
Prague, second visit[]
The majority of XP bonuses listed in Prague, first visit that are not mission-dependent can also be acquired on the second (and third) visit if you've missed them. However, some devices get fully reset, allowing you to get XP from them again, while some only get re-locked, becoming hackable, but providing no XP; and there are a few completely new bonuses too.
As a forewarning, if you don't mind using glitches and interested in trying to complete both M11 and M12 without having to choose between them, then you would have to keep two things in mind. 1) Avoid triggering the document check cutscenes at Palisade Station or Monument Station, since they are one-time only and essential for the exploit to work. Don't go near the "Naturals" section when entering or exiting the metro and always travel using the aug-only train cars. And 2) make sure you have P.E.P.S. aug fully upgraded before starting M10: Facing the Enigma. Since it's an experimental aug, activating it while already at 350% overclock and going to 400% will lead to one of the other augs getting forcibly deactivated, so plan accordingly.
Revisited Areas, second visit[]
Prekazka District[]
- PRA: Tars sells a new Praxis kit (14/20). If his inventory does not refreshes you may have to travel back and forth between districts via metro to fix it.
- TRO(x1): Tars, again.
- TRO(x1): Dealer's bodyguard in Zelen apartment 22.
- DRO(x5)
- BOT(x1): A police sentry bot will patrol the ground floor in the Church of the MachineGod after M11 is either completed or failed.
- MCH(15): ECGS in Ruzicka Station.
- PTW(60): 12 TV screens in Ruzicka Station.
- CAR(50): Car alarms that can be disabled.
Cista District[]
- TRO(x3): Kazatel, Costache and Mikael Mendel can be encountered again, provided you didn't kill them on the 1st visit. Sometimes they may fail to appear at their specific locations — traveling via the metro between districts fixes this. You can knock them out once you no longer require their services on this visit, and if there are no red skulls showed on the bodies afterwards, they will be encountered on the 3rd visit. None of their bodyguards give XP.
- TRO(x8) / DTD(x4): 8 Dvali henchmen in the underground casino.
- DRO(x2): Police drones patrolling the streets. It is recommended to postpone hacking the drone patrolling the Monument Station, as for some reason it turns hostile after a remote hack, which can cause complications during M10: Facing the Enigma.
- BOT(x1): A police sentry bot will be stationed near Stanek's shop after M8 is completed.
- COM(350): POI: Good Cop, Bad Cop completed. Buy the info from Kazatel (near the Neon party), then go to Gerard Romero's apartment above the Praha Unneda Cleaning Supply shop.
- COM(350): POI: Rich Man, Poor Aug completed. Buy the info from Kazatel, then go to Oleg Drago's apartment above the Negozio di Magia shop.
- COM(350): POI: Mystery Stalker completed. Receive this mission in Milos Adawalla's apartment above Sobchak Security by examining the photos on the wall, then go to the roof of Rose's Garden to complete it. Both resolutions (attack/calm him down) provide the same XP.
- HAC(30): Alarm panel (L1) across the entrance of 33 Hlavni.
- HAC(30): Alarm panel (L1) on Hlavni, across Rose's Garden.
- HAC(30): Alarm panel (L1) near the Bolzano monument, at the entrance of Sobchak Security.
- HAC(30): Alarm panel (L1) on Hlavni, to the west of Monument Station.
- HAC(30): Alarm panel (L1) across Autodily's entrance.
- HAC(30): Alarm panel (L1) near the Market Square under the circular ad screen.
- HAC(30): Alarm panel (L1) on the east side of Market Square.
- CAR(110): Lockdown barriers controlled by the alarm panels. There are also 2 barriers in Davny and the 2 in Prekazka that don't reset.
- CAR(50): Car alarms that can be disabled.
- PTW(5): 1 radio on Hlavni street near the Bolzano monument.
- MCH(45): 3 tripmines near the entrance door of the mole people settlement in Cista sewers.
- HAC(55): Door (L2) to The Tubehouse.
- HAC(80): Door (L3) to Sobchak Security.
- HAC(30): Door (L1) to Hemingway's Fine Spirits.
- HAC(55): Door (L2) to Praha Unneda Cleaning Supply.
- HAC(55): Door (L2) to Autodily.
- HAC(80): Entrance door (L3) to the underground casino.
Davny District[]
- TRO(x1): The pharmacy vendor.
- DRO(x2)
- HAC(30): Door (L1) to Future-Past Antiky.
- HAC(—): The door (L2) to Cern-Zlaty shop gets re-locked but not reset, so it does not grant XP again.
- CAR(20): Car alarms that can be disabled.
TF29 HQ[]
Once again we will avoid using any codes in the HQ and postpone triggering the password glitch until the 3rd visit, to make sure we get all the PCs in one go.
- MCH(90): The turret and 5 cameras get reset.
- HAC(185): Security hub (L1+155) near the entrance.
- HAC(180): Server room door (L3+100).
- HAC(30): Computer (L1) of Meredith Yang. Available immediately.
- HAC(30): Computer (L1) of Robert Allen. Available immediately.
- HAC(30): Computer (L1) of Ava Cook. Available immediately.
- HAC(30): Computer (L1) of Pedro Meiffen. Available after M9.
- HAC(180): Hidden safe (L3+100) in Miller's office.
SECTION SUMMARY (Revisited Areas, second visit)
- Section XP: 2755
- Combat XP: 1165
- TRO(x14)
- DTD(x4)
- Human XP: 740 = 14*40 + 4*45
- DRO(x9)
- BOT(x2)
- Robot XP: 425 = 9*35 + 2*55
- Total XP: 3920
Red Light District[]
Map of Dávný and Red Light districts with locations marked.
- TRO(x6) / DTD(x3): Dvali thugs around the central square.
- PTW(5): TV in the Irish Stool's basement.
- HAC(30): Computer (L1) in Nada Birak's apartment.
- EBO(100): In Nada Birak's apartment, on a table in the back.
- TRI: In Nada Birak's apartment, hidden behind an archive box.
- HAC(105): Door (L4) leading to the Cigar Lounge's basement.
- SOC(500): Convince Nada Birak to sell you his wares (Persuade: Beta - Beta).
- HAC(105): Door (L4) to the backyard of Hotel Narikala.
- HAC(80): Door (L3) to the right storage unit in the backyard.
- HAC(130): Door (L5) in the sewer's gas-filled room.
- EXP(300): Rooftop passage near the Red Queen's terrace connecting to Dvali territory.
The Red Queen[]
- TRO(x2) / DTD(x1): The bartender and a thug downstairs.
- § TRO(x5) / DTD(x2): Masa Kadlek and her 4 bodyguards in the card room. Should be left unharmed until SM09: All in the Family is finished. Included below.
- § TRO(x5) / DTD(x2): There are 5 Dvali thugs originally residing in Dvali Safehouse who will be replaced with a group of another 7 Dvalis once you accept SM09. They are included in Dvali Safehouse section below.
- COM(350): POI: One Last Favor completed. Starts SM09: All in the Family.
- PTW(5): TV in the right guestroom.
- HAC(180): Safe (L2+125) in Masa Kadlek's office.
Dvali Safehouse (Apartments)[]
- TRO(x5) / DTD(x2): 5 Dvalis that reside here before you accept SM09.
- TRO(x8) / DTD(x4): 7 Dvalis plus Dominik that appear only after accepting SM09, replacing the first group.
- COM(350): Infiltrate the Dvali safehouse (SM09).
- GHO(200)
- SMO(200)
Courtyard[]
- MCH(45): 3 cameras.
- HAC(55): Alarm panel (L2) near the laundry room.
- HAC(80): Door (L3) to the left storage unit.
- HAC(80): Door (L3) to the right storage unit.
- COM(750): Find and incapacitate Dominik (SM09).
- GHO(200)
- SMO(200)
Apartment 84[]
- HAC(80): Computer (L3) in the living room.
- PTW(5): 1 TV in the living room.
Apartment 85[]
- HAC(155): Alarm panel (L2+100) next to the entrance.
- HAC(80): Entrance door (L3).
- HAC(80): Computer (L3) in the living room.
Apartment 86[]
- HAC(80): Computer (L3) in the living room.
- PTW(5): 1 radio.
Apartment 94[]
- HAC(80): Computer (L3) in the living room.
- PTW(10): 1 TV and 1 radio.
- EBO(100): Under the TV screen.
Apartment 95[]
- HAC(80): Entrance door (L3).
- HAC(80): Computer (L3) in the living room.
- EBO(100): Under the TV in the living room.
- PTW(15): 3 TV screens.
- COM(750): (Optional) Find the control room (SM09).
- GHO(200)
- SMO(200)
- HAC(55): Alarm panel (L2) in the control room.
- HAC(130): Security hub (L3+50) in the control room.
Apartment 96[]
- HAC(80): Computer (L3) in the living room.
- PTW(10): 1 TV and 1 radio.
Finishing All in the Family[]
- COM(1500): Store Dominik in the locker near the entrance to the sewers behind the apartments.
- GHO(200)
- SMO(200)
- COM(350): Secure the storage locker.
- GHO(200)
- SMO(200)
- COM(750): SM09: All in the Family completed.
- TRO(x5) / DTD(x2): Masa Kadlek and her 4 men in The Red Queen. Knocking out or killing Kadlek (even after the business with her is concluded) would anger Otar and lead to him killing Vaclav Koeller on the 3rd visit.
Dvali Theater[]
Outside[]
- TRO(x5) / DTD(x2)
- EXP(300): Angelfire's apartment on the south side.
- PTW(15): 3 roller shutters protecting the apartment.
- MCH(15): Camera on the theater's roof.
Main Area[]
If you break the weak wall in the ventilation area where it connects to the streets in the southeast during this visit, the hole will be protected with tripmines on the 3rd visit.
- TRO(x12) / DTD(x6)
- MCH(240): 8 cameras, 4 laser grids and 4 tripmines at the entrance.
- PTW(40): Various TV screens and radios around the building.
- HAC(80): Computer (L3) in the gift shop.
- HAC(210): Security hub (L3+130) in the ticket booth of the lobby.
- HAC(210): Security hub (L3+130) in the projector booth.
- EXP(400): Climb to the rafters.
- TRI: On the rafters, above the backstage in the north-east corner.
- HAC(55): Laser grid terminal (L2) in the backstage.
- HAC(30): Door (L1) to a small dressing room on Level 2.
- HAC(180): Computer #1 (L3+100) in the main dressing room on Level 1.
- HAC(80): Computer #2 (L3) in the main dressing room on Level 1.
Manager's Office[]
- VET(x1): Radich Nikoladze, in his office. If neutralized, even non-lethally, he will not appear in the future mission M14: Hunting Down the Final Clues, presumably killed off-screen by Otar. In that case, Otar becomes the Dvali boss and helps Jensen out during M14, provided that all other conditions are met. Since we have already angered Otar by knocking out Masa Kadlek it won't change M14 in any meaningful way, as all Dvalis will remain hostile. The main benefit of taking out Radich is getting an extra GTD objective to search his PC in M14.
- HAC(80): Alarm panel (L3).
- EBO(100): On one of the couches next to Radich.
- HAC(330): Hidden safe (L5+200) in the back of the main room.
- PRA: Praxis kit (15/20) inside Radich's safe.
- TRI: Also inside the hidden safe.
- HAC(105): Door (L4) to the backroom (covered by a crate).
- HAC(205): Security hub (L3+125) in the backroom.
- BRE: Right next to the security hub.
SECTION SUMMARY (Red Light District)
- Section XP: 12500
- Combat XP: 2670
- TRO(x43)
- VET(x1)
- DTD(x20)
- Human XP: 2670 = 43*40 + 1*50 + 20*45
- Total XP: 15170
- Max XP: 183445
SM03: The Mystery Augs, Part II[]
- COM(750): Investigate the scientist’s apartment.
- HAC(55): Orlov's computer (L2) on the table.
Pick up the Tai Yong Medical vault keycard on Orlov's body.
Section XP (SM03): 805
SM06: 01011000[]
Accept the POI: The Glitch from any flickering ad panel.
- COM(350): POI: The Glitch completed.
- TRO(x3) / DTD(x1): 3 mercenaries in the abandoned tourism center.
- HAC(130): Door (L5) to the storage room.
- COM(750): Retrieve Helle's Package.
- GHO(200)
Once inside Future-Past Antiky, unlock the door to the basement first, then speak to the clerk. There are multiple ways to handle this encounter, including letting the "clerk" go unharmed (see the walkthrough page for details). The best option XP-wise is talking to him, them knocking him out after escaping from the trap in the basement.
- HAC(—): Door (L1) to Future-Past Antiky. If you didn't hack it before getting the objective you'll find it unlocked. (Already included above.)
- HAC(30): Door (L1) to Future-Past Antiky's basement.
- SOC(50): During the QTE in the conversation upstairs ask about the price, then select Negotiate, or about the customer, then Warn.
- SOC(200): Select Intimidate during the QTE in the conversation downstairs.
- MCH(165): 11 tripmines in the basement.
- COM(750): Find a Reader at Future-Past Antiky.
- TRO(x1): Walker. Will reappear later, if not killed here.
- COM(350): Access the Data at the Safe House.
- TRO(x4) / DTD(x2): Walker and 3 mercenaries interrupting the talk with Helle/Eliza.
- COM(750): SM06: 01011000 completed.
SECTION SUMMARY (SM06)
- Section XP: 3725
- Combat XP: 455
- TRO(x8)
- DTD(x3)
- Human XP: 455 = 8*40 + 3*45
- Total XP: 4180
SM07: Fade to Black[]
- COM(350): Search Vince Black's office.
- COM(350): Meet Vince Black's informant. When given the choice, press her for information.
- TRO(x2) / DTD(x1): At this point you can take out the two Dvalis that's been following Dobromila (do it as they walk down the stairs) or deal with them later in Prekazka.
- COM(350): Go to the meeting spot.
- COM(350): Wait for Dobromila.
- COM(350): Get info from Dobromila.
- COM(350): Read the map.
- COM(350): Investigate Vlasta's locker.
- SOC(500): Successfully negotiate with Vlasta (Persuade: Omega - Omega).
Talk to Olivie, and she will give you a Praxis kit. Vlasta and his men can be disposed of afterwards.
- PRA: Praxis kit that Olivie gifts you (16/20).
- TRO(x5) / DTD(x2): Vlasta and 4 of his men.
- CAR(10): Vlasta's van under the archway leading to the marketplace.
- COM(350): Find Vince Black's apartment.
- COM(750): SM07: Fade to Black completed.
SECTION SUMMARY (SM07)
- Section XP: 4060
- Combat XP: 415
- TRO(x7)
- DTD(x3)
- Human XP: 415 = 7*40 + 3*45
- Total XP: 4475
M8: Tracking Down the Real Terrorists[]
- GTD(500): Meet Smiley in his Office.
There are two ways to complete the next objective:
A) Talk with a homeless man, Nosey, near Stanek's shop and use Social Enhancer to convince him to help.
- § SOC(500): Convince Nosey to give you Stanek's location with persuation (Alpha).
- § GTD(500): Find Nomad Stanek.
B) Attempt to persuade Nosey with Social Enhancer, but fail on purpose and then go to Stanek's place (Libuse apartment #96).
- SOC(250): Fail to persuade Nosey by using Omega option.
- TRO(x2) / DTD(x1): 2 Dvali thugs at Libuse Apartments' entrance.
- GTD(500): Find Nomad Stanek. (Completes when entering his apartment.)
- GTD(1950): Search Stanek’s Apartment.
- GTD(3150): Escape the Dvali Deathtrap.
- GTD(1950): Confront Stanek.
- § BOT(x1): A police sentry bot will be stationed near Stanek's shop after the mission is completed. (Already included.)
SECTION SUMMARY (M8)
- Section XP: 8300
- Combat XP: 125
- TRO(x2)
- DTD(x1)
- Human XP: 125 = 2*40 + 1*45
- Total XP: 8425
M9: Checking Out the Men in Charge[]
None of the hackable virtual objects other than the ladder give XP.
- GTD(1950): Search Miller's Apartment.
- GTD(500): Meet Vega Near TF29.
- GTD(1950): Use the NSN Device.
- PTW(5): Ladder in the back of the virtual area.
- TRI: Below the room with the moving lasers.
- GTD(5100): Retrieve Data from 5 Servers.
Section XP (M9): 9505
M10: Facing the Enigma[]
- COM(350): POI: Dead Drop completed.
If you wish to to escape through the sewers and destroy the bots there, then you will have to make some preparations. Normally what happens when you go near the sewer exit after meeting with Janus is that the drones become alarmed seemingly for no reason, even if you are cloaked, and when you complete the mission afterwards you do not get Ghost. The reason for that is the 2 drones in the sewers start shooting civilians (whom they consider enemies) when you approach them, and when the drones see the bodies of the civilians they themselves killed, it voids Ghost. To prevent this go to the sewers before meeting with Janus, knock out the 4 civilians, hide the bodies, and proceed to the meeting. With no civilians present, you'll be able to hack and destroy all 5 bots without any of them going on alert. If you intend to do both M11 and M12 using a glitch, you'd have to escape either through the elevator shaft or the sewer exit behind Tech Noir (see below for the explanation).
- GTD(500): Meet with Janus.
- DRO(x5): 3 appear in the middle of the tourist center, 2 in the nearby sewers. Disappear after this mission is finished.
- PTW(45): 9 TV screens in the room where you meet with Janus.
- MCH(150): 10 tripmines in the elevator shaft.
- GTD(500): Escape the Drones.
- GHO(200)
SECTION SUMMARY (M10)
- Section XP: 1745
- Combat XP: 175
- DRO(x5)
- Robot XP: 175 = 5*35
- Total XP: 1920
- Max XP: 212755
M11: Confronting the Bomb-Maker and M12: The Heist[]
After you finish M10, you are presented with a choice between doing either M11: Confronting the Bomb-Maker or M12: The Heist. If you commit to one of the missions, at some point another mission will fail. While in story terms the choice is presented as necessary because both options are time-sensitive, there is no actual time limit in the game for either of them. What triggers the failure condition in either one of the missions is crossing the invisible boundaries in the area of the other one. M11 will fail in the Palisade Bank once you get too close to a keycard encoder on Level 9, and in the Church of the MachineGod M12 will fail when you reach Level 3 or 4. So, while you can complete the first few objectives in each, you're eventually expected to choose one. Since M12 is more lucrative in terms of completion bonuses, and unlike M11, its exclusive mission area doesn't become available later if another mission is completed, it is the obvious choice.
However, there is a way to do BOTH missions and get all possible XP rewards and story items — but it requires exploiting some of the game's mechanics to avoid failing each mission and clearly not the intended option. If you don't want to deal with glitches, then you can skip to the next section. The preferred choice for a normal playthrough is M12, but we also include a full breakdown of M11.
1) The first version of the exploit goes for M11 first and then M12. It relies on going out of bounds to avoid the cancellation triggers for M12 by using Icarus Dash to phase through walls. This version allows to play through M12 normally, but requires to skip some parts of M11 (you'll miss one L1 hack and getting DTDs on the church guardians would be harder after they are arrested). It will also leave M12 permanently marked as "In progress" in the journal and will never let it complete or fail. Here is a video example for version #1. The general idea is:
- Get the call from Nomad Stanek after finishing M10.
- Instead of traveling to Prekazka right away by going down the stairs and taking the train, take the long way around through the North Prague.
- First go to the Red Light district, then to Dvali theater and to Radich Nikoladze's office. Open the door in the security hub and jump down to the sewers (Icarus Landing is required). This will lead to a long corridor that connects to Pilgirm Station. Enter the station, and go to Prekazka district to do M11. The reason for taking the long route is to avoid walking down the stairs leading to the trains at any of the metro stations — which is what triggers the acquisition of M12 and allows it to be marked as failed by one of the cancellation triggers in the Church of the MachineGod. The triggers are either getting to Level 3 or 4 (even if you don't have the mission yet), or finishing the conversation with Allison (but only if M12 was accepted). Since M12 was never added to the journal it shouldn't fail after we talk with Allison.
- Once in the Church of the MachineGod, go to the backyard and climb the giant stack of yellow equipment. When near the top, use charged Icarus Dash to climb to the edge of the roof, which lets you move out of bounds. Climb towards Allison's room on Level 4 and Icarus Dash inside the apartment. Open the door to the apartment from inside to trigger the conversation. This bypasses all M12 failure triggers in the Church.
- Once Allison is dealt with, go to North Prague, walk out of any metro station to the streets, get the call from Vega, accept M12: The Heist and proceed to do it as normal.
2) The second version of the exploit goes for M12, and then for M11. It uses P.E.P.S. to glitch out the infolink call from Stanek with an unskippable cutscene. It requires playing through a slightly glitched M12, but it allows to get 100% rewards in either mission without skipping anything, and it will let M12 fail and remove it from the journal after completing M11.
It's faster but more complicated to execute than version #1 and may require several attempts. If you're going for this glitch, it is recommended to complete M12 normally first, to figure out where to go and what to do, then reload and do the glitched version, as the exploit will mute most of the mission's dialogue and will not let the objectives update properly. Here is a video example for version #2 showing the setup for the glitch and both missions being completed. As was mentioned before, there are two initial requirements for it to work: 1) you avoided triggering the document check cutscene at Palisade or Monument Station, and 2) you have P.E.P.S. aug with Precision Diode upgrade. You can perform the exploit at either metro station, although you are less likely to alert other policemen at Palisade Station.
The steps for the exploit are:
- Get the call from Nomad Stanek after finishing M10.
- While the call is still playing, run to the metro, charge P.E.P.S. and approach the police officer near the "naturals" entrance.
- Fire P.E.P.S. from about 4-5 meters away from the officer and then move forward to trigger the document check cutscene.
- The cutscene should start moments before the blast from P.E.P.S. knocks out the officer, and once it does it should instantly end the cutscene.
- Because of how the dialogue is programmed, Stanek's call gets paused as soon as the cutscene starts, but since the cutscene never finishes properly, the call never gets resumed either. So it gets stuck on "pause".
- If Stanek's call doesn't get finished, M11 never starts, and as a result you can't fail it since it never gets added to your journal.
- Now move down to the metro. Walking near the stairs to the trains at any station triggers M12 and spawns all the objects required for the mission (the car in the garage and the keycard encoders in the Bank). You don't have to listen to the call from Vega to formally accept the mission. As long as you do all the required steps, the mission can be completed. Of course, you have to already know what those steps are.
- Proceed to the Bank and finish M12.
- Once you enter the vault and watch the cutscene, the call form Stanek will resume, and M11 will be added to your journal.
- Besides some weirdness involving the objective Meet Miller at the Helipad which will be marked active for M11 (even though it should be in M12's part of the journal), M12 will also be marked as failed after you complete M11, even after you finished all its objectives. Nevertheless, you should end up with the antidote, collectibles and all possible XP rewards from M12.
- Proceed to finish M11.
We will follow the glitched version #2 (so M12 first, then M11) and include the full XP for both in the total count.
Palisade Property Bank, second visit[]
Main mission: M12: The Heist
If you cleared out the Bank during the first visit the majority of devices and robots will remain in the state you left them. There are a couple of new turrets added to the lobby, two of the bots are replaced, and some of the door keypads and laser grids get reset, allowing to earn the XP for them again. Also, due to what's likely a bug (that has no relation to the M11+M12 exploit we use and caused by hacking the doors on the 1st visit), most doors will get re-locked every time you go down to the metro and return to the Bank. There isn't much use to this though, since hacking them again won't offer any rewards if you already did it once. You can, however, use codes to unlock the keypads that have them.
You may want to postpone dealing with the guards and bots until after you finish The Heist, as there are several GHO/SMO bonuses that would be lost if you get spotted in the Bank, even if that happens before you accept the mission here.
Garage[]
- VET(x3) / DTD(x1): 2 patrolling the garage, 1 in the security booth.
- VET(x1) / DTD(x1): A guard spawns at the start of M12 at the entrance of the garage, then walks to a secluded corner of Market Square. Can be paired with one of the guards from the garage for a DTD.
- GTD(500): Get to the Bank.
- KEY(100): Entrance door (L4) to the garage. Re-locked upon starting M12, but does not grant hacking XP if it was already hacked on the 1st visit. Can be opened with a code (5136). Using a code here or on any other listed device in Palisade will trigger the password glitch for most of North Prague area. If you haven't done it before, you will receive 2000+ XP of various KEY bonuses for most of the locked PCs you interacted with in North Prague up to this point. If you've already done it on first visit you will only receieve the glitched XP for new PCs from the second visit (we include it at the end of the Prague, second visit section). If you are using the document check glitch or if you got to the Bank too fast, the door will become locked the second time you return here from the metro.
- GTD(500): Retrieve Vega's Package.
- GHO(200)
- SMO(200)
Level 8[]
- ELI(1) + VET(9) / DTD(x5): 1 elite Exo-suit guard outside (only if you knocked out/killed the guard outside on the 1st visit) and 9 veteran guards in the main area.
- § ELI(2): If you triggered an alarm in the Bank during the 1st visit, then two extra Exo-suit guards should spawn here (although unsuccessfully). When Smart Vision is used, they appear to be standing on top of the Executive Safes A, near the wall of the account manager's office on Level 8, but out of bounds. They will react to Adam's presence, and will try to engage him through walls, but there doesn't seem to be a way to reach them normally. There are two ways to neutralize them. 1) Detonate explosives near the ceiling of the Executive Safes. Thanks to Piece by Piece bonuses, it is possible to score 200-300+ XP for both of them this way. 2) Go to the stairs from Level 8 to 9, go into cover near the first corner so that camera switches to 3rd person, charge P.E.P.S. and discharge it towards the Exo-suits. Because of how 3rd person camera works the P.E.P.S. blast should be able to penetrate the wall and knock them out for Elite (30) + Merciful Soul (20) — but there is also a chance it would kill them outright. Since both methods are rather unpredictable, we do not include this XP in the total count.
- TUR(x2): 2 new turrets.
- BOT(x1): A replacement bot.
- SOC(500): Ask for the account manager at the reception, try to open a new account with him, then persuade him that you're a security supervisor (Persuade: Alpha - Omega).
- KEY(25): Door (L1) to the account manager's office (code: 0831).
- HAC(80): Account manager's computer (L3).
- MCH(15): Laser grid blocking the stairs to the upper floor.
- HAC(80): Laser grid terminal (L3).
- HAC(80): Door (L3) to the security office.
- HAC(230): Security hub (L3+150) in the security office.
- MCH(15): EMP tripmine behind the security supervisor's office.
Level 7[]
- VET(x2) / DTD(x1)
- MCH(30): 2 EMP tripmines around the elevator shaft.
- HAC(80): Door (L3) to the security booth.
- KEY(25): Door (L1) to the executive services room (code: 9593).
Level 9[]
- VET(x5) / DTD(x2)
- BOT(x1): A new replacement bot.
- HAC(30): Door (L1) to the IT services.
- KEY(25): Door (L1) to the IT services (code: 1969). Since all door keypads in the Bank re-lock every time you enter the metro, you can also use the code on this keypad after hacking it by returning to the Bank later.
- HAC(80): Computer (L3) in the IT services.
- MCH(15): Laser grid before the employee lounge.
- HAC(30) / § KEY(25): Door (L1) to the CEO's office (code: 0211). We already unlocked it with the code to trigger the password glitch on the 1st visit, so we hack it this time.
- GTD(3150): Access a Restricted Terminal. Can be done in the CEO's office or in the monitoring room.
- GHO(200)
- SMO(200)
- GTD(3150): Use the Corporate Vault Elevator.
- GHO(200)
- SMO(200)
Corporate Vaults[]
- VET(x4) / DTD(x2)
- TUR(x1): In front of the laser corridor.
- TUR(x1): Above the security office. Activate it by plugging a biocell into the receptacle in the false ceiling.
- BOT(x2): In the laser hallway.
- MCH(45): 3 cameras.
- HAC(80): Door (L3) before the stairs.
- HAC(30): Alarm panel (L1) in the resting room.
- HAC(30): Alarm panel (L1) on the bridge.
- HAC(30): Alarm panel (L1) in the security office.
- HAC(55): Security hub (L2) in the server room.
- HAC(30): Security hub (L1) in the false ceiling.
- MCH(270): 18 laser emitters in the laser hallway.
- HAC(130): Vent cover (L5) in the vents, above the hallway.
- HAC(80): Laser grid terminal (L3) at the end of the hallway.
- GTD(3150): Enter the VersaLife Vault.
- GHO(200)
- SMO(200)
- HAC(55): Computer (L2) in the Versalife vault.
- EBO(100): Next to said computer.
- HAC(130): Safe (L1+100) in the Versalife vault. Contains the Orchid neutralization enzyme and 5 vials of Neuropozyne.
Make your exit through the vault shaft by bringing the Versalife vault up and opening the large door above. This also allows for a convenient visit to the Tai Yong Medical vault.
- HAC(55): Computer (L2) in the TYM vault.
- HAC(80): Safe (L3) in the TYM vault.
- PRA: Praxis kit inside the TYM vault's safe (17/20).
- GTD(500): Escape from the Bank.
- GHO(200)
- SMO(200)
SECTION SUMMARY (M12)
- Section XP: 15590
- Combat XP: 2140
- VET(x24)
- ELI(x1): 2 elite Exo-suit guards from Level 8 not included
- DTD(x12)
- Human XP: 1800 = 24*50 + 1*60 + 12*45
- TUR(x4)
- BOT(x4)
- Robot XP: 340 = 4*30 + 4*55
- Total XP: 17730
- Max XP: 230485
Church of the MachineGod[]
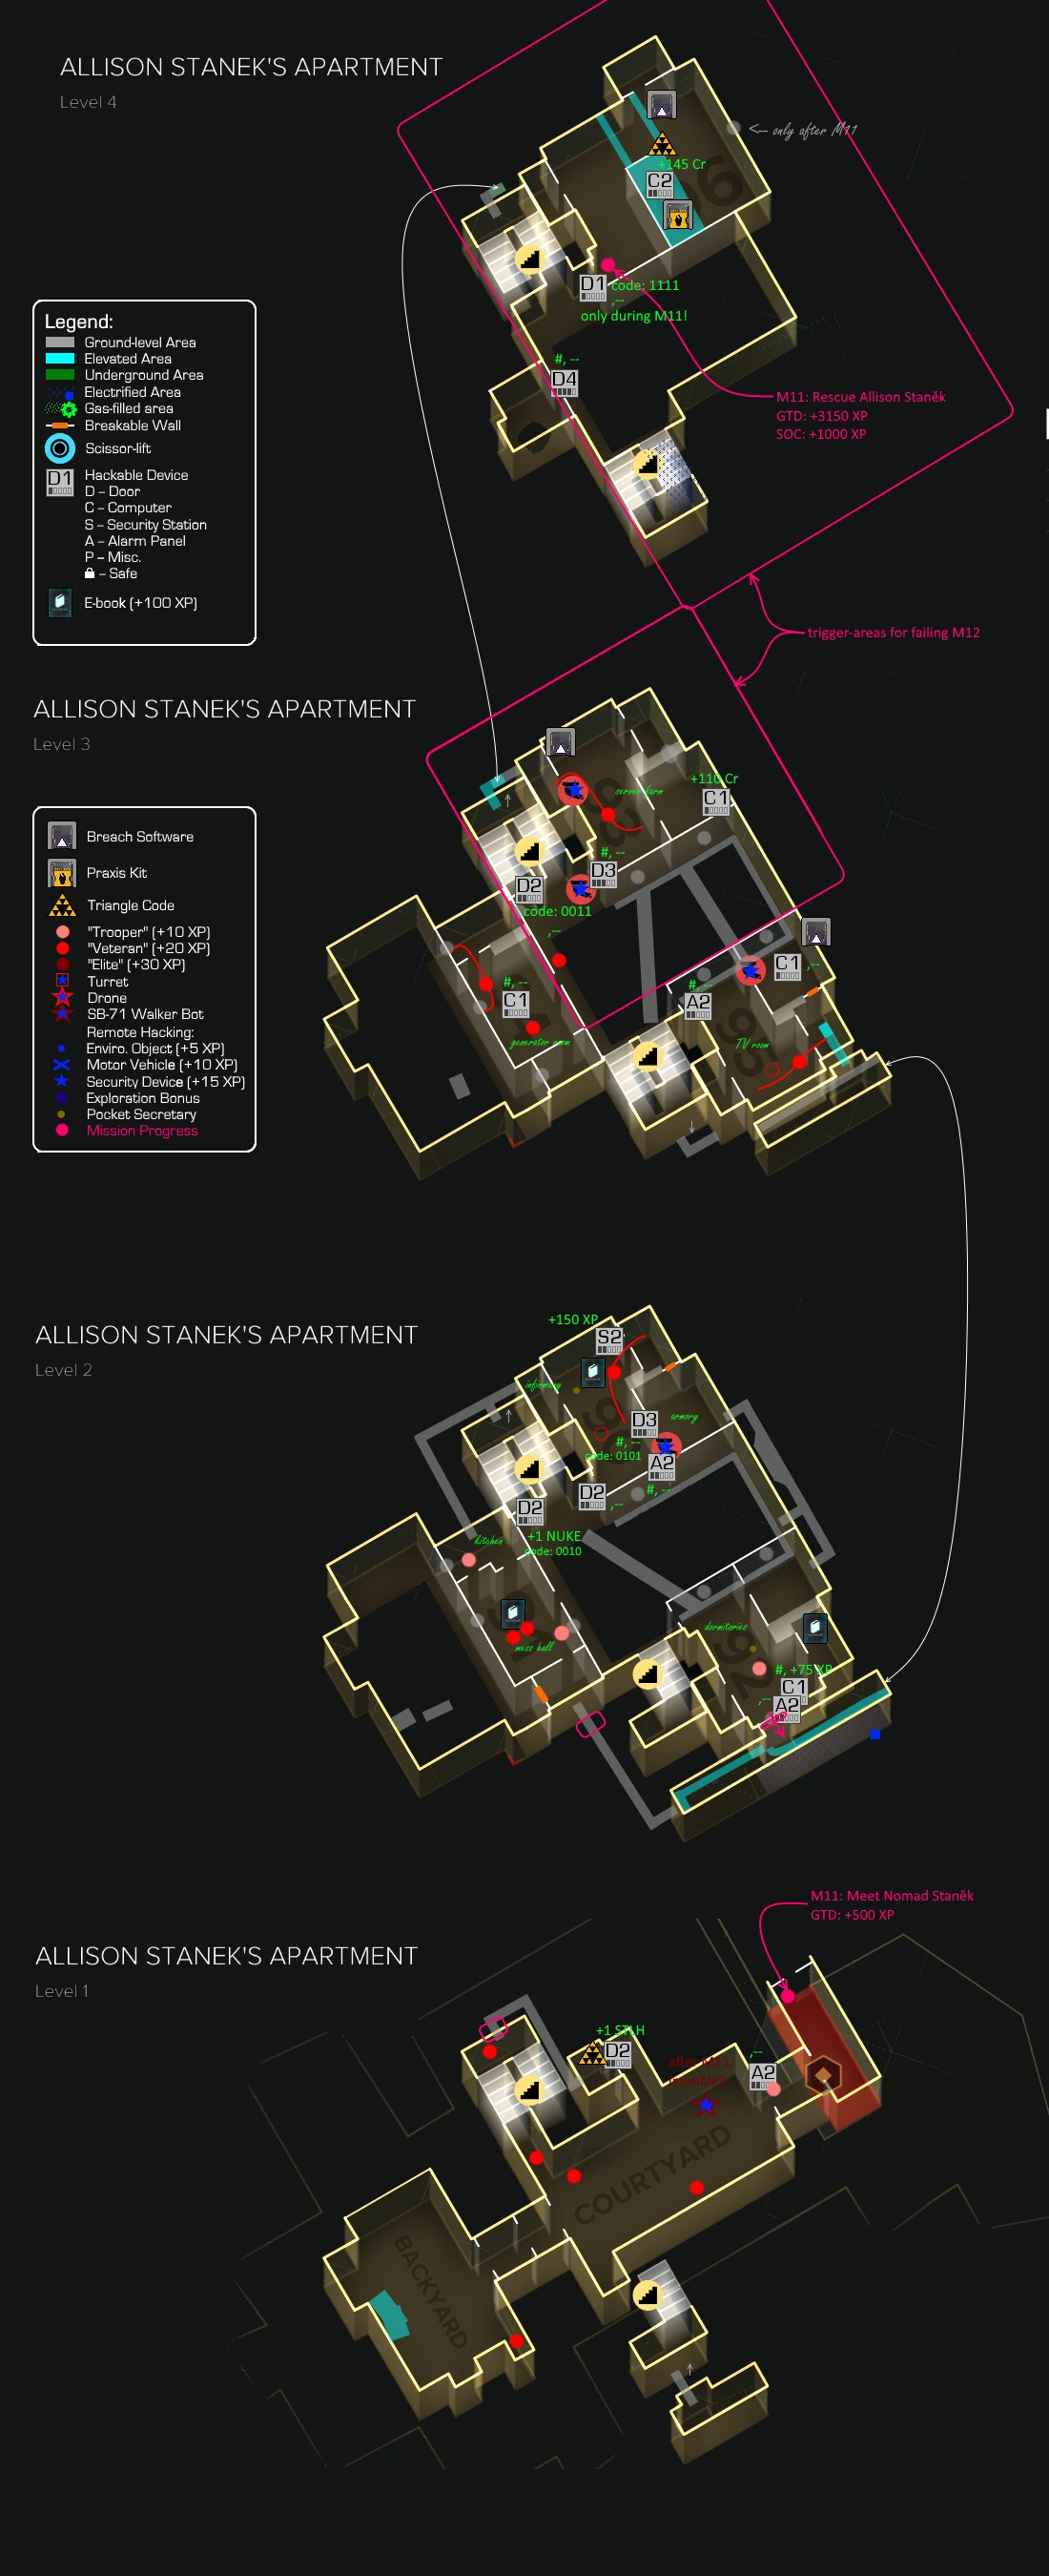

Annotated map of the Church of the MachineGod. The areas that make M12 fail are marked by magenta frames.
Main mission: M11: Confronting the Bomb-Maker
Bonuses marked with "-" cannot be earned without failing M12 in normal play. However, you can explore most of the Church on Levels 1-3 and still go do M12 afterwards (see the map for the exact boundaries), and you can also come back later to collect the rest. It is, of course, possible to earn every reward listed here using the aforementioned exploit.
- GTD(500): Meet Nomad Stanek. Becomes unavailable after M12.
- - TRO(x5) + VET(x11) / DTD(x8): All the enemies here will disappear after you finish M12 the normal way, so deal with them beforehand if you are not using the glitch. You may have to enter combat to get the guardians from the upper floors come down to the ground floor. Considering that there are no GHO/SMO here and since, unlike Rucker, Allison Stanek does not react to Adam being aggressive it shouldn't affect the mission in any way. The veteran church guardian in apartment 93 will refuse to leave the room even during combat, but can be drawn close to a window and then headshot from a tranquilizer rifle for the standard 50 XP. (Only applies to normal play if you're trying to collect the rewards that don't fail M12.)
Ground Floor and Atrium[]
- HAC(55): Alarm panel (L2) at the entrance.
- HAC(55): Door (L2) to a small hidden storage room on the right.
- TRI: Inside the hidden storage.
- HAC(55): Door (L2) to the stairs on Level 2.
- HAC(55): Door (L2) to the stairs on Level 3.
- HAC(105): Door (L4) to the attic above #94.
- § BOT(x1): A police sentry bot that appears after M11 is either completed or failed. (Already included.)
Apartment 90[]
- HAC(55): Entrance door (L2).
- HAC(80): Door (L3) to the armory.
- HAC(55): Alarm panel (L2) next to the armory door.
- MCH(15): Camera above the armory door.
- EBO(100): On the table in the back.
- HAC(205): Security hub (L2+150) in the back.
Apartment 91[]
- EBO(100): On a table in the middle.
Apartment 92[]
- HAC(105): Computer (L1+75) on a bed.
- HAC(55): Alarm panel (L2) next to the hidden vent.
- EBO(100): In the bathroom, on the floor.
Apartment 93[]
- HAC(80): Entrance door (L3).
- MCH(30): 2 cameras.
- HAC(30): Computer (L1) in the back room.
- BRE: Inside the "server fort," in the back of the main room.
Apartment 94[]
- HAC(30): Computer (L1) in the middle.
Apartment 95[]
- HAC(55): Alarm panel (L2) next to the entrance.
- MCH(15): Camera in the office.
- HAC(30): Computer (L1) in the office.
- BRE: Inside the hidden safe behind the painting.
Apartment 96[]
- - HAC(30): Entrance door (L1). Becomes unlocked after completing M12.
- - SOC(1000): Convince Allison to help you (Alpha - Omega - Alpha - Beta).
- - GTD(3150): Rescue Allison Stanek. Completes M11: Confronting the Bomb-Maker.
- HAC(55): Allison's computer (L2).
- BRE: On a one of the shelves.
- TRI: Hidden in the rafters.
- PRA: Praxis kit (18/20) inside a medical container in the rafters.
SECTION SUMMARY (M11)
- Section XP: 6200 (If you want to do M12 instead, you'll miss out on at least 4180 XP during a non-glitched normal playthrough and probably some combat XP for DTDs. We include the full XP from M11 in total count.)
- Combat XP: 1110
- TRO(x5)
- VET(x11)
- DTD(x8)
- Human XP: 1110 = 5*40 + 11*50 + 8*45
- Total XP: 7310
- Max XP: 237795
SM08: The Fix[]
- COM(350): Go See Koller.
- COM(750): SM08: The Fix completed.
Section XP (SM08): 1100
SM10: The Harvester[]
Wait until you've completed M11/M12 to receive the POI: Too Close To Home after a call from Aria Argento. If you get the same call a second time, wait for it to play out fully, then go complete the POI, otherwise you will end up with a second instance of this POI stuck in your journal. Then talk to Daria to start SM10.
- COM(350): POI: Too Close To Home completed.
- COM(350): Talk to Montag.
- COM(250): (Optional) Investigate the scene.
- COM(750): (Optional) Exhaust all evidence (7/7). Talk to Montag again about Modus Operandi until he mentions Smolinski.
Talk to the nearby NPC called Scandalmonger to receive the objectives pertaining to Radko Perry.
- COM(250): (Optional) Talk to Radko Perry.
- TRO(x1): Perry's bodyguard in his office.
- COM(250): (Optional) Find compelling evidence (by using the messenger on Perry's computer and bluffing during the conversation).
- COM(750): (Optional) Examine Smolinski's notes.
- GHO(200)
- SMO(200)
- COM(750): (Optional) Talk to Johnny Gunn. Avoid picking up his medical report before asking him about his hands.
- SOC(400): 2 QTEs during the conversation (After asking about Belltower: Omega / Omega).
- COM(250): (Optional) Find compelling evidence (by talking about Gunn's hands).
- EBO(100): In Gunn's apartment, in the restroom.
- TRO(x1) x2: Johnny Gunn (twice). Can be knocked out after the first meeting with no repercussions and then again after the mission is finished.
- COM(1500): Report back to Montag. Exonerate both suspects.
- COM(750): SM10: The Harvester completed.
Avoid angering or knocking out Montag, as it will auto-fail SM11 later.
SECTION SUMMARY (SM10)
- Section XP: 7100
- Combat XP: 120
- TRO(x3)
- Human XP: 120 = 3*40
- Total XP: 7220
- Max XP: 246115
Unfinished business in Prague, second visit[]
Since there are no more stealth bonuses to worry about, you can freely neutralize enemies in the Palisade Bank, in the underground casino, and around the Red Light district (including Masa Kadlek and her bodyguards, if you haven't yet); also destroy police drones and bots. You can fight the police for ammo and guns — just make sure not to anger or knock out detective Montag from SM10 or it will auto-fail SM11 later.
Knock out Kazatel, Tars, Costache, Mikael Mendel. Make sure their bodies show no red skull after neutralizing them. As before, none of their bodyguards give XP.
You can also trigger the password glitch again in each district, although the rewards would be lower this time. If you've used keycodes in the Palisade Bank, then you'd have already received a partial sum of these bonuses for Cista district, so you may want to do it again on any re-lockable device in the Bank to get any bonuses you've missed. Due to a bug, all of the Bank's doors on Level 8 and 9 get re-locked every time you go to the metro, and there are codes available for 4 of them, so there are plenty of choices.
Here we list the XP that will be awarded upon triggering the glitch in all major locations, assuming that you've interacted with every listed computer during the second visit. We are again leaving TF29 HQ for later.
- Cista district
- GLI(400): This covers extra XP for most of the computers in North Prague except the TF29 HQ and the Red Light district. Can be triggered from any of the 4 re-lockable keypads in the Bank.
- Davny District/The Red Light district
- GLI(975): Can be triggered on the re-lockable keypad (code: 3458) in Future-Past Antiky's basement. This time it triggers XP glitch for all the new PCs in the Red Light district.
- Prekazka District
- GLI(200): Can be triggered from the door to Adam's apartment (code: any number).
- GLI(1575): Total amount of XP earned from the password glitch on the second visit.
Continuing with M11/M12:
- GTD(500): Meet Miller at the Helipad.
- GTD(500): Fly to the GARM Facility.
Section XP (Unfinished business, second visit): 2735
SECTION SUMMARY (Prague, second visit)
- Section XP: 76120
- Combat XP: 8280
- TRO(x82)
- VET(x35)
- ELI(x1)
- DTD(x50)
- Human XP: 7340 = 82*40 + 35*50 + 1*60 + 50*45
- TUR(x4)
- DRO(x14)
- BOT(x6)
- Robot XP: 940 = 4*30 + 14*35 + 6*55
- Total XP: 84400
- Max XP: 248755
G.A.R.M.[]
Main mission: M13: G.A.R.M.
Facility Entrance[]
- HAC(30): Backdoor (L1) to the facility.
- GTD(500): Get Inside the Facility.
When given the option, contact Vega to avoid the scripted alarm in Hangar 2 later.
Junkyard[]
- PTW(10): A ladder leading to the terrace and a giant fan on the ground level.
- HAC(80): Door (L1+50) on the terrace leading to Hangar 1.
- EXP(100): Crawlspace behind the fan.
Hangar 1[]
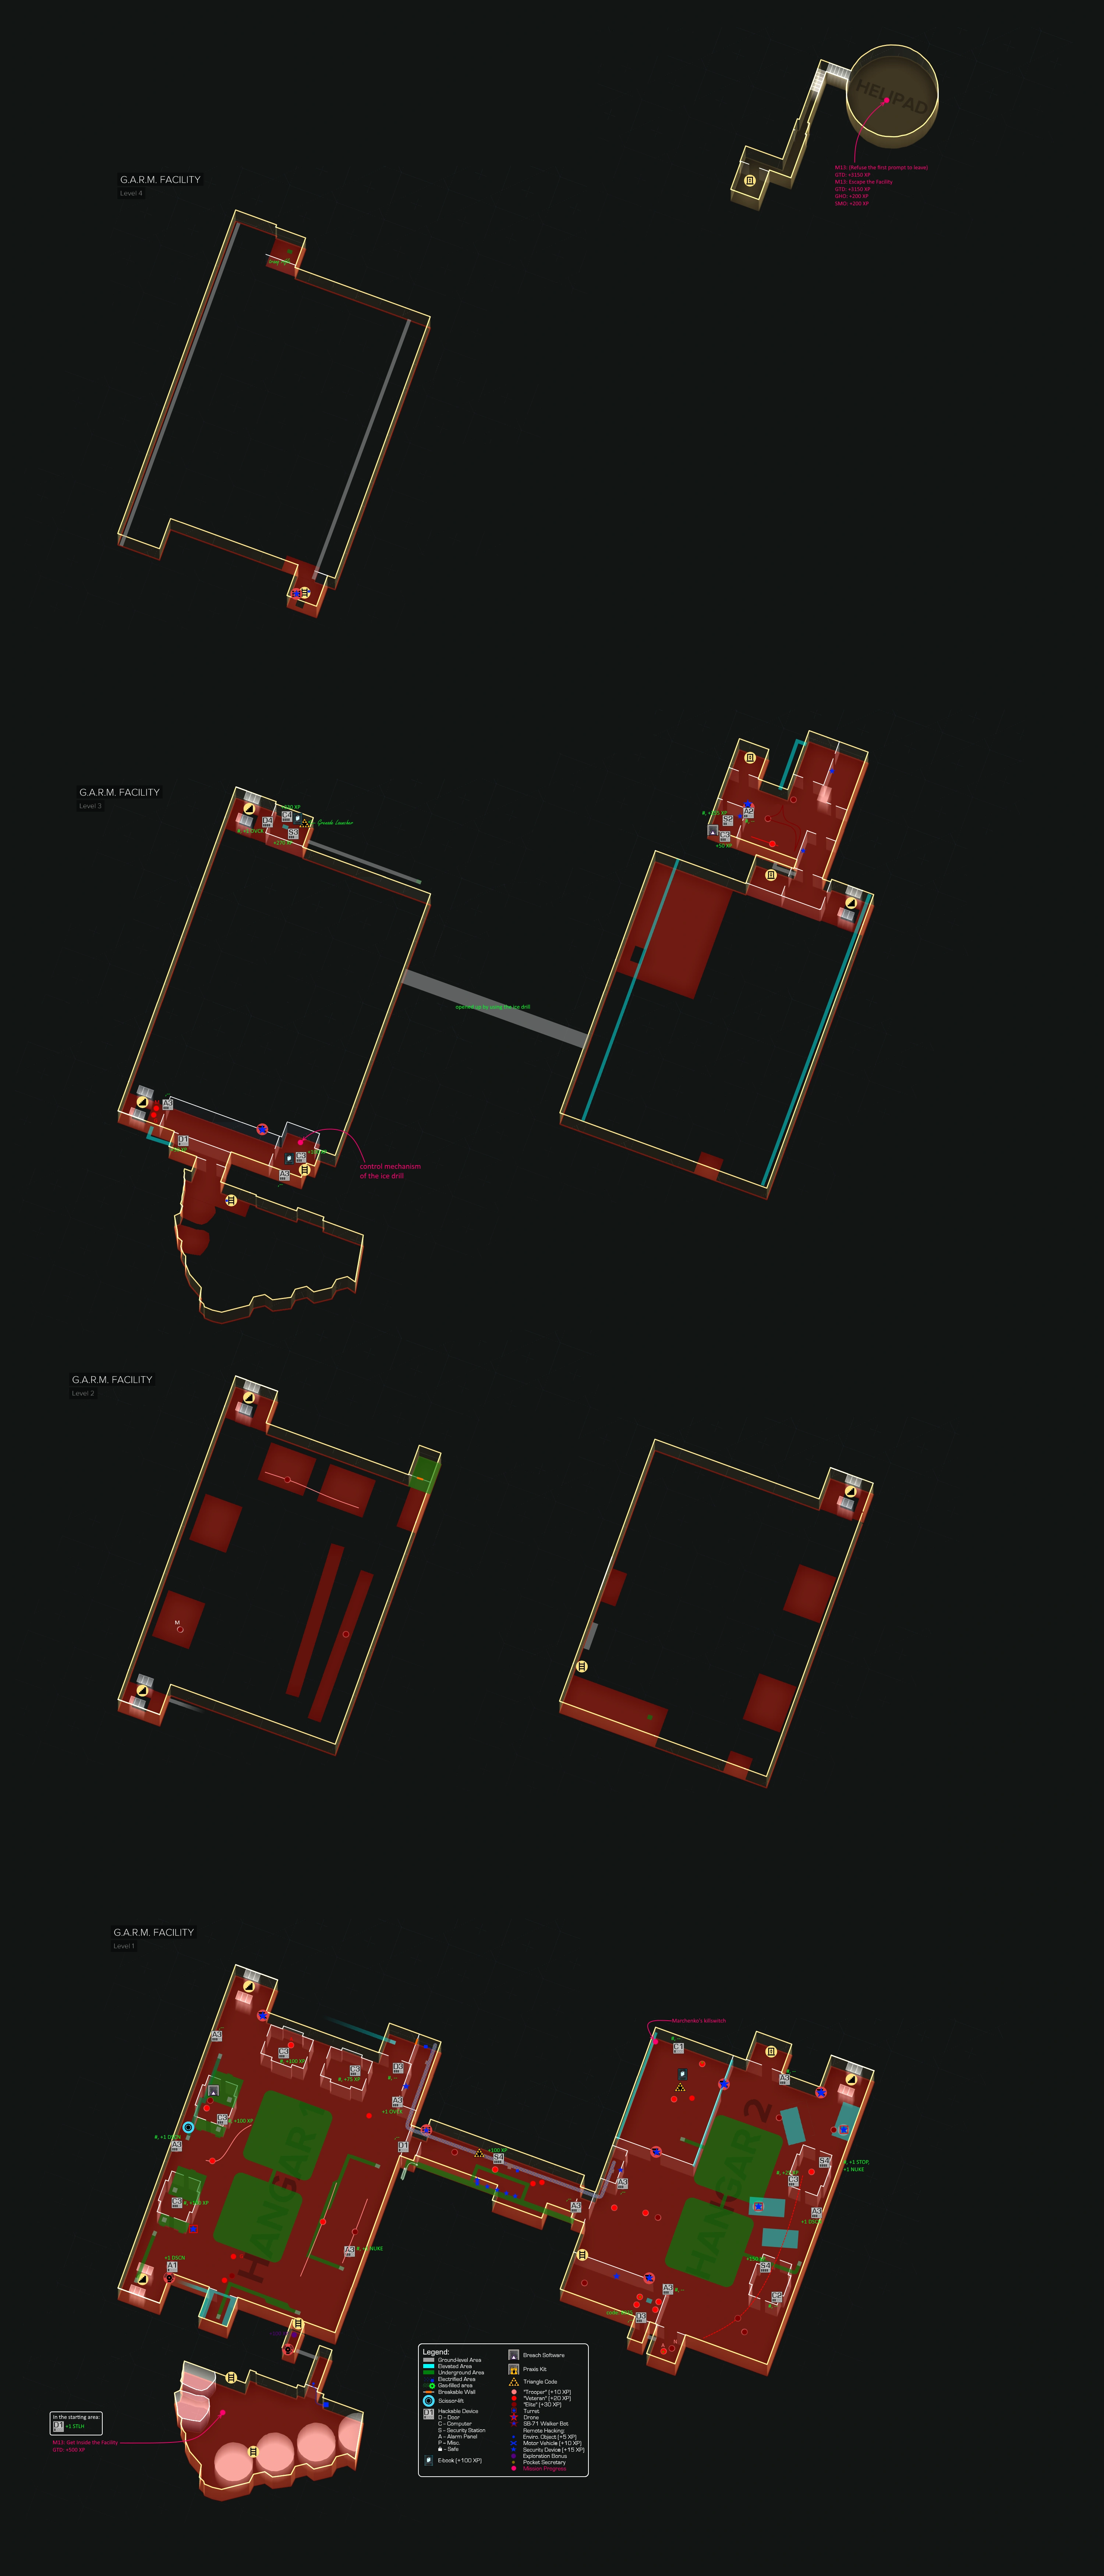
Map of G.A.R.M.: Hangar 1.
- VET(x9) + ELI(x6) / DTD(x7)
- MCH(15): Camera before the drill control room.
- HAC(180): Computer (L3+100) in the drill control room.
- HAC(80): Alarm panel (L3) in the drill control room.
- EBO(100): In the drill control room, on a table.
- PTW(5): Ladder to the top of the drill control room.
- MCH(15): Laser grid guarding said ladder.
- HAC(80): Alarm panel (L3) on the balcony, on top of the southern stairwell.
- HAC(30): Alarm panel (L1) near the bottom of the southern stairwell.
- HAC(80): Alarm panel (L3) on a column, under the giant ice cores.
- TUR(x1): Near the southern crawler.
- HAC(180): Computer (L3+100) inside the southern crawler.
- HAC(80): Alarm panel (L3) between the two crawlers.
- HAC(180): Computer (L3+100) inside the northern crawler.
- BRE: Inside the northern crawler.
- HAC(80): Alarm panel (L3) between the northern crawler and the northern stairwell.
- MCH(15): Camera at the bottom of the northern stairwell.
- HAC(180): Computer (L3+100) inside the western shack.
- HAC(155): Computer (L3+75) inside the eastern shack.
- HAC(80): Door (L3) to the storage unit behind the shacks.
- MCH(15): ECGS in the room with the blue pipeline.
- HAC(80): Alarm panel (L3) near the door to the connecting tunnel.
- HAC(30): Door (L1) to the connecting tunnel.
Marchenko's Office[]
- HAC(105): Entrance door (L4).
- HAC(350): Security hub (L3+270).
- HAC(435): Computer (L4+330).
- EBO(100): On a desk.
- TRI: Near the medical case, on a shelf under a box.
Connecting Tunnel[]
- VET(x3)+ELI(x1) / DTD(x2)
- MCH(15): Laser grid at the Hangar 1 entrance. Has to be turned on with the nearby panel.
- HAC(205): Security hub (L4+100) in the middle.
- TRI: Near the security hub, on a shelf.
- MCH(90): 6 lasers blocking the ditch-like path to the side.
- HAC(80): Alarm panel (L3) near the Hangar 2 entrance.

Map of G.A.R.M.: Hangar 2.
Hangar 2[]
- VET(x11) + ELI(x7) / DTD(x9)
- TUR(x2): Near the eastern wall, on top of APCs.
- MCH(90): 4 cameras and 2 ECGS.
- HAC(80): Alarm panel (L3) near the door to the connecting tunnel.
- HAC(80): Alarm panel (L3) in the shooting range.
- § HAC(80): Door (L3) to the armory in the shooting range. If you want to do the password glitch in G.A.R.M. then leave this door for later.
- HAC(55): Computer (L2) inside the southern shack.
- HAC(255): Security hub (L4+150) inside the southern shack.
- HAC(80): Alarm panel (L3) between the two shacks.
- HAC(105): Computer (L3+25) inside the northern shack.
- HAC(105): Security hub (L4) inside the northern shack.
- HAC(80): Alarm panel (L3) near the elevator.
- HAC(30): Computer (L1) in the boxguard tent.
- EBO(100): In the boxguard tent, on a table.
- TRI: Inside the boxguard tent, under a boxguard.
You can find Marchenko's killswitch hidden behind the lockers in the tent — but it won't be needed.
Offices and Landing Pad[]
- VET(x1) + ELI(x2) / DTD(x1)
- MCH(60): 1 camera and 3 ECGS.
- HAC(55): Alarm panel (L2) under the camera.
- HAC(310): Security hub (L2+255) in the office.
- HAC(130): Computer (L3+50) in the office.
- BRE: The last breach software is in the same office.
You can perform the password glitch at this point by going to the armory (L3) in Hangar 2 and entering the code 8935. You lose its HAC(80) bonus but gain:
- KEY(75): For the armory door (L3) itself.
- GLI(1150): For all the PCs in G.A.R.M.
When you're prompted to return to Prague, refuse it at first, then enter the VTOL manually. This makes the game give you an extra hidden GTD bonus.
- GTD(3150): (Refuse the first prompt to leave.)
- GTD(3650): Escape the Facility. Completes M13: G.A.R.M.
- GHO(200)
- SMO(200)
SECTION SUMMARY (G.A.R.M.)
- Section XP: 13800
- Combat XP: 3105
- VET(x24)
- ELI(x16)
- DTD(x19)
- Human XP: 3015 = 24*50 + 16*60 + 19*45
- TUR(x3)
- Robot XP: 90 = 3*30
- Total XP: 16905
- Max XP: 265660
Prague, third visit[]
Like on the second visit, some bonuses get fully reset, some only get re-locked (hacking them again won't give XP but it's posible to use a code to get a reward from a few of them), and there are lots of new bonuses as well.
It is recommended to complete objectives Meet Miller in his Office (M14) and Use my home TV to contact Sarif (SM03) before doing anything else in Prague, as they both offer GHO + SMO bonuses.
Revisited Areas, third visit[]
Prekazka District[]
- PRA: Tars sells a new Praxis kit (19/20). If his inventory does not refreshes you may have to travel back and forth between districts via metro to fix it.
- TRO(x1): Tars, again.
- TRO(x1): Dealer's bodyguard in Zelen apartment 22.
- TRO(x2) / DTD(x1): 2 smugglers in the backroom of the Underpath, near the abandoned tourism center.
- DRO(x3): 3 drones around the district, including 1 near The Time Machine.
- BOT(x1): Patrolling near the fountain.
- PTW(60): 12 TV screens in Ruzicka Station.
- MCH(15): ECGS in Ruzicka Station.
- MCH(15): Laser grid in the metro station.
- HAC(150): Door (L4) to the basement of Svobody Beer. Doesn't actually reset, only re-locks, but the Data Extracton bonus (150 XP) makes it more lucrative to hack it again instead of using a keycode (100 XP).
- PTW(10): 2 industrial fans on the north side of the compound of Richard the Great. Smart Vision required.
- CAR(80): 8 cars.
Cista District[]
- TRO(x2): Costache and Mikael Mendel.
- TUR(x5): 1 near Rose's Garden, 1 under the pedestrian bridge, 1 near Monument Station, 1 between Hlavni and Market Square, 1 in front of the Palisade Bank.
- BOT(x4): On the streets: 1 above Palisade Station, 1 in front of Monument Station, 2 at the Market Square.
- BOT(x5): In the Palisade Bank: 1 in the garage, 1 on level 7, 2 on level 8, 1 on level 9. The 4 bots inside the Bank respawn every time you use the metro.
- MCH(60): 2 laser grids and a camera in Palisade Station, 1 laser grid in Monument Station.
- CAR(370): 37 cars.
- CAR(60): Lockdown barriers controlled by alarm panels.
- PTW(45): 9 TV screens in the tourist center where you met with Janus during M10.
- HAC(30): Alarm panel (L1) on Hlavni, across Rose's Garden.
- HAC(30): Alarm panel (L1) across the entrance of 33 Hlavni.
- HAC(30): Alarm panel (L1) across the entrance to Sobchak Security.
- HAC(30): Alarm panel (L1) across Autodily's entrance.
- HAC(30): Alarm panel (L1) on Hlavni, to the west of Monument Station.
- HAC(30): Alarm panel (L1) on the east side of Market Square.
- HAC(130): Security hub (L1+100) east of the Market Square, under the circular ad screen.
- HAC(130): Security hub (L1+100) in Palisade station.
- HAC(180): Security hub (L1+150) in front of the Palisade Bank.
- HAC(80): Security hub (L3) in the Palisade Bank garage.
- HAC(155): Security hub (L2+100) in the monitoring center inside the Palisade Bank. (Gets fully reset every time you use the metro.)
- HAC(55): Door (L2) to Negozio di Magia.
- HAC(55): Door (L2) to Rose's Garden.
- HAC(80): Door (L3) to Ludvik's Lounge.
- KEY(50): Door (L2) to The Tubehouse (code: 0701). (Using a code to unlock any of the listed doors would trigger the password glitch, but only for some devices in North Prague.)
- KEY(75): Door (L3) to Sobchak Security (code: 1122).
- KEY(25): Door (L1) to Hemingway's Fine Spirits (code: 9410).
Davny District[]
- TRO(x1): Kazatel in Libuse apartments.
- COM(350): POI: Sugar-free Picus completed. Buy the info from Kazatel, then go to Apartment 94 in Libuse apartments.
- COM(350): POI: Give Me a Thug completed. Buy the info from Kazatel, then go to Apartment 95 in the Dvali apartments.
- TRO(x4) / DTD(x2): 3 Dvali thugs and the bartender in the Red Queen.
- TRO(x5) / DTD(x2): 5 Dvali thugs in the Dvali apartments.
- TUR(x1): 1 at Pilgrim Station.
- TUR(x2): 2 turrets in the Redlight district will get blown up by Eliza shortly after you enter the area if you've done SM06. You can still get full XP for them by running in while invisible, spamming Nuke viruses to quickly finish the hacks and then destroying them before Eliza does.
- BOT(x2): 1 police sentry patrolling Davny in southeast, 1 inactive near the LIMB clinic.
- MCH(15): Laser grid in Pilgrim Station.
- PTW(5): Radio in the former Samizdat HQ.
- CAR(250): 19 cars in Davny district itself and 6 police cars in the Red Light district. 4 cars in the Red Light district will get blown up by Eliza shortly after you get there, but you can hack them quickly with Nuke viruses before that happens.
- HAC(105): Laser grid terminal (L4) at Pilgrim station.
- HAC(55): Security hub (L2) in the storage locker east of the pedestrian bridge.
- HAC(105): Door (L4) to the coffee shop.
- HAC(55): Door (L2) to The Music Box.
- HAC(55): Door (L2) to The Irish Stool.
- HAC(80): Door (L3) to the storage unit behind The Irish Stool where Dominik was supposed to be dragged to during SM09.
TF29 HQ[]
At this point we can finally trigger the password glitch in HQ by unlocking the door to the supply closet in the infirmary (glitched XP included at the end in the Unfinished business in Prague, third visit section).
- § HAC(80): Door (L3) to the supply closet. We'll use the code (5298) to unlock it instead of hacking it. Included at the end.
- HAC(130): Door (L1+100) to the cell holding Allison Stanek (if she was arrested during M11).
- HAC(30): Computer (L1) of Aidan Green on the main floor.
- HAC(130): Door (L3+100) to the server room.
- MCH(15): Camera in the same room.
SECTION SUMMARY (Revisited Areas, third visit)
- Section XP: 3790
- Combat XP: 1870
- TRO(x16)
- DTD(x5)
- Human XP: 865 = 16*40 + 5*45
- TUR(x8)
- DRO(x3)
- BOT(x12)
- Robot XP: 1005 = 8*30 + 3*35 + 12*55
- Total XP: 5660
SM03: The Mystery Augs, Part III[]
- COM(350): Use my home TV to contact Sarif.
- GHO(200)
- SMO(200)
- COM(750): SM03: The Mystery Augs completed.
Section XP (SM03): 1500
SM11: The Last Harvest[]
- COM(350): Check Up on Daria Myska.
- COM(350): Find Clues about Daria. Also check her computer to find out about Cipra.
- EBO(100): In Daria's apartment, on a small table in the corner across from the TV.
- PTW(5); TV in Daria's apartment.
- COM(250): (Optional) Seek out Dr. Cipra.
You can play it straight:
- § SOC(200): Persuade Cipra to give you the keyword. Ask about "other way", then select option Alpha during the QTE.
Or, fail the QTE on purpose and then read the eBook hidden in Cipra's apartment. You'll get an extra objective:
- SOC(50): Fail to persuade Cipra. Ask about "other way", then select option Omega during the QTE.
- EBO(100): In Cipra's apartment, behind the fridge.
- COM(250): (Optional) Ask about the override.
- COM(350): Follow the trail. (After returning to Prekazka and going into the sewers.)
You can use the keyword (Ad hominem 2026), then persuade Daria to stand down:
- § SOC(500): Persuade Daria (Omega x2).
However, intentionally failing the persuasion, then taking her out is much more lucrative:
- SOC(100): Fail to persuade Daria (Beta x2).
- TUR(x1): Overlooking the room.
- MCH(495): 2 cameras and 31 tripmines around the room (7 tripmines at the entrance have to be turned on via the terminal first).
- HAC(30): Door (L1) to the backroom with the security hub and tripmine terminal.
- TRO(x1): Daria herself.
- COM(1500): Neutralize the Harvester.
- GHO(200)
- SMO(200)
- COM(1500): SM11: The Last Harvest completed.
In case Daria was knocked out or killed detective Montag will ambush you as you leave the area. You can convince him in your innocence with Reason - Critique - Appeal - Reassure. If you attempt to persuade him with Social Enhancer twice it would anger him and lead to a fight (no XP for Montag himself). However if you ignore the first Persuade option and only use it once during the QTE then it would also result in a peaceful outcome.
- SOC(200): Convince Montag in your innocence after defeating Daria. Skip the first Persuade and choose Reason, then Inform, then Omega/Pacify during the QTE.
You can also return Daria's chip found on her body to Cipra for 400 credits.
SECTION SUMMARY (SM11)
- Section XP: 6030
- Combat XP: 70
- TRO(x1)
- Human XP: 40 = 1*40
- TUR(x1)
- Robot XP: 30 = 1*30
- Total XP: 6100
SM12: K is for Kazdy[]
- COM(350): POI: Samizdat SOS completed. Will not trigger if Samizdat members were knocked out on a previous visit.
- COM(750): Infiltrate the makeshift station.
- HAC(30): Door (L1) to the cell.
- COM(350): Find a way to open the cell.
- COM(1500): Meet Samizdat at the rendezvous.
- COM(750): (Optional) Meet Irenka/Edward at the rendezvous.
- COM(1500): SM12: K is for Kazdy completed.
Section XP (SM12): 5230
M14: Hunting Down the Final Clues[]
- GTD(500): Meet Vega in the L.I.M.B Clinic.
- GTD(500): Meet Miller in his Office.
- GHO(200)
- SMO(200)
- GTD(3150): Find a Way into Dvali Territory (by reaching the Red Light district).
Dvali Theater[]
- TRO(24x) + VET(x1) / DTD(x12): 5 Dvali thugs outside and on the roof, 15 inside the theater with Otar on the stage, 4 in the dressing room below.
- BOT(x3): 1 in the sewers, 1 in the plaza, 1 behind the stage.
- MCH(90): Camera overlooking the entrance, 2 tripmines in the ventilation duct on the roof and 3 tripmines covering the hole in the ventilation area where the weak wall was (only if broken on the previous visit).
- HAC(210): Security hub (L3+130) in the ticket booth of the lobby.
- HAC(210): Security hub (L3+130) in the projector booth.
- HAC(105): Door (L4) on a side-corridor leading to the backstage.
- HAC(105): Door (L4) to a smaller dressing room with a camera inside.
- GTD(3150): Find Radich Nikoladze's Office.
- HAC(30): Computer (L1) of Otar Botkoveli.
- GTD(1950): Search Nikoladze's PC. Appears when: 1) both Dvali bosses are dead, 2) both are alive, if you alert them before reaching the office, or 3) Otar is alive and Radich was neutralized during the second visit, if Otar was angered when doing the favor for him (which is the case here).
SECTION SUMMARY (M14)
- Section XP: 10400
- Combat XP: 1715
- TRO(x24)
- VET(x1)
- DTD(x12)
- Human XP: 1550 = 24*40 + 1*50 + 12*45
- BOT(x3)
- Robot XP: 165 = 3*55
- Total XP: 12315
Unfinished business in Prague, third visit[]
You can trigger the password glitch again, including TF29 HQ this time. Since we've already triggered the glitch for most of Prague's areas before, only the new bonuses are included.
- Triggering the glitch on the re-lockable keypad (code: 3458) in Future-Past Antiky's basement should unlock KEY bonuses for all of North Prague, including the new PCs from the Palisade Bank and Dvali theater.
- GLI(400)
- TF29 HQ
- KEY(75): Door (L3) to the supply closet (code: 5298). We lose its HAC(80) bonus.
- GLI(1075): Total amount of glitched XP received for all the locked PCs that were interacted with in TF29 HQ across all 3 visits.
- KEY(75): Total amount of XP earned for unlocking the devices with codes.
- GLI(1475): Total amount of XP earned from the password glitch on the third visit.
Continuing with M14:
- GTD(1950): Go to my Apartment.
- GTD(1950): Meet Chikane at the Helipad. (Refuse the first prompt to leave to get an extra GTD objective.)
- GTD(500): Fly to London. Completes M14: Hunting Down the Final Clues.
Section XP (Unfinished business, third visit): 5950
SECTION SUMMARY (Prague, third visit)
- Section XP: 32900
- Combat XP: 3655
- TRO(x41)
- VET(x1)
- DTD(x17)
- Human XP: 2455 = 41*40 + 1*50 + 17*45
- TURx(9)
- DRO(x3)
- BOT(x15)
- Robot XP: 1200 = 9*30 + 3*35 + 15*55
- Total XP: 36555
- Max XP: 302215
London[]
M15: Securing the Convention Centre[]
Rooftop[]
- HAC(105): Door (L4) to a storage room near the elevator.
- HAC(260): Door (L4+155) to an electrified generator room.
- EXP(300): Enter the electrified generator room.
- HAC(130): Door (L5) to a storage room in the middle of the roof.
- EXP(300): False ceiling above the central storage room.
Section XP (Rooftop): 1095
Central Security Office[]
You can encounter an issue here when interacting with bodies of unconscious enemies after saving and reloading a game can lead to losing Ghost. It was a rather prominent bug before it was supposedly patched, and the majority of areas in the latest version of the game are indeed unaffected by it. But, for some reason, in this particular location it seems to continue cause problems. To avoid it, limit saving and never drag bodies of enemies after the first time you knock them out and drag them to a safe spot. Also make sure there are no physical objects in the vicinity of the bodies when you hide them.
Do not enter any of the rooms containing the corpses of Tavros' guards before visiting Slater's office or it will fail the GTD objective.
- VET(x10) / DTD (x5): If you want to score extra 1200+ XP, then leave at least one of the guards standing (or better 2, for the DTD) before activating the switch in Slater's office.
- BOT(x1): Stationed near the elevator.
- TUR(x1): At the end of the hallway, near Slater's office.
- GTD(1950): Get to Slater's Office.
- GHO(200)
- SMO(200)
- HAC(30): Security override panel (L1).
- GTD(1950): Activate the Security Override Switch.
- GHO(200)
- SMO(200)
If you don't care about Foxiest of the Hounds achievement you can trigger an alarm after you activate the override switch and receive both of the listed GHO/SMO bonuses to acquire an extra objective that you wouldn't normally get when playing stealthilly. Doing so will not prevent you from earning any GHO/SMO bonuses in the subsequent areas and missions M16/M17. Note that it will only be given if you haven't neutralized all 10 enemies yet. Completing it without being seen can also earn you an extra Ghost bonus.
- GTD(1000): (Optional) Neutralize all enemies in the C.S.O. (After an alarm is triggered.)
- GHO(200)
- MCH(30): 3 lockdown doors around the area that activate only during an alarm. None of the roller shutters give XP.
- MCH(225): 6 cameras, 5 laser grids, and 4 ECGS.
- HAC(80): Door (L3) to the boardroom.
- HAC(205): Security hub (L4+100) in the boardroom.
- HAC(135): Laser grid terminal (L3+55) in the lobby.
- HAC(30): Door (L1) to the receptionist's office.
- HAC(80): Alarm panel (L3) in the receptionist's office.
- EBO(100): In the receptionist's office, on a table.
- HAC(130): Alarm panel (L3+50) between the two laser grids.
- HAC(80): Alarm panel (L3) in the room west of the laser grids.
- HAC(135): Laser grid terminal (L3+55) in the corridor leading to the upper security office.
- HAC(105): Southern door (L4) to the upper security office.
- EXP(300): Crawlspace to the west of the the upper security office, accessible via vents or a weak wall.
- PTW(10): 2 giant fans in the crawlspace. Smart Vision required.
- EXP(300): False ceiling above the upper security office.
- HAC(205): Security hub (L4+100) in the upper security office.
- HAC(95): Computer (L1+65) in the upper security office.
- HAC(105): Northern door (L4) to the upper security office.
- HAC(80): Alarm panel (L3) near the the entrance of Slater's office.
- HAC(80): Alarm panel (L3) in Slater's office.
- EXP(300): False ceiling above Slater's office.
- TRI: In the false ceiling above Slater's office.
- HAC(80): Door (L3) to a maintenance area under Slater's office.
- EXP(300): Enter the maintenance area under Slater's office.
- HAC(80): Alarm panel (L3) in the central hall.
- PTW(15): 3 TV screens in the lower security office.
Section XP (Central Security Office): 9215
The Reception Hall[]
- VET(x11) / DTD(x5): Failing to neutralize all 11 guards will lead to an alarm, and them assaulting the attendees.
- MCH(75): 4 cameras, 1 ECGS.
- PTW(25): 5 TV screens around the area.
- HAC(80): Alarm panel (L3) near the elevator.
- HAC(30): Door (L1) to security room B.
- HAC(80): Security hub (L3) in security room B.
- HAC(30): Door (L1) to a balcony on Level 5.
- HAC(80): Alarm panel (L3) on a balcony on Level 4.
- HAC(230): Alarm panel (L3+150) on a balcony on Level 4.
- HAC(80): Alarm panel (L3) in the lower stairwell.
- § HAC(30): Door (L1) to the lower stairwell on Level 2. This is a good candidate for the password glitch. To get the best results, wait until after you've gotten everything in the meeting rooms during M17 and hacked all the PCs in the exhibition hall during M16. Then return here (Marchenko wouldn't mind) and unlock it. We include it at the end.
- HAC(80): Alarm panel (L3) on a secluded balcony on Level 2.
- HAC(80): Alarm panel (L3) on the big public staircase.
- HAC(80): Alarm panel (L3) near the DJ's stand.
- EBO(100): In a corner near the DJ's stand, on a yellow sofa.
- GTD(1950): Find the Keycard to Catering. Can be taken from the bald guard in the north-east corner of Level 1 or grabbed through a vent cover at the very end of the ventilation shaft accessed through the restrooms. Makes no difference as long as you neutralize all the guards.
- GHO(200)
- SMO(200)
- GTD(1000): (Optional) Quietly Neutralize all the Guards (11/11).
- GHO(200)
- SMO(200)
Section XP (The Reception Hall): 4800
Catering[]
- VET(x3) / DTD(x1)
- HAC(80): Alarm panel (L3) in the main corridor.
- TRI: Inside the locker room.
- HAC(80): Alarm panel (L3) in the surveillance room.
- GTD(1950): Investigate the Catering Area.
- GHO(200)
- SMO(200)
Section XP (Catering): 2510
SECTION SUMMARY (M15)
- Section XP: 17620
- Combat XP: 1780
- VET(x24)
- DTD(x11)
- Human XP: 1695 = 24*50 + 11*45
- TUR(x1)
- BOT(x1)
- Robot XP: 85 = 1*30 + 1*55
- Total XP: 19400
- Max XP: 321615
At this point, the game gives you two separate missions, with the implication of a severe time limit. In reality, you can take as much time as you want to complete one of them, and only then will you receive a 10 minute time limit to reach the other one. Since the target location of M17 contains a collectible and an eBook bonus that you would miss if you were to complete M16 first, you should start with M17. Alternatively, you can start M16, then go directly to the delegates by opening the secret passage in the exhibition hall to complete M17, and THEN complete M16, but there is no benefit in doing that.
M17: Protecting the Future[]
- VET(x5) + ELI(x12) / DTD(x8)
- TUR(x2): 1 in the lobby, 1 before the elevator.
- MCH(225): 15 tripmines all over the place.
- PTW(15): TV screens in various meeting rooms.
- HAC(105): Security hub (L4) in the cloakroom.
- HAC(30): Door (L1) to meeting room C101.
- HAC(30): Door (L1) to meeting room C102.
- HAC(180): Computer (L5+50) in meeting room C103.
- HAC(105): Door #1 (L4) to meeting room C105.
- HAC(105): Door #2 (L4) to meeting room C105.
- HAC(170): Computer (L4+65) in meeting room C107.
- HAC(30): Door (L1) to meeting room C110.
- TRI: Inside meeting room C110.
- HAC(190): Security hub (L4+85) on the balcony of the elevator hall.
- MCH(30): 2 wireless control boxes in the elevator shaft. Smart Vision required.
- HAC(30): Door (L1) to the VIP room.
- GTD(3150): Find and Protect the Delegates.
- GHO(200)
- SMO(200)
- EBO(100): To the right of the entrance in the delegates' room, on a table.
- TRI: Inside the room with the delegates.
SECTION SUMMARY (M17)
- Section XP: 4895
- Combat XP: 1390
- VET(x5)
- ELI(x12)
- DTD(x8)
- Human XP: 1330 = 5*50 + 12*60 + 8*45
- TUR(x2)
- Robot XP: 60 = 2*30
- Total XP: 6285
M16: Stopping Marchenko[]
Ghost can be rather tricky to earn here when going for a stealth takedown on Marchenko. Besides all the basic requirements, such as: not being seen directly until enemies turn hostile, not hurting Marchenko with lethal damage, not triggering the laser mines, etc., few other things can spoil that.
- Marchenko has a special property where hurting him by a stun gun or TESLA instantly voids Ghost, even if he gets stunned and you immediately follow it up with a takedown, without seeing Alarmed or Hostile on the radar. This does not apply to stun effects produced by a tranquilizer rifle or EMP mines and grenades.
- If you initiate a melee takedown on Marchenko from the front it will void Ghost by itself, even if he was stunned by a safe method. Only do it when you are standing behind him.
- Marchenko sees you destroy the robots enemies, which is something he can do from almost everywhere in the room.
The one guaranteed way to avoid all of these problems is to lure Marchenko to a secluded area in the south-east corner of Level 1, into the small room with a weak wall. Once you get him inside by baiting him with a loud noise or letting him see you briefly, you can cloak or throw a smoke grenade, then stun him by either a tranquilizer shot from behind or EMP mine/grenade, and quickly perform a takedown. None of the robots should be able to see the takedown or the body afterwards, even if they are still active.
Funnily enough, it is also possible to perform a stealth takedown on Marchenko with Punch Through Wall aug if you manage to box him in that small room with a vending machine, and circle around through the ventilation in the security room above. In case you have other plans for him, it would still be a good idea to trap him there at the start of the mission, so that you could get all the rewards and destroy the robot enemies in the area without any risk of being detected by him. There is no time limit on defeating Marchenko once the fight starts.
- PTW(5): In the cloakroom at the corridor leading to the exhibition hall from the reception.
- TUR(x2): 1 in the middle, 1 on the right balcony.
- DRO(x5): 2 will be activated right away, the other 3 will appear once the first 2 is destroyed. The 3 inactive bots can also be destroyed before they are deployed.
- BOT(x2): Originally inactive, the first bot will appear if you prolong the fight long enough. The other will activate once the first one is destroyed.
- MCH(450): 28 tripmines, a camera and a control box for the giant fans in a crawlspace.
- PTW(10): 2 giant fans in a crawlspace.
- PTW(5); A ladder in the ventilation area, reachable from the small office on Level 2.
- HAC(30): Terminal (L1) controlling the laser tripmines.
- HAC(130): Security hub (L5) downstairs. Controls the nearby turret.
- HAC(130): Security hub (L5) on the balcony on the west side. Controls the drones and the nearby turret.
- HAC(130): Security hub (L5) on the balcony on the east side. Controls the bots and the camera.
- TRI: Near the security hub on the east side balcony.
Before dealing with Marchenko, go back to the reception hall and unlock the door to the lower stairwell on Level 2. For going through the trouble you'll get:
- KEY(25): For unlocking the door (L1) to the lower stairwell on Level 2 (code: 1515).
- GLI(1100): Total amount of glitched password XP for all the PCs in London.
Go back to the exhibition hall and finish the game:
- MAR(x1): Viktor Marchenko. Carries a Praxis kit.
- PRA: Praxis kit (20/20) found on Marchenko's body.
- GTD(3150): Defeat Marchenko.
- GHO(200)
- SMO(200)
SECTION SUMMARY (M16)
- Section XP: 5565
- Combat XP: 485
- MAR(x1): Marchenko's unique bonus, worth 140 XP = 100 base + 40 for a melee takedown
- Human XP = 140
- TUR(x2)
- DRO(x5)
- BOT(x2)
- Robot XP: 345 = 2*30 + 5*35 + 2*55
- Total XP: 6050
SECTION SUMMARY (London)
- Section XP: 28080
- Combat XP: 3655
- VET(x29)
- ELI(x12)
- MAR(x1)
- DTD(x19)
- Human XP: 3165 = 29*50 + 12*60 + 19*45 + 140
- TUR(x5)
- DRO(x5)
- BOT(x3)
- Robot XP: 490 = 5*30 + 5*35 + 3*55
- Total XP: 31735
- Max XP: 333950
Global Stats[]
- Non-combat XP: 302625
- Combat XP: 31325
- TRO(x209)
- VET(x194)
- ELI(x29)
- MAR(x1)
- DTD(x172)
- Human XP: 27680 = 209*40 + 194*50 + 29*60 + 172*45 + 140
- TUR(x31)
- DRO(x32)
- BOT(x29)
- Robot XP: 3645 = 31*30 + 32*35 + 29*55
- Total XP: 333950